chocolate pudding alice medrich (no eggs)

Oh, this pudding is DELICIOUS.  I absolutely LOVE it.  Really really good and quite easy to make!

It is so thoroughly chocolatey and not at all cloying like some puddings seem to be.  This one is different from the other chocolate pudding recipe on the blog in many ways, but most importantly, there are no eggs.  Yup.  So this is great if someone has an egg allergy and often can’t enjoy pudding.

chocolate pudding (from Sinfully Easy Delicious Desserts by Alice Medrich):
1/3 cup (2.33 ounces) sugar
1/3 cup (1 ounce) unsweetened cocoa powder (preferably natural and a high-end cocoa)
2 tablespoons cornstarch
1/4 teaspoon kosher salt
1 3/4 cup whole milk
1/4 cup heavy cream
4 ounces bittersweet chocolate or 3 ounces semisweet (not both)
1 teaspoon pure vanilla extract

Whisk the sugar, cocoa, cornstarch and salt together in a heavy medium saucepan.

Add about 30 tablespoons of the milk, and whisk to form a smooth paste.

Whit in the remaining milk and cream.

Over medium heat, bring to a boil, stirring constantly with a wooden spoon.  Try to get into the bottom edges of the pan especially as it almost reaches the boil.  Once it begins to thicken and bubble at the edges, cook for about 1 minute more on a simmer.  Add the chopped chocolate

and stir briskly until the chocolate is melted and the pudding is smooth.  (About 30 more seconds).  Remove from heat and add vanilla.

I made this into a pie – and you can too – or place in pretty glasses with freshly whipped cream.  Yum.  Check out an old post from April of… for a delicious crust and whipped cream topping.  Delicious.


apple crisp (another one)

I loved this.  Loved the simplicity of this crisp.  Probably my favorite.  Cored and sliced apples, skin intact, simple simple streusel topping – done.  Yes, no need to peel these apples, the skin enhances the flavor of the crisp and the colors that follow are awesome.  Like Autumn in a dish.  I served this with freshly whipped cream and it was delightful.  Truly.  I made this with a variety of apples…honeycrisp, tango, fugi, and jazz.  Have fun with it – just be sure that your apples are firm and hard so they don’t break down to applesauce while they cook.  Enjoy –

Oh, this is from Ruth Reichl’s new book My Kitchen Year and it is great!

5 heirloom apples
lemon
2/3 cup flour
2/3 cup brown sugar
1/2 teaspoon kosher salt
1/2 teaspoon cinnamon
6 tablespoons unsalted butter

Preheat oven to 375 degrees.

Core, slice and layer the apples in a buttered pie plate or baking dish.  Toss them with the juice of one lemon.

Combine the flour, sugar, salt and cinnamon.  Cut the butter into small pieces and add to the bowl.  Using your hands, rub ingredients together until the butter is incorporated and the streusel is of even color.

Place streusel on top of the apples and bake for about 45 minutes – and up to an hour or so.  The juices should be bubbling a bit at the edges and the top should be crisp, golden and fragrant.

Serve with whipped cream, ice cream, or just drizzled cream as Ruth suggests.

banoffee pie (just a really good banana pie!!)

AMAZING Jason exclaimed, eyes wide the other night after he had a bite of this pie.  He was so excited!  And today I got a text from him asking for the recipe because “that was so insanely good and I want to try to make it for Thanksgiving.”  So…I figured many of you may be interested in this recipe for the holidays, because yes, so so so good, a little different and although there are a few steps to this, you can do them slowly and in advance of your meal (any meal).

The caramel filling is really decadent and rich.  The espresso powder in the whipped cream adds a something new to the flavor.  The digestive cookie crust is another departure from the normal graham cracker crust which really gives the pie more depth of flavor and less sweetness somehow.  And well, bananas are bananas!

You will need to get digestive cookies from the market.  You can also order them online here.  Hard to get less than three pack via mail, but they are good cookies – great to use to make the pie again, share with friends (Jason, I’m going to give you some) or crumble and put in vanilla ice cream so good!

You also need to get some sweetened condensed milk and some espresso powder.  You can get the milk at the store and espresso powder here or here or at a specialty store.  It lasts for a long time – and it is called for in many chocolate cake recipes as well.

Make the filling and crust up to a day before you plan to serve it.  Finish it closer to service with the topping and bananas.

banoffee pie (very slightly adapted from Sticky, Chewy, Messy, Gooey by Jill O’Connor):

filling

2 cans (14 oz each) sweetened condensed milk
1 teaspoon pure vanilla extract
1/4 cup firmly packed dark brown sugar
4 tablespoons unsalted butter, melted
1/4 teaspoon kosher salt
hot/boiling water as needed

crumb crust

2 1/2 cups (plus extra to sprinkle on top) wholemeal digestive biscuit crumbs (use a food processor to make the crumbs)
1/4 cup sugar
1/2 cup (one stick) unsalted butter, melted
1/2 teaspoon kosher salt

topping

3-4 medium bananas
2 cups heavy cream
2 tablespoons sugar
1/4 teaspoon instant espresso powder dissolved in
1 teaspoon vanilla extract

Preheat oven to 400 degrees.

For the filling, stir together the sweetened condensed milk, vanilla extract, dark brown sugar, melted butter, and salt.  Place mixture in a 6 cup oven proof dish (approx.) and cover with tin foil.  Place this  filling pan, inside a larger baking pan (approx 9×13).   Place the double pans in the oven, then take hot or boiling water and fill the outer pan with water – about half way up thebrownie-pudding-pour sides.  Your custard will remain dry, covered and inside of the pan with the water.  (Example on the left is a chocolate dessert, but similar idea, remember the foil though.)  Bake for about 1 1/2 -2 hours.  Stir after 30 minutes, then in 15 minute intervals until the filling turns a toasty caramel color and thickens.  Remove from oven and hot water and let cool.  Make the crust while the filling cools – or while it is baking if you have 2 ovens.

For the crust, preheat the oven to 350 degrees.

Mix the crumbs, sugar, melted butter and salt together with a fork or your hands.  Press the mixture somewhat firmly into a 9 inch pie shell – or a similar sized container (a tart pan, decorative quiche pan) and place in the oven.  Bake for about 6-7 minutes until a little deeper brown.   Let cool.

Scoop and spoon the cooled filling into the pie shell.  At this point, you can cover and let sit for us to 24 hours.  But let sit for at least a few hours to set.

Make the topping by whipping up the cream with the sugar, epresso powder and vanilla.  Go to freshly whipped cream for instructions on how to do this.

Now, sprinkle a little awesome salt if you have it on top of the caramel filling.  I love my Malden sea salt.  Cut the bananas in about 1/2 inch thick slices.  Place on top of the filling.  I really jammed the bananas in since I really wanted to taste them.  Cover the bananas with the whipped cream.  Make sure you cover them all so they don’t brown.

Sprinkle bits of the crumbled digestive cookies on top and place in the fridge for a bit.  Serve when you are ready!

Enjoy-


caramel apple jam

Thanks mom for sending me this recipe!

MMMMmmmm….so delicious and warm and soothing and inviting.  Funny for a “jam” to be all that but it is!  Caramel, vanilla, and apples delightfully and simply combined.  Warm this up and pour over some vanilla ice cream and you have a winner.  Equally good on the savory side if you serve as a sweet side relish for pork or chicken.  Alison Roman, the creator of this apple jam, also suggests ice cream (like me) – but topped with crushed Nilla wafers.  And I say, sounds great, but make home made vanilla wafers (coming next)  and add a little whipped cream.

Use a variety of apples, makes for a more interesting outcome because different apples break down differently and this will provide texture and fun!

apple jam (from Bon Appetite Oct 24th):

Original recipe and write up are here.

1 cup sugar
3 pounds apples, use a variety if you can, peeled, cored and cubed about 3/4 inch thick.
1/2 vanilla bean (scraped)
1 tablespoon lemon juice
cinnamon stick or powder
kosher salt

Place 3 tablespoons water in a large saucepan.  Add the sugar and mix.  Heat on medium high and boil – and continue to cook until the sugar caramelizes.  It will turn a dark amber color – but be careful as it all happens very fast, and it is HOT.  Seriously hot.

Add the apples and the vanilla seeds and bean to the pot and cook on medium heat.  The caramel may seize up at the start (because the apples cool it down) but soon it will dissolve again.  Add a 1/2 cinnamon stick (if you don’t have a stick, wait and add some ground cinnamon to taste at the end.)

Continue to cook for about 20-25 m, stirring occasionally until some of the apples are translucent and some still have their shape, and most of the liquid is dissolved.  You can keep cooking btw, if you like your apples super soft, or remove them earlier if you like them super chunky.

Remove from heat.  Add lemon juice and a pinch of kosher salt.  Store in a glass jar or container for up to a month in fridge.


how to cut, peel and core apples

IMG_4874
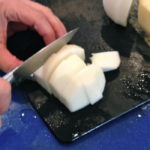
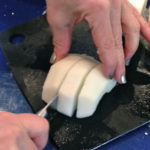
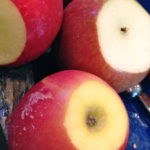
Apples are soooo good – especially now.  And I know when you see that the ingredients read – 8 apples roughly chopped, your heart might sink a bit with the prep work.  So, here is the plan of attack.  First, put on some really good music.

Cut the top and bottoms off of the apples.  All of them.  Then peel each apple with a sharp paring knife (I do this) but try not to take too much of the flesh off.  If you are lousy at this – use a peeler.  Peel them all.

Slice the apples in half.  All of them.

IMG_4877
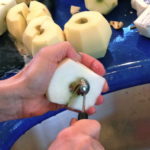
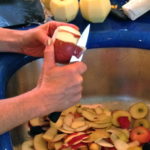
Taker your apple corer (you should get one) and scoop out the center core by gently pushing the scooper in and twisting.  Then use the scooper to take the little extra rough bits around the core.

Core them all.

Take each apple half and slice.  Now you have slices.

Turn apple, slice again – now you have roughly chopped apples.


IMG_4880 IMG_4888IMG_4886

mixed berry pavlova

Lisi's Kitchen

This was so good that I completely forgot to take a photo!  But not to worry, photos on the Smitten Kitchen site for you to enjoy.  I made this a while ago – and kept thinking I would make again to photograph and share – but the summer is almost over and I don’t want you to miss out.  Use the last of the berry season to make this delicious treat.  I mean it – the meringue so tasty, soft and fluffy – the whipped cream and the fresh cold berries.  So so so good!  I followed the recipe (well, I doubled it and made two!)

Try to squeeze it in and enjoy

smitten kitchen pavlova

raspberry crisp

Raspberries, raspberries, raspberries.  If you like them – you will LOVE this.  This one speaks summer.  Tasty, simple, and not too sweet this is a perfect ending to a summer dinner.  Serve with barely sweetened freshly whipped cream and swirl any leftovers into vanilla ice cream for a berry streusel ice cream.  Yum!  Really, yummy.  I made 3 crisps/cobblers this week and although all were tasty, the raspberry crisp was the only one that is truly a bit more special and blog worthy.  I found this on this on the Taste of Home website.  The directions are so easy – so I have no extra tips.  Just follow the recipe from the link.  Oh, the only thing I did was to add a bit of kosher salt to the crumb topping.  Enjoy –

raspberry crisp:

http://www.tasteofhome.com/Recipes/Raspberry-Crisp

remember to add a 1/4 teaspoon kosher salt to the crisp topping (if you want) — brings out the flavor a bit more.

banana caramel cream pie

Lousy photo I know!  Forgot to take picture and this is on a plate, mostly eaten, with berry ice cream.

This is part of an email I received in the morning after serving this pie the night before:

Gregg just came in from a run, opened the fridge and asked if there was any more of your pie!  He said that it was “the most decadent outstanding thing he has ever eaten”… coming from a non dessert eater, not a bad compliment!  So I found the recipe on your blog, but where did you add the bananas?
Nice, right?  So yes, this is very similar to the salted caramel pie – but the caramel is a little richer (omgoodness) and there is the addition of bananas.  So delicious.  Rich though.  VERY rich.  Beth called me the morning after I brought the pie to her house and asked if I could bring some back (she made me take it home the night before!)  She said Jason (her son) wanted to try it because Sarah (her daughter) told him how good it was (she sampled the night before).  I also think Beth wanted it too and regretted forcing it upon me as I left her house!   I was more than happy to get it out of my house because although I do have decent restraint, I couldn’t stop taking spoonfuls in the early am! And honestly at that point it was making me feel sick.  Anyway – that is how Gregg was lucky to find it in his refrigerator the next AM.   This recipe came from Jill O’Connor’s cookbook Sticky, Chewy, Messy, Gooey.  And it is a good one!  Enjoy –

You can start this pie the day before you plan to serve it if you like.  Just save the bananas and whipped cream for the next day.  You can also make the caramel filling 2-3 days before and store in a container until ready to use.  This would be nice also in parfait glasses — no crust and just layer with whipped cream and bananas.

banana caramel cream pie (slightly adapted from cookbook above):

filling-

2 cans (14 oz) sweetened condensed milk
1 teaspoon pure vanilla extract
1/8 cup firmly packed dark brown sugar
3 tablespoons butter (melted, unsalted)
1/2 teaspoon kosher salt

crust –
2 1/2 cups wholemeal digestive biscuit crumbs — or graham cracker crumbs
1/4 cup sugar
1/2 cup (1 stick) unsalted butter, melted
1/3 teaspoon kosher salt

topping –

3 medium barely ripe bananas
2 cups heavy cream
1.5  to 2.5  tablespoon sugar (to taste) – I prefer my whipped cream to be less sweet here since the caramel is very sweet.

Place rack in middle of oven and preheat to 400 degrees.

For the filling, stir together the condensed milk, vanilla, dark brown sugar, melted butter and salt.  Place mixture in a 6 cup oven proof dish – a Pyrex pan is good.  To see if 6 cups will fit in your pan, just pour 6 cups of water into it and see.  If you need to go bigger that is fine, but cooking time will be less.  Cover the pan with foil.

Place the pan with the covered mixture in it into another pan (9×13) and place in the oven.  Similar to chocolate photo below (although your’s will be covered and likely in a rectangular pan.)  Next pour very hot water into the larger pan so that it comes up about 1/2 way up the sides of the dish.  Bake this mixture until it as reduced and thickened and turned a nice toasty caramel color.  This should take 1 1/2 -2 hours – and try to stir with a spatula every 15 minutes or so.

When done, carefully remove from oven and the water bath and let cool.  Reduce temp to 350 degrees.  If you are waiting to use the filling cover and refrigerate once cooler.

For the crust — in a medium bowl, combine the crumbs, butter and sugar and salt.  Stir until crumbs are wet and all is combined.  Press into a 9 inch pie plate or a 9 inch tart pan (3 inches deep).  Bake at 350 until fragrant and a little crisp about 8-10 minutes.  Place on rack and let cool.

When the caramel is cool but still soft, spoon into the cooled crumb crust – spread in an even layer an refrigerate until the filling is set.  You can cover and keep pie at this point for 24 hours.  Or, just chill for 2 hours.

Cut the bananas into 1/2 inch thick slices and place them all over the caramel filling.

Place the heavy cream and sugar in the bowl of your electric mixer – or with hand held beaters and whisk on medium speed until medium peaks form.  Spoon the whipped cream on top of the bananas – and make sure to cover the bananas to prevent browning.

Chill in fridge until ready to serve.

Yum!

momofukus butter cake bars

OK, so these bars were interestingly good which I know can be a shaky description.  But read on.  Karen LOVED LOVED LOVED them.  Effusive.  Rob liked them saying if you like custard they are right up your alley.  Someone also said that the inside looked like snot which is not so nice…but gave us a laugh and I guess if your snot is yellow and custard-y then so be it.  Did I mention that Karen LOVED these?  The crackly top and oozing custard was my fave.  The bottom of the cake was my only issue.  I rarely use a box cake mix but this recipe called for it so I gave it a whirl.  The taste isn’t for me so I ate the top off.  Anyway, if you look at all the comments from Tastspotting.com and from Some Kitchen Stories (who posted these on Tastespotting) you will see many a fabulous comment.  We all got the recipe from Gilt Taste when they featured the bars and the recipe from Momofuku.  Enjoy –

momofukus butter cake bars:

Find the recipe at Tastspotting.com

Only tip I have is to maybe use a 9×9 cake pan — as these are super gooey and easy to under bake.  Enjoy!!

salted caramel pie (don’t miss this one)

Although my memory is hazy  from a night or day (?) a few weeks ago, I do remember Jason (my non chocolate loving friend) standing up and exclaiming “Lisi, hands down the BEST thing you ever made!”  (Kind of like I won the game!)  Everyone else agreed by mmmm…ing and eating as he made this pronouncement.  This pie is ridiculously and particularly easy to pull together and the taste is so decadent and luscious.  It truly is.  I decided to make it again last weekend and Rob and Steph couldn’t get enough of it.  They mmm…ed too and were delighted to keep the pie for friends who were coming over later.  My friend Beth poo poo’d the dessert when I told her about it saying “but where is the chocolate?!”  but she too tried it and loved it – although we both did agree that some sort of chocolate addition would also be quite awesome.  Maybe a chocolate wafer crust and/or bananas too.  Next time.  Anyway, this pie is sweet and salty – gooey and rich.  I love love love it.

Oh and btw, you can make the filling 3 in advance to make life easier on the day you plan to serve it.

salted caramel pie (very slightly adapted from Simplethings Sandwich & Pie Shop in LA written up in the November issue of Food & Wine):

1 1/4 cup graham cracker crumbs
4 tablespoons unsalted butter, melted
1/4 cup light brown sugar
1/4 teaspoon kosher salt
two 14 oz. cans sweetened condensed milk
fleur de sel or Malden sea salt (delicious)
1 1/2 cups heavy cream
1 1/2  tablespoons confectioners’ sugar

Preaheat oven to 350 degrees.  Mix together the graham crumbs, brown sugar, melted butter and salt.  Once all incorporated place and press into an 8-9 inch glass or metal pie pan.  Place in the oven for about 11 minutes until fragrant and lightly golden.  Remove and set aside.

Increase oven temp to 425 degrees.

Place the condensed milk into a 9×13 pyrex pan – or of similar size.  Cover the pan with foil.  Then place that pan into a bigger roasting pan and place in the oven.  Fill the roasting pan (the outside pan) with enough hot water so that it comes about 1/3 up the sides of the condensed milk pan.  I like to do this with the pans in the oven so that I don’t have to carry the pan with water sloshing around.

Now bake the condensed milk for about 2 hours.  During this time, lift the foil and mix with a spatula.  Do this 3-4 times while it cooks.  It should thicken like dolce de leche  and turn nice and golden (versus the whitish color it started out as).  Don’t worry if lumpy – you can smooth out later.  Also – check the water level during this time and add more if necessary (keeping the water 1/3 up the sides of the pan.)

Remove from the oven and let cool.

Scrape caramel into pie crust.  Cover with plastic wrap (spray this with veggie oil spray so that it doesn’t stick to the caramel) and let sit until the filling is chilled and set (about 4 hours).

Whip up heavy cream and sugar (check out whipped cream post for more instruction).  Sprinkle with the fleur de sel/Maldon salt (best!)

And slice and serve…wait for the mmms….