
 This was so beautiful, but really, more importantly, scrumptious! I brought this crisp with two other fruit desserts to a dinner party and this one was probably the most universally loved. Fine Cooking Magazine featured this recipe months ago – it was the colors in the photo that propelled me to pull it, save it and eventually bake it. As we spooned it out, the dessert almost glowed with blue-y purples and yellows, as well as orange and pink hues. The pecan streusel on top added a delightful crunch and snap to this treat that paired extremely well with the soft juicy peaches and bursting blueberries. This is great for a dinner party as you can easily reheat later in the day and serve it warm with freshly whipped cream and vanilla ice cream. Equally good as a brunch dessert with its fruity goodness — at room temperature – also sure, paired with whipped cream and/or ice cream. This is verrry easy to make which is an added benefit if you are a busy person who still likes to bake. Enjoy-
 Double this if you want enough for a crowd – this serves only around 5-7 people (depends on portion size) – using an 8 or 9 inch square pan. peach blueberry crisp with pecan topping (adapted from Fine Cooking magazine): 3 oz (2/3 cup) all purpose flour 1/2 cup packed light brown sugar 2/3 teaspoon ground cinnamon 1/4 teaspoon kosher salt 2 oz (4 tablespoons) unsalted butter, softened 2/3 cup coarsely chopped pecans 3 cups blueberries (washed and drained on paper towels) 5 medium peaches (and or nectarines) peeled, halved, pitted and sliced 1/2 inch thick 1/4 cup sugar 2 tablespoons cornstarch 1/3 teaspoon freshly ground nutmeg 2 pinches kosher salt Preheat oven to 375 – and position rack in the center of the oven. Lightly butter a 9 (or eight) inch pan. Metal or ceramic – or glass as I used. In a small bowl, whisk together the flour, brown sugar, cinnamon and salt. Cut up the butter and mix in with your hands and fingers so that the mixture readily clumps together when pressed. Mix in the pecans. Set aside. In a medium bowl, mix together the blueberries and prepared peaches. In a small bowl, mix together the sugar, cornstarch and nutmeg and salt. Next, toss this dry mixture into the fruit and mix carefully with your hands to coat. Spread the fruit (and any remaining dry mix) into the prepared pan. Press the streusel into the fruit – in small lumps and also sprinkle all around and on top to cover. Bake until the fruit in the center bubbles – and the topping is nicely browned (I moved mine to the top rack in the oven for the last 5 minutes). This should take about 50-57 minutes – but check before – just in case! Let cool, and serve warm. Or reheat later in a warm oven for 10 minutes or so. Enjoy-


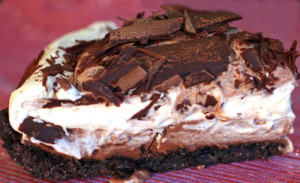 It was Alisa’s birthday – she is what we like to call our “young friend who is a student who lives with us and helps out now and then” – long title, but she is no longer an au pair and she is not just a student, she is truly part of our family. So…anyway…it was her 25th birthday and I really wanted to make her something special. Well…success! This pie is extremely good. I’m not even a custard girl (although I think I’m becoming one!) and oh…the cookie crumb crust, the whipped cream and pudding – all together, delicious. I mean it. Alisa was very happy and exclaimed “this is perfect for me!” and “I love it!” She said she had to hide it in the refrigerator when her friends came to celebrate and I believe it. If you
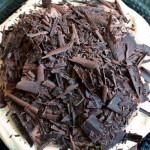 grind the cookie wafers and make the pudding the day before it is a breeze to assemble the following day. All the small steps are fairly simple, but I guess added together take a little time and effort. But please, make this, bake this…and enjoy!
 I really wanted to sneak this one in before Thanksgiving because it is so easy to make yet really delivers. This moist pudding like cake is full of ginger flavor and when paired with freshly whipped cream or ice cream…oh so very good. While it bakes – the top turns cakey while the bottom creates a sticky syrup. I’ll admit that sometimes it doesn’t look too beautiful (although to me – the sticky look is immediately appealing). I read about this a few years ago in Bon Appetit – it was in the readers’ favorite restaurant recipes – and brought it to our families for Thanksgiving. Huge hit especially with Rob’s family! Over the past few weeks I’ve received e-mails from almost every member of his family – urging me to share this recipe and to please bake it again for Thanksgiving. OH, and by the way, you can make this the day before you plan to serve and just re-heat in the oven for service. This recipe makes one 8×8 pan – I often double the recipe making two pans – or bake doubled in a 9×13 pan – just watch the baking time…
 This is a great dessert for Thanksgiving – the cranberries make it festive and the red color throughout is visually appealing. Oh, and it tastes great. Forgot that nugget of information. I really love crisps and cobblers because they are so easy to make. One of my goals with this blog was to branch out and bake more difficult things…but that is proving to be tough for me. Plus it seems that most people who read this are busy and love to bake but with out too much crazy effort. I love the pecans in the topping – they add great crunch and texture that offsets the tartness of the cranberries and apples. This is just great served warm out of the oven with vanilla ice cream and freshly whipped cream – yes…both! It is also great at room temperature and guess what…it is awesome cold! On Saturday night I cooked this for friends and they were wowed. Loved it. All those fruit loving folks. Someone placed the crisp in the refrigerator overnight (even though it does not need refrigeration) and when I found it there in the AM, I just had to take a spoonful and oh, cold heaven. Maybe a little little bit with yogurt in the AM would turn it into breakfast?? Hmmm…