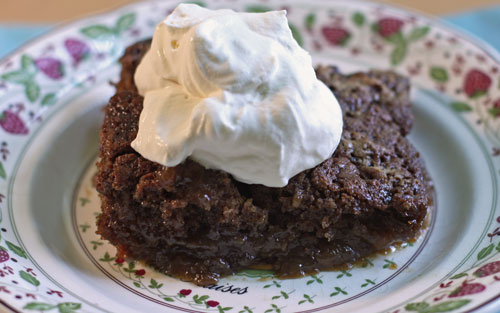
remember the gingerbread pudding cake for this Thanksgiving…

Don’t forget this gooey gingerbread pudding – always a good go to this holiday.  My sis in law Kathy now makes this for us each Thanksgiving…and with great success!!

Other good ideas, gingerbread cookies, apple cake bars, caramel shorties, gingerbread and white choc chunk brownies, banana toffee cake, orange cake, and cranberry apple crisp.  Oh, and of course my last post that is just under this.

There are so many more though…so look through the recipe index and also at the 20 crowd pleasers to date post packed with all time favorites regardless of the season!

Enjoy your holiday!!

berry summer pudding

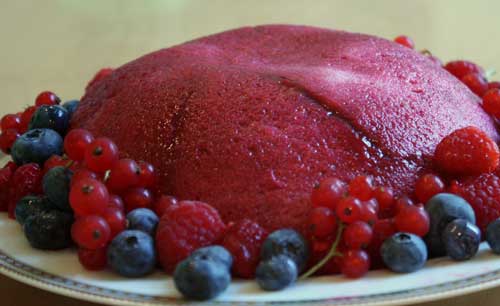
Scrumptious berries with very little adornment, cold and tasty, pure and simple surrounded by a layer of white bread – now sweet red bread.  This one really intrigued people.  “What is that?”  “What’s on the outside.”  “What’s on the inside.”  I said well, the outside is bread.  “That’s bread, white bread?” Debbie exclaimed.  Shari and Nancy kept repeating “bread bread?”  Yes, bread bread surrounding an obscene amount of berries and berry juices that sit for a night or two and turn into beautiful and interesting bright red dessert.  Sylvie said she liked it but the outside was the best.  (She does love white bread.)  Darren muttered good good and and Nancy and Rob echoed him.  Someone said awesome and that it looks heavy but its not.  And Jeff said it was perfect for 108 degree day (it was hot and he grilled for us).  I brought this to another BBQ and everyone who tried it gave it the thumbs up.  Jason and Marco especially – my fruit-loving friends.  Serve with freshly whipped cream this is a lovely light and different summer dessert.  Alice Medrich once again really prompts me to try new things.  She said that this summer pudding was described in Helen Gustafson’s memoir The Agony of the Leaves.  And Helen herself recited the recipe to her.  Give it a whirl, it certainly begs for discussion 🙂

This is best if you let it sit for two days although one is fine too.

This serves only about 5 or 6 people – feel free to double it and make two like I did.

berry summer pudding (slightly adapted from Alice Medrich’s book Pure Dessert):

3-4 slices white sandwich bread with a tight crumb
4 cups ripe berries (mixture of raspberries, blackberries and a handful of red currents if possible)
blueberries – I added some fresh blueberries to the recipe — you can ignore or use –
Alice also suggests boysenberries if you have them to put in the mix
1/2 cup sugar (well, to taste)
2 pinches kosher salt

serve with freshly whipped cream

Grease a 1 quart bowl (5-6 inches across the top and 3-4 inches deep) and line it with plastic wrap.  Try to press it into the bowl as crease free as possible.  Make sure there is overhang too.

Cut the crusts off the bread. then cut the bread in wedges.  Place the wedges in the bowl – trying to minimize space in between.  Feel free to press the bread together to make a tight fix.

In a nonreactive saucepan (big enough so that the berries are only 1-2 layers deep) heat the berries and sugar.  Turn them gently so that they throw off their juices.  You want to do this slowly and do not boil.  As Alice says, ” the aim is not to cook the berries but only to warm them and coax forth their juices.”

Adjust the sugar if necessary, add the pinch or 2 of salt.  At this point I threw in a few uncooked blueberries just for fun.  Up to you.

Spoon the prepared berries into the bread lined bowl.  Then fit more bread on top to cover.  Then fold the plastic wrap over to cover.  Next place a small saucer on top and weight it with a can of beans or something heavy.  Then place in the fridge at least overnight – 1 or 2 days even better.

To unmold, pull back the wrap and invert bowl onto plate – center it because it is hard to move after you invert it.  Serve with fresh berries and freshly whipped cream.

Enjoy –

mango crisp (on the healthy side)

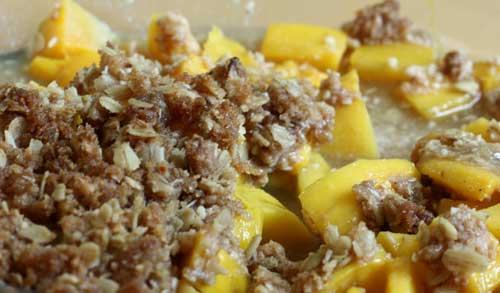
Yum yummy yum!  I truly loved this dessert.  Fresh natural mangoes enhanced by a delicate, tasty and  uncomplicated crisp topping – this is one of my new favorites.  I mean it.  So easy, so pretty and bright – perfect for a summer BBQ.  My friends agreed especially Marco who was in mango heaven.  I told him excitedly that it was on the healthy side – and he said that was good considering the amount of whipped cream he ate with it.  I ate mine plain – cold the next morning and in my vanilla ice cream the next night and mmm…hit the spot 3 times.  If you are not a mango lover (Sylvie is away and the rest of my family wouldn’t even try this!) you can make it with peaches, apples, pears or plums.  Probably equally as delicious although you won’t get that beautiful marigold hue.  Give this a whirl.  This comes from Mark Bittman’s The Food That Matters which I just love.  His write up states “this was stunning and also stunningly easy.”  He is right.

As with any fruit dessert taste the fruit first.  Your dessert (esp this one) will only taste as good as your fruit.

Enjoy –

Serves around 8.

mango crisp (from Mark Bittman’s The Food That Matters):

4 tablespoons (1/2 stick) unsalted butter, softened, plus a tad more for greasing pan.
2 tablespoons vegetable oil
1 cup brown sugar (I used a mixture of light and dark)
1/2 cup shredded, unsweetened coconut
1 tablespoon lemon or lime juice
1/2 teaspoon cinnamon
1/2 cup whole wheat flour
1/2 cup rolled oats (old fashioned, not quick cooking)
2 pinches kosher salt
3 pounds mangoes, peeled, pitted and chopped

Preheat the oven to 400 degrees.  Lightly butter an 8 or 9 inch square, round or oval pan.

With the paddle attachment of an electric mixer or with handheld beaters (or a fork), cream together the butter, oil, and brown sugar.  Scrape bowl, and mix again.  Remove from mixer and stir in the coconut, lemon or lime juice, cinnamon, flour, oats, and salt until combined and crumbly.  (You can make the topping a day in advance and store in fridge.  You can also freeze topping and it will last a few weeks.)

Place the mangoes into the prepped dish and then evenly crumble the crisp topping on top of the mangoes.

Bake until golden and just starting to brown – about 24 – 35 minutes.  This is lovely warm, room temp, and as mentioned above quite good in the AM cold from the fridge too!

banana toffee cake

Yum yum yummmmmmy.  Even some of the men said yummy (which is typically not a word that they tend to use) but it is a MUST here.  What can be better than bananas, caramel and chocolate?  Not much!  This cake oozed with sticky sweet caramel, had a delicious and distinct banana flavor and was even further enhanced by chocolate chips.  Not sure I need to say more about this.  But I will.  I saw the picture in the March issue of Bon Appetit and immediately knew it going to be a hit.  I then noticed that the recipe came from Lauren Chattman and I was even more committed to trying it.  Well, again, as I stated…delicious.  Beth and Mark loved it the most.  But most everyone who tried it raved.  Warm with my vanilla ice cream this was so very good.  Make it soon while it’s cool out as it is a good one to warm up with and hunker down and enjoy in elastic waist pants!

BTW, you can make the sauce 2 days ahead of the cake and store in the fridge.  Just reheat lightly before using.

banana toffee cake (slightly adapted from Lauren Chattman’s recipe from the March issue of Bon Appetit):

toffee sauce –

1 1/4 cup plus 3 tablespoons heavy whipping cream
1/2 cup light brown sugar (packed)
1/2 cup dark corn syrup
1/4 cup (1/2 stick) unsalted butter
1/2 teaspoon kosher salt

banana cake

2 cups all purpose flour
1 1/2 teaspoons baking powder
1/4 teaspoon kosher salt
3/4 cup (1.5 sticks) unsalted butter, room temp
2/3 cup dark brown sugar (packed)
2 large eggs
1 cup mashed very ripe bananas (about 7 oz. – or about 2 bananas)
1 tablespoon dark rum
1 1/2 teaspoons vanilla extract
chocolate chips (optional)

toffee sauce

Bring 1 1/4 cups cream, brown sugar, corn syrup, butter and 1/8 teaspoon salt to boil in a heavy small saucepan over medium heat.  Whisk until the sugar dissolves.

Once boiled, cook over medium low heat for about 15 minutes, whisking occasionally – until the sauce coats the back of a spoon (heavily) and the sauce is reduced to about 1 1/2 cups.  It is very hot and can burn you easily so please be careful.

Once thick, remove from heat and let cool.  Add up to 4 more tablespoons of cream to thin the sauce to desired consistency.  Now make the cake.

banana cake

Preheat oven to 350 degrees.  Butter and 8x8x2 inch metal baking pan.  Dust pan with flour and pat out excess.

In a small bowl, whisk together the flour, baking powder, and 1/2 teaspoon salt.

On medium high speed and with the paddle attachment of your mixer (or with handheld beaters), beat the butter and sugar until well blended.   Scrape and mix again for another minute.  Add the eggs, one at a time until each is incorporated.  On medium low speed, beat in the mashed bananas, rum and the vanilla.  Scrape and mix again.  At this point the mixture may look curdled but don’t worry.

Next, add the dry ingredients in 3 additions, beating on the lowest speed and just to blend.  I think if you add chocolate chips here it would be nice.  I didn’t – I added them at the end,  but will probably stick them in the batter next time.  A few or a lot, that is your call.  This is also delicious without chocolate!

Spread the batter into the prepped pan and bake until a toothpick comes out just clean.  (The recipe says 35-38 minutes but it took me only 30 and I should have checked even a few minutes early…so watch carefully and know how your oven cooks.)

Spread about 1/2 cup of the toffee sauce evenly over the cake and return cake to the oven for 3-6 minutes – until the sauce bubbles thickly.  Remove from oven and place desired amount of chocolate chips on top (if you choose).

Allow the cake to cool in the pan for about 30 minutes.  Cut and serve warm (or not) with the leftover toffee sauce.  You can top with sliced bananas and/or whipped cream, or ice cream.  Wowee.  Enjoy –

brownie pudding

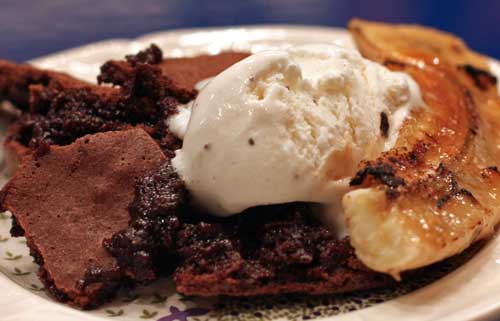
This is heaven.  Serious chocolate heaven.  I know I say that a lot – but I REALLY mean it (not that I haven’t before!)  And this photo does not do it justice.  It was taken at the end of the night after one glass of wine too many.  Oh well, unimportant because this will make everyone go nuts.  A cross between a brownie, a cake and a pudding with a hard crispy top that covers a succulent molten brownie, nothing compares.   I served this with Rob’s favorite chocolate sorbet, chocolate chip ice cream, freshly whipped cream and caramelized bananas – to make a decadent chocolate extravaganza.  My absolute favorite.  A few friends came over for this and they really couldn’t get enough.  Really.  Mark said this is crazy!  I mean crazy!  And it is.  This recipe is from Ina Garden’s Back to Basics and I have to tell you that everything she puts in each of her many books is a hit.  Ina writes that this recipe is from Anna Pump – who has a store called Loaves and Fishes and was happy to share it with her.  Make this for company.  Make this for your family. Make it just for you!  YUM.  Delicious.  Enjoy-

brownie pudding (from Ina Gartens Back to Basics – the only change I made was the addition of a little kosher salt):

1/2 pound (2 sticks) unsalted butter, plus little extra for buttering the dish
4 extra large eggs, room temp
2 cups sugar
3/4 cup good quality cocoa powder
1/2 cup all purpose flour
1/2 teaspoon kosher salt
seeds from one vanilla bean (scraped)  look at the fruit soup post for instructions and photos to scrape seeds

Preheat oven to 325 degrees.  Lightly butter a 2 quart oval baking dish (9x12x2 inch).

Melt the 2 sticks of butter and set aside to cool a bit.

With the paddle attachment of your mixer, beat the eggs and sugar on medium high speed for about 5 -7 minutes until it becomes very thick and light yellow.  While beating, whisk together the cocoa powder, flour and salt and set aside.

Reduce the speed to low (once the eggs are thick and light yellow) and add the vanilla seeds and the dry ingredients – mix until JUST combined.  With the mixer still on low, add the melted (and cooled) butter and again, mix until just incorporated.

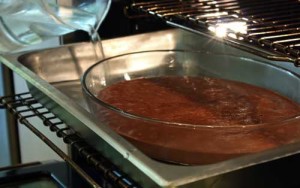
Pour the brownie mixture into the prepared pan and place it in a larger baking pan or baking sheet.  Fill a pitcher with hot tap water -and carefully pour the water into the baking pan (do this in the oven, on the rack it is easier) so that it come about 1/2 way up the sides of the brownie dish.  This is called a bain marie.

Bake for 55 m to an hour.  A cake tester inserted 2 inches from the side will come out 3/4’s clean.  The center will seem very under-baked but that’s what makes this a brownie pudding!

Cool and serve with vanilla ice cream, whipped cream, chocolate chip ice cream, or sorbet.  Have some fun and caramelize some bananas too!

Enjoy –

peach cake (pudding like on the bottom)

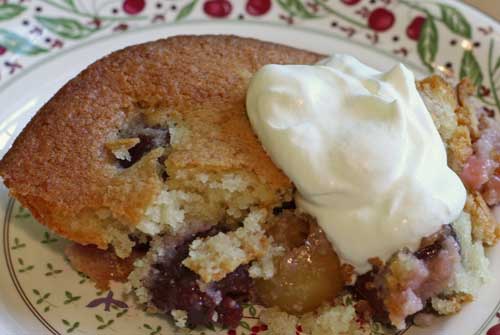
Friends know that I usually limit myself to one little mug of dessert usually mixed with vanilla ice cream.  However on this night, I needed a big over-sized mug!  Warm out of the oven, with freshly whipped cream and a little ice cream well, really  – this one spoke to me.  Loudly.  It is a true true peach lovers delight!  Each bite filled with succulent peaches and a lovely cake topping that is extremely moist and almost pie like.  I couldn’t stop munching on this one taking little slivers throughout the evening – and that was in addition to my over-sized mug!  I quickly asked around to see if I had any local tasters and luckily Suzanne rushed right over.  She and Jamie loved it – and Lauren loved the cake part (she’s not a peach lover) with the whipped cream (remember to please whip your own cream).  Suzanne shared with her neighbor Jen who said “what’s not to like?  Sweet, moist and delicious!”  David my computer wizard wrote that it is good to live by me 🙂  Jonathan too – my fruit fan was a verrry happy neighbor.   Enjoy this.  Really nice for a summer BBQ.

While this bakes, the peaches sink to the bottom making a soft moist peach-like base.

peach cake (from the Hyde Park bar and Grill in Austin from BonAppetit readers favorites):

1 3/4 cups plus 2 tablespoons all purpose flour
2 1/4 teaspoons baking powder
1/2 teaspoon baking soda
3/4 teaspoon kosher salt
3/4 cup (1 1/2 sticks) unsalted butter, room temp
1 3/4 cups sugar
1 1/2 tablespoons vanilla extract
2 large eggs
3/4 cup buttermilk

4 cups peeled sliced peaches (from about 3 pounds)

Preheat oven to 350 degrees.  Lightly butter a 13x9x2 inch glass baking dish.

Whisk together the flour, baking powder, baking soda and salt.

With the paddle attachment, beat the butter and sugar until smooth – and a little lighter.  About 3-4 minutes.  Add the eggs one at a time on medium speed, and then the vanilla.

Scrape and mix again.

On the lowest speed, add 1/3 of the flour mixture, followed by 1/2 of the buttermilk, repeat and finish with the flour.  Scrape and mix again – until all comes together.

Pour the batter into the prepared dish.  Spread with a spoon or palette knife.

Arrange peaches over the batter – it is OK if some overlap.

Spray or lightly butter a piece of tin foil. and cover the cake with the foil (butter side down)  – and seal tightly.  Bake for 45 minutes covered.

Remove the foil carefully, then bake another 40 minutes or so until the top is a nice golden brown and the edges are crusty.  A toothpick should come out just barely clean.

Cool for about an hour – then serve warm with whipped cream.  Yum.

Enjoy-

summer fruit crumble (with a ton of different fruits!)

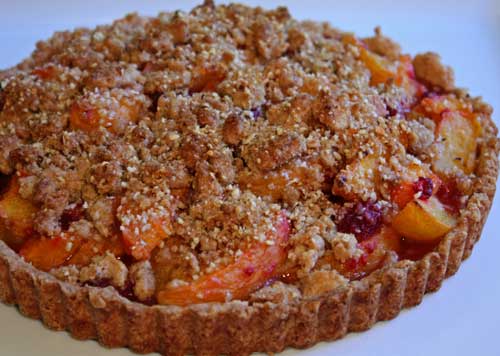
Plums, apricots, pluots, cherries, blackberries, raspberries, nectarines, peaches (and more) – this crisp has everything in it!  I wanted to take full advantage of all the fruits I saw and love at my local farmers market.   And I did!  Grown-up friends loved this…Amy, Judy, Marco and Michael all had verrry nice things to say although didn’t speak much because their mouths were full.  The crisp buttery oat-y topping paired with the succulent fruits just speaks summer.  It really does.  I love crisps, crumbles and cobblers, they are so easy to make and really pack such delicious flavor.  Served this with a mixture of whipped cream and creme fraiche and oh, each bite tastier than the next.  Vanilla ice cream or plain freshly whipped cream would also be great.  The kids are reluctant to try this – not sure why because they’d love it, but there is time for everything eventually.  Serve warm from the oven, or room temp later, or cold the next morning this is all around superb.  Enjoy-

Feel free to fiddle with your fruits.  Also, I had left over streusal (that keeps well in the freezer for any time I want a little crisp.)

Serves from 8-12.

summer fruit cobbler (slightly adapted from Baking For All Occasions by Flo Braker):

You’ll need a 13x9x 2 inch baking dish – or around that.  If you have smaller dishes, you can make two!

streusal

1 1/4 cups old fashioned rolled oats
1 cup all purpose flour
1 cup firmly packed light brown sugar
5 oz (1 1/4 sticks) cold unsalted butter, cut into 1/4 inch slices
1 teaspoon baking powder
3/4 teaspoon ground cinnamon
3/4 teaspoon kosher salt

fruit filling– (9-10 cups total)

4 cups mixed berries such as blueberries, blackberries, boysenberries , raspberries (you pick what you like to equal about 3-4 cups)
1 cup sweet cherries, stemmed, pitted and halved
2 medium firm but ripe peach, peeled, halved, pitted and sliced
1 each small firm but ripe nectarine, pluot, apricot and plum, halved, pitted and sliced
2 tablespoons fresh lemon juice
1 teaspoon vanilla extract
1/4 – 1/3 cup sugar  (if your fruits are very sweet, go with a little less, if not, go with a little more)
3 tablespoons all purpose flour

whipped topping-(double this if you think your guests or family will eat a lot of it.  I find people take the smallest spoonfuls.)

1 cup cold heavy cream
1/4 cup creme fraiche
1 tablespoon sugar

Streusal- In a large bowl, combine the oats, flour, sugar, butter, baking powder, cinnamon and salt.  Using your fingers mix and squish this until it resembles coarse sand and kind of comes together as a dough a bit if you squeeze it.  The streusal can be stored at room temp for 1-2 hours.  For longer storage, place in fridge for up to 5 days.  You an also freeze the streusal to keep on hand for the next time you want a crumble fast.

Preheat oven to 350 degrees.  Place rack in center of the oven.

Combine all the prepped fruits in a large bowl.  In a small bowl, stir together the lemon juice and vanilla.  Sprinkle this mixture over the fruit.  Add the sugar and pinch of salt to the fruits and and gently toss with your hands to coat evenly.  Sprinkle the flour over the fruit and again, toss gently.

Pour the fruits into the gratin dish and then scatter the streusal on top of the fruits.  Do not press down – just try to evenly top the fruit. (Although a lot of topping is good, I wanted this to be very fruity – so I didn’t use all of the streusal.  So up to you.  I saved the extra in the freezer for strawberry crumble on the fly.)

Bake the crumble until the fruit is soft and bubbling – and the topping is lightly browned.  Probably take about 30-40 minutes or so although I forgot to time this.  So check at 30 and continue to bake if not yet golden and bubbly. Let cool on a wire rack.  Serve warm, or re-heat later, or serve at room temp.  Cold is good too actually!

Whipped cream/creme fraiche – whisk together the cream, creme fraiche and sugar with hand held beaters or in your electric mixer until it is very softly whipped.  Cover and refrigerate until service.  Ice cream or plain whipped cream is great too (freshly whipped please!)

nectarine, cherry, and berry crisp

Yes, another fruit crisp.  I just love love love them.  So much easier than a pie and really (to me) just as good! Made this for Father’s Day – Rob’s family was in and I thought they would enjoy this.  (Served favorite fudgy brownies too for my chocolate lovers.)  Here the nectarine, raspberries and cherries make for a colorful crisp that just tastes like summer.  The reds and yellows are so vibrant and pretty – feels like I’m eating sunshine.  This one is not too too sweet which is also nice – the fruit tastes like it should – and the topping adds a special crunch. Everyone enjoyed this, especially my mother-in-law I think 🙂  (Me too!)  Hard to keep the leftovers on the counter (too much extra nibbling) so I gave it to Jodi and Mike for their Father’s Day celebration and got more rave reviews.  Have fun here, fiddle with your fruits and sugar – and spices.  Taste the fruits before you use them and taste them again once you add the sugar and spices.  Go easy at first and add sugar and spice as you need and desire.  Enjoy this-

Serves around 6-8.

nectarine, cherry, and raspberry crisp (adapted from Baking Unplugged by Nicole Rees):

4 1/2 cups pitted, sliced nectarines (about 3-4 large)
3 cups raspberries
1 1/2 cup pitted, halved cherries
1/2 cup sugar (more or less to taste)
1 1/2 tablespoons cornstarch
1/4 teaspoon ground allspice
1/4 teaspoon ground cardamom
pinch kosher salt

topping
1 cup all purpose flour
1/3 cup packed light brown sugar
1/3 cup old fashioned oats
1/3 teaspoon kosher salt
1/4 plus 3 tablespoons unsalted butter, melted

Preheat the oven to 350 degrees.  Place rack in center of oven.  Butter a 9 inch square baking dish.

Combine the fruits with the cornstarch, allspice, cardamom and pinch of salt in a medium bowl.  Pour into prepped pan.

In a smaller bowl, whisk together the flour, brown sugar, oats and salt.  Add the melted butter and stir to combine.

Sprinkle the topping over the fruit and bake for about 35-45 minutes.  I forgot to time this – so keep cooking until the fruit juices bubble and the top to turn a nice golden brown.  Enjoy-

apricot raspberry tart (with easy press in crust)

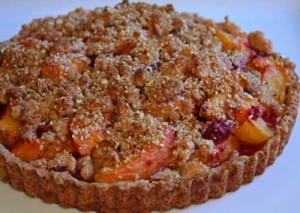
The apricots and raspberries together in this sweet make for a truly sensational bite.  This is my favorite of the three fruit desserts that I baked for friends recently. Jen’s too if I’m remembering right.  I meant to take notes, but just couldn’t manage to stuff myself and write about it at the same time.  Alcohol doesn’t help either, so hopefully it is as good as I’m remembering.  The fruit sits upon a delicious nutty crust and is topped with a crisp streusel topping.  What more can you want?  The crust is a press in btw – no rolling here, so don’t be scared.  I was worried that the tart would be a soggy mess (since you do not pre-bake the shell), but it was sweet, tart, and so very flavorful.  My mouth is watering in memory now as I write.  I must say that this rivals any chocolate dessert for me (and that is saying a lot).  Oh and try to find good apricots and berries – remember that the best fruit desserts must start with tasty fruit (so sample it and if it is bad, remember that it will be worse in your dessert)!  Deborah Madison’s book is filled with a myriad of fruit desserts.  Each more mouth watering than the next.  Enjoy this-

You will need a 9 inch tart pan and a food processor.

Best to serve the day you make it although leftovers are good in the AM.

apricot raspberry tart (from Seasonal Fruit Desserts by Deborah Madison):

tart dough and topping

1/2 cup almonds (with our w/out skin)
1/3 cup brown sugar
1/4 teaspoon kosher salt
1 cup all purpose flour
1/3 cup whole wheat pastry flour (or just use (more)vall purpose if you don’t have)
8 tablespoons (1 stick) cold unsalted butter, cut into 10 pieces
1 tablespoon water
1 teaspoon vanilla extract
1 egg yolk

fruit filling

4 cups ripe apricots, quartered (if overripe just cut in half), pitted
1 cup raspberries
2 tablespoons all purpose flour
1/4 cup sugar
pinch kosher salt

Preheat oven to 375 degrees.  To make the tart dough and topping, place the almonds and sugar in a food processor with half the salt and pulse until the mixture is fine and smooth.  Measure out 1/2 cup of this mixture (for the topping) and set it aside for later.

Add the flour and remaining salt to to the remainder in the food processor and combine.  Add the chunks of butter and pulse until broken up into coarse crumbs.

Mix the water, vanilla and egg yolks with a fork and then with the food processor running, add this liquid and pulse until the dough looks moist and has started to come together.

Remove 1/2 cup of this dough and add it to the reserved 1/2 cup of the almond sugar mixture.  And again, set aside for topping.

Press the remaining dough (from the food processor) into a 9 inch tart pan and using your fingers press the dough into the pan. Use your fingers to press the dough up the sides of the tart pan and to flatten the base.  If the butter warms up and you are having trouble – refrigerate it and then continue to press in and form a nice even crust.

Toss the apricots, raspberries, flour, sugar and salt together and pour into the tart shell.

Rub the reserved 1/2 cup almond tart dough and 1/2 cup almond-sugar mixture together and make coarse crumbs.  Sprinkle over the fruit.

Place the assembled tart on a sheet-pan and place in the center of the oven – bake until the top is nicely golden and the fruit has released its juices – about 45 minutes or so.

Remove and let cool.

I had a hard time removing the bottom circle of the tart – so i just left it on.  Of course remove the tart ring before serving.

Delicious!  Enjoy-

cherry almond cobbler

If you like cherries and marzipan, then this is for you. I brought this cobbler along with few other treats to a dinner party.  This one was either LOVED and ADORED by people, or really not loved at all. Comments ranged from “this is my absolute favorite” and “hands down, this is amazing”…to “oh, this reminds me of something my grandma would like” or “I really don’t like almond paste or marzipan.”  So, know your audience and decide whether this is right for you (and them).  I happen to be in the love it camp.  The sweet cherries, the rich almond-y cake-like topping combined with freshly whipped cream was just delicious.  Rob’s favorite!  I was psyched to use my new cherry pitter.  Very little effort to de-pit many berries at a time.  I didn’t get the hang of it though until half way through so a few of my cherries still had pits (ohmygoodness…) in the baked dessert.  Mark, our host, was in the “I love this the most” camp but unfortunately, he had a pit in each of his 3 portions!  By the third one, he knew to bite softly – but proceeded to spit the pits at me.  I deserved it.  So be careful – luckily no one lost a tooth!  Enjoy-

cherry almond cobbler (very slightly adapted from Ripe for Dessert by David Lebovitz):

filling

5 cups sweet cherries, pitted (about 2 pounds)
1 tablespoon plus 1 teaspoon sugar
juice of 1/2 lemon
pinch kosher salt

topping

7 ounces almond paste
1/3 cup sugar
8 tablespoons (1 stick) unsalted butter room temp
1 large egg,room temp
1/2 teaspoon vanilla extract
1 cup flour
1 1/2 teaspoons baking powder
1/2 teaspoon kosher salt
1/2 cup whole milk

Preheat oven to 350 degrees and place oven rack in middle of oven.

For the filling…arrange cherries in the bottom of a 2 quart baking dish.  Toss with the sugar, salt and lemon juice.

For the topping, with the paddle attachment, beat together the almond paste and sugar on low to medium low speed until it comes together. Be careful as it can shoot out of the mixer.  Beat in the butter and mix well, then the egg and vanilla.

In a separate bowl, whisk together the flour, baking powder and salt.

With paddle attachment and at the lowest speed, mix in about half of the dry mixture and mix until almost incorporated.  Follow with the milk and then remove from the mixer and gently fold in the rest of the dry ingredients.

Spread the batter evenly over the cherries.  Bake for about 45-50 minutes until the top is a nice golden brown and a toothpick comes out clean.

Serve warm or at room temp with whipped cream or ice cream.  Yum.