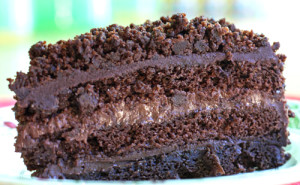
 When I asked Ali (my friend and neighbor) what I could bake for her birthday, she looked hard and focused and said “chocolate.” I said like chocolate chocolate crazy chocolate? And she replied with a good happy grunt. So I started to hunt for a cake recipe that would suit both of us since I was going to celebrate too! I can get lazy with cakes and pies – which is why I’m psyched about this blog. It forces me to really bake out of my box. And I can be very tentative about cakes because I unfortunately do not have that artistic flair that makes it all just look good. But the blackout cake is perfect because you get to cover your cake with lots of cake crumbs,
 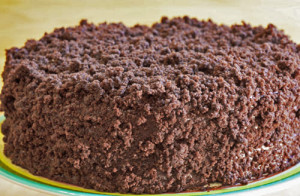 hiding any imperfections. I found and slightly adapted this recipe from the Nordstrom Flavors cookbook. I cook from this cookbook all the time – really great recipes here – but this is my first dessert. And wow, what a success. We ALL loved it. Ali and her husband Jonathan, their daughter Danika (their little guy Leo just wants Dove chocolates so no cake for him), my kids Andy and Sylvie (not Greg because he won’t even try chocolate cake), my husband Rob and my daughters piano teacher too (who I happened to give a piece to). Oh, and me! I overate and actually still feel slightly sick but it was worth it! If you make it in stages it is not overwhelming. I made the pudding first day, the cake the next day, and the ganac
 he and assembly the third. But if you’ve got the time you can make it happen in a day. Just read the recipe all the way through – so you can get yourself very organized.
blackout cake (adapted from the Nordstrom Flavors cookbook – which I believe you might be able to purchase at the store):
pudding-
1/4 cup sugar
2 tablespoons cornstarch
2 tablespoons unsweetened natural cocoa powder (not Dutch processed)
1/4 teaspoon kosher salt
1 1/2 cups whole milk
1 cup (6 oz) chopped chocolate – I used a mixture of semi sweet and bittersweet
2 tablespoons unsalted butter -room temp
Fill a medium sized bowl with a lot of ice and water (once the pudding is cooked, you will place it in this bowl to stop further cooking of the pudding – and to speed up the process if you are making this all in one day). In a sturdy saucepan, whisk together the sugar, cornstarch, cocoa and salt. Gradually whisk in the milk – and mix until dry ingredients are incorporated. Add the chocolate to the mixture and over medium heat, cook the pudding – whisking constantly. The chocolate will melt first and then slowly the mixture will heat up and boil and have a nice smooth sheen to it. Remove from heat and add the butter one tablespoon at a time. The whole process should take about 6-8 minutes or so. Pour the pudding into a bowl, cover with plastic wrap so that it touches the pudding itself and place a few holes in it to let the steam escape. Place this pudding bowl in the ice bath. The pudding will need an hour in the ice bath to get it spreadable – but again, I made this in advance and put it in the refrigerator until the next day.
cake–
2 cups flour
1/3 cup unsweetened natural cocoa powder (not Dutch processed)
1 teaspoon baking powder
1 teaspoon baking soda
1 teaspoon kosher salt
2 sticks (one cup) unsalted butter, room temp
2 cups sugar
3 large eggs (room temp)
2 teaspoons vanilla extract
1 cup buttermilk (room temp)
1 cup strong brewed coffee (I used my Nespresso machine – and used espresso)
chocolate chips (to taste)
Preheat oven to 350 degrees. Butter the bottom and sides of two 9 inch round cake pans, line with parchment, butter again, and lightly dust with flour tapping out excess.
Place first five dry ingredients in a bowl, whisk, and set aside. In a mixer – with paddle attachment beat butter on medium high speed until light about 2 minutes then add sugar and continue to beat on high for another few minutes until light and fluffy. Scrape down the bowl, and mix again. Lower the speed to medium and add the eggs, one at a time until each is incorporated as well as the vanilla. Remember to scrape and scrape again, mix again.
On the lowest speed (or by hand with a spatula), add the flour mixture in 3 additions and alternate with the buttermilk in 2 additions – ending with the dry. Do not over mix. Gently pour in the coffee or espresso and again, mix until just incorporated. Divide the cake into the two pans. Now add the chocolate chips to just one of the cake pans – I like a cake with a bite and texture – so I added these to the recipe. But you must keep one cake free of chips because you later blend part of it to make the outside crumb.
Bake for about 40 minutes – but again, please check before that – and pull when cake is just cooked. Let cool for 5-10 minutes, then run a knife around the edges, invert on a rack and peel off parchment. Let cool completely. I find it is easier to cut these cake rounds horizontally if you put them in the freezer for a bit to harden – especially if you are a novice. So wrap up and freeze if you choose. Either the night before or a few hours before assembly.
Ganache–
2 cups heavy cream
3 cups semisweet chocolate chips or chopped chocolate
1/4 teaspoon salt (optional, but I like it- brings out the chocolate flavor)
Place chocolate in a bowl. Heat cream to a simmer and then pour over the chocolate and let stand for a few minutes then whisk until smooth and shiny. Let this stand at room temp for a few hours – until it thickens (you’ll need to frost the cake with it). I ended up putting it in the refrigerator and mixing every now and then to speed up the process.
Assembly–
Ok, place the frozen (or not) cake on the counter and cut each one horizontally into two slices. You can even pop back in the freezer so again they are easier to handle. Pull one of the cake layers from the pack – one with out chocolate chips – and in a food processor, gently pulse until it turns into cake crumbs. (I have a mini processor so I did it in batches.) Set crumbs aside.
Take the pudding out and mix well (especially if refrigerated overnight). Place one cake slice on a cardboard cake round (or use the base of a tart pan, or spring-form pan) and spread with half of the pudding. Repeat with the next cake layer, the other half of pudding, and top with a cake layer. Pour some ganache on top of the cake and spread it with an offset spatula or knife, and continue to spread the ganache over the sides of the cake. It doesn’t have to look pretty here…as it will be covered with crumbs! Spread and add more ganache to your liking (I like a lot!) Then let set in the fridge for about 5 minutes.
Place the crumbs on parchment or tinfoil, and holding the cake bottom in one hand, scoop up the cake crumbs (in the other hand) and press them into the cake, all around and on top – turning the cake as you go. Some crumbs will stick, some will fall, but keep going and pressing until the cake is covered. The foil below will catch the mess (well, most of it – I should warn you this will be messy).
And that is it! It seems like a lot when I write it out, but in stages it is doable and so worth the effort. Store this in the refrigerator – but pull out about an hour before you eat it to truly enjoy the tastes and flavors as it is much better and meant to be eaten at room temperature.
Oh, and btw – you will most likely have extra ganache. This will keep in the refrigerator for some time. Melt before use, and enjoy as a rich chocolate sauce over ice cream, dip a frozen banana in, or simply make a mini fondue for your family with fresh fruit as a treat.


 sides. Your custard will remain dry, covered and inside of the pan with the water. (Example on the left is a chocolate dessert, but similar idea, remember the foil though.) Bake for about 1 1/2 -2 hours. Stir after 30 minutes, then in 15 minute intervals until the filling turns a toasty caramel color and thickens. Remove from oven and hot water and let cool. Make the crust while the filling cools – or while it is baking if you have 2 ovens.


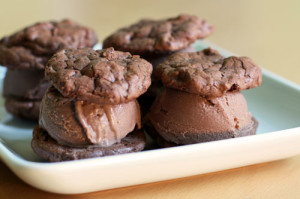 These ice cream sandwiches are delicious. My son Greg asks for them often – and since it is a little work (not crazy work) to make the ice cream, I often blow his request off. But he was very happy last night. He turned to me… gave a quiet groan of delight, looked me in the eyes and simply thanked me. My dad who really only likes Haagen Daaz choc choc chip also loves these little sandwiches. He seemed surprised that he liked them so much – especially given the milk chocolate title. But the addition of bittersweet chocolate and malt really make the ice cream special and not too sweet. The cookies are extra delicious too. A little espresso deepens the flavor and I happen to love the texture of the mini chips. And they are very easy to make. My husband Rob can’t eat/drink milk (sadly) but is very content with these brownie-like cookies alone. I am too! I’ve also made the sandwiches with chocolate sorbet which he truly appreciates. This recipe
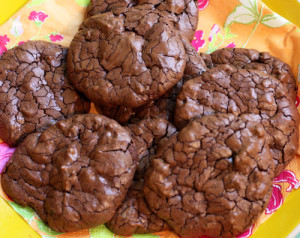 originated from Claudia Fleming – the former pastry chef of Gramercy Tavern. The cookbook is lovely. She suggests adding dried cherries to the cookies which I did (only to a quarter of the batter because my family would not be happy). And they too were yummy. Oh and by the way, you can also crumble the cookies and mix them into the ice cream which is also verrry good!