dairy free chocolate pudding ice cream

I used to kind of scoff at a non-dairy ice cream and I’m sorry about that.  (I don’t think I scoffed out loud though.)  But now that Greg is here, living with us, I’ve taken on the job of making him delicious gluten and dairy free desserts.  He is studying now for a big test so I’m on a mission to find delicious sweets for him – as it is something to look forward to at the end of the day.

Greg had told me about this vegan ice cream cafe called FoMu in Boston that he loved.  He said the ice creams were unreal and that he could safely eat so many of them.  So I bought the FoMu cookbook before the holidays (at the tail end of 2020) and surprised him with some chocolate pudding ice cream.

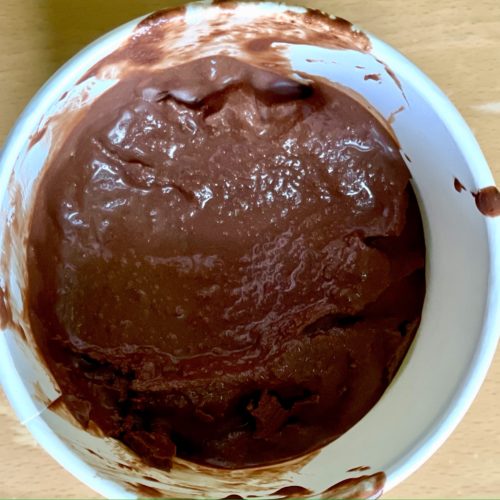
He was delighted!  And I was too.  Simple, cold, chocolatey, and smooth.  I’ve made it two more times since then as well as the vanilla which I can write about another time. 

I will say that this is best eaten a 4-6 hours after you run it through your ice cream machine.  It is soft and oh just so delicious.  Once frozen overnight it hardens (more than your ice cream) and it has to sit out a bit before you eat it.  And each day it recovers less from the thaw.  But this shouldn’t be a problem because you can eat it all right up ASAP.  Now you have an excuse to.  Also – you can freeze it it smaller portions to avoid re-thawing thawed ice cream.  You can purchase pint/quart containers easily online. 

Ingredients

  • 2.5 ounces or 70 grams premium dutch processed cocoa 
  • 2.5 cups or 600 ml coconut milk
  • 1/4 cup or 50 grams unrefined organic cane sugar (you can sub granulated sugar)
  • 1/2 cup or 120 ml agave 
  • pinch of sea salt I prefer Maldon 
  • 2 tablespoons or 30 ml espresso powder (optional) ( I used 1 of the two) 

Directions

  • In a heavy duty mixer or with an immersion blender, combing the coconut milk, cane sugar, agave and espresso (if you are using) 
  • Sift the cocoa powder into the mixture and mix again to combine well.  Add the salt and taste the ice cream base for flavor – add a tad more salt if it needs it.  Don’t skip this.  But don’t add table salt if that is all you have.
  • Run your ice cream in your machine – and store in freezer in freezer safe containers.  (Again, I buy the ice cream pint containers online).
  • Let freeze for a few hours before serving.  And let come up to room temp for a bout 10-15 minutes if it has hardened overnight.

ice cream cake

If you make a cake that falls apart, save it.
If you make a cake and it is undercooked in the middle, save the edges.
If you make a cake that isn’t fabulously moist, save.
If you make cookies or brownies that are dry, save
If you have left over meringues, save as well.

(You can freeze all of these above to make your cake at a later date…)

MAKE AN ICE CREAM CAKE.  My fave.

Great thing about ice cream cake is that you can make it from all sorts of scraps and failures and it will still taste scrumptious.  You can also make an ice cream cake with your successes.

Line a spring-form pan with plastic wrap.  I have some 6 inch spring form pans that are perfect for this.  Place the cake, or pieces of the cake (and squish together) on the bottom making one solid layer.  Now fill with some softened ice cream.  You have fun with your flavors…maybe some coffee chip and vanilla (2 different layers) or chocolate and mint.  You can then add another layer of your failure…be it cookies, brownies, more cake…what ever you want.  Add another layer or two of ice cream.  And top with more failed attempts.  If you happen to have meringues, this is nice too – to mix into the ice cream or make the top layer (eventually the bottom).

Freeze until you feel like eating or serving it.

Unmold pan and peel off the wrap.  Place bottom side up as this should be the smoothest and easier to frost.

I like to then pour layers of ganache on my cake, eventually covering the whole cake.  And then decorate (while still wet) with goodies (sprinkles, chips, anything you like!)

Pull to room temp for a 25 m before you plan to serve.

Enjoy-

ganache
3/4 cup heavy cream
6 ounces chocolate (semi, bitter or milk)

Chop chocolate.  Heat the cream until just about boils.  Pour on top of the chocolate and let sit for a minute.  Stir to combine.


oreo ice cream (not exactly homemade btw)

Growing up I was always looking for sweets to eat.  Unlike my brother who could manage his dessert quantities, I could not.  My mom took to hiding the goodies which resulted in my own secret treasure hunt when I was alone in the house.  Or picking on all the sweets that were not hidden.  The pattern wasn’t good and I was always stressed and worried while I was nibbling and foraging.   I eventually figured it out.  Eat your food first (since I didn’t back then!)  Eat breakfast.  Eat lunch.  Eat dinner.  And eat dessert if you want it but make it very GOOD.  Oh, and not too much!

With all that in mind – the rule in our house is NO CRYING or COMPLAINING while eating your treat.  And don’t eat what isn’t good enough to eat.  Place what you want in a bowl or mug and sit.  Enjoy.  The kids all do this, but Andy oreosometimes inhales his dessert – but well, he is sitting, not crying or complaining.  I just feel like it goes so fast – but I guess not my business.

IMG_7159Onto the ice cream.  I made my own (kind of) Oreo ice cream for Sylvie because I wanted her to enjoy her little mug to the max.  You get the drift.  Some brands often taste really good but have very few big chunks of cookie.  Good problem to have I know.  Some brands taste artificial.  Some brands have so many ingredients that it bums me out.  So I bought Fresh Market’s vanilla (because it has so few additives but also isn’t as rich as the haagan daaz’s and ben and jerry’s).  Turkey Hill is also good.  And I bought Oreos.  Put them together and you make the very best Oreo cookie ice cream you can have.

To make:

Very simple.  Let the ice cream sit on the counter for 10-20 minutes or so.  And/or place in microwave on defrost for a few minutes.  You want to soften it, but not melt it.

While it is chilln (well the opposite of chilling) – bag up a bunch of Oreos and place in a plastic bag.  Crunch them with the bottom of a pan, or with a rolling pin.  Or grind them in a processor.

Place the ice cream and Oreo crumbs in the mixer and with the paddle attachment – beat well.  The ice cream will soften more and start to look less vanilla-y and more Oreo cookie-like.

You can also do this by hand – but the ice cream needs to be softer and you have to get your muscles on board.

Remove ice cream and place a layer of it back in the container.  Now add big chunks of Oreo cookies (as much or as little as you personally want since this is your treat!)  And continue to layer and add.

When done.  Place the lid back on and label it 🙂

Enjoy –


peanut cookie ice cream with choc crackle

Oh Ohmygoodness.  This was fantastic.  I loved it and dinner goers did too!  Lots of oohing and ahhing.  As mentioned in the peanut cookie post, I thought ice cream would be good.  And it wasn’t good, it was GREAT.  Phenomenal.

To assemble:

I used Turkey Hill Original Vanilla.  I like their vanilla  because it isn’t too rich and made with mostly all good things.  No long list of ingredients which is nice.

To soften the ice cream, leave on the counter for a bit or place in microwave and use the defrost setting for a couple of minutes.  Keep checking the ice cream as you do not want to melt it.   In the meantime, I melt some milk chocolate (good quality pls) and cut up the cookies.

Place ice cream in the bowl of mixer and on medium speed with the paddle attachment, soften it further.  (Or you can do this with strong hands and arms.)  Add the crumbled cookies and incorporate.  Pull bowl from mixer, and drizzle the milk chocolate all over the ice cream – folding and drizzling and working quickly.

Place in a container and pop back in freezer and voila a semi-homemade ice cream that really really satisfied all my sweet needs.  I highly recommend!


chocolate ice cream milkshake

So Greg had his appendix taken out!  He didn’t eat 2 days prior to the surgery and the day after.  Already lean, I was willing to make anything for him.  Chocolate ice cream milkshake was what he wanted so off I went to find a good recipe.  This was delicious.  I actually haven’t made a milk shake before – so I have nothing to compare it to – save for the milkshakes at the diner – and they are good, but not too chocolatey.  Greg loved, Chris and Andy did too.  Chocolatey and “real” tasting were the comments.  I should mention that Greg specifically asked for premium ice cream — Greater’s Ice Cream actually.  So I put chocolate chocolate chip in and it created little specs of blended chocolate which also added to the quality of the shake.  It is not necessary – but do know that your shake will only be as good as the ice cream you put in!

chocolate ice cream milk shake (slightly adapted from food.com)

4 cups milk, cold (I used low fat milk, although full fat would have been better I bet!)
4 cups chocolate ice cream (premium if you can, choc choc chip also good as mentioned above)
1.5 teaspoon cocoa powder
2 teaspoons sugar
1/8 teaspoon kosher salt
2 teaspoons hot chocolate powder
1 cup chocolate syrup, divided (optional – and home made sauce would have been better, but I didn’t have time)

Blend milk, ice cream, chocolate powder, sugar, salt, cocoa powder in a blender.  Process until smooth.

Pour a little chocolate syrup into the bottom and sides of each glass.

Divide mixture among glasses.cover bottom and drizzling syrup in a spiral pattern inside of each glass.

Pour ice cream mixture into each glass

Swirl some chocolate syrup over each serving and serve cold.

Enjoy –

ice box zebra delight

This is a very old fashioned dessert – but it has never ever lost its appeal.  Mark said “This is slice number four…I’m going to have to ride (my bike) 100 miles tomorrow morning!”  And Mike was lamenting the absence of my ginger cookies but sang a different tune when he sampled this treat.  He said “So light, so airy, hands down the best thing you have ever made!”  This is a perfect treat for summer  –  you can make it in advance and although rich in chocolate flavor it is not too heavy.  Serve it with ice cream and you have such and easy sweet to serve.  My mom made this when we were young and I remember thinking that it must be so difficult to make.  But as usual (with me) it is not!  Well, if you decide to make thin chocolate wafer cookies on your own, then yes, this is more work.  But I happen to love the Famous Chocolate thin chocolate wafters by Nabisco that you get in that yellow box.  I do.  The recipe for this is actually on the box!!  I tweaked it a bit – making it in a cake pan so that I could invert it and coat with ganache – but you don’t have to – really up to you.  If you follow the directions on the box you simply make a zebra roll.  And that is quite good.  I’ll list the ingredients and then how I made this one – and you can play around.  Even if you throw all the cookies and whipped cream in a big bowl, and served with a spoon and some chocolate sauce and ice cream…well – that is just the same!   Enjoy this one!’

Basic recipe is first, then what I did in addition is below that.

ice box zebra delight (from the Famous Chocolate thin chocolate wafer box):

2 cups heavy cream
1 teaspoon vanilla
1 package (9 oz) Famous Chocolate Wafers
ice cream
ganache – optional

With whisk attachment beat the cream until stiff peaks form.   Towards the end, add the vanilla

Spread 1-1/2 teaspoon (I did a bit more) whipped cream onto each wafer, stack then stand on the edge on a plate.  Keep going until you finish with the cookies.  Spread the remaining cream on top and sides.

Then refrigerate for at least 4 hours.  Cut into diagonal slices to serve.

You can also freeze until firm and wrap tightly and store for up to 2 months!  Remove from freezer and place in fridge for at least an hour until you are ready to serve.

I lined a cake pan with plastic wrap – so that the sides overhang.  I placed some whipped cream down first, then i filled the bowl with the long tube that is described above — I put that in the center.  After that I just layered the cookies and the cream all around.

Once frozen, invert the pan and pull the frozen dessert out with the help of the plastic wrap.  If it is too cold, just run the bottom of the pan under hot water.  Then take your ganache (the recipe is in the blog) and pour over the concoction and cover the top and sides.  I served with both chocolate and vanilla ice cream.

Alternatively you can just drizzle ganache on top – or skip it.  You can also place all in a bowl, and scoop out with a spoon.  Again, feel free to add some chocolate sauce in there.

You cannot go wrong!

Enjoy –

ice cream cake (using a failure)

What a megaflop (Sylvie’s word)!  But no worries…you can easily turn a calamity into a triumph (again, she’s using the thesaurus).  On Sunday, Sylvie and I decided to bake together.  I directed, she executed, and we were happy with the scents and smells of rich chocolate filling the kitchen.  We were all smiles until the little brownie cakes came out the oven; we could immediately tell that they were not going to pop out nicely from their molds.  After a few failed attempts, I just gave up.  Luckily Linda, Patrick and cousins Stephen and Daniel are not too picky (well they like a good treat but didn’t mind the appearance) and happily sprinkled the chocolate mass on top of their ice cream and fruit.  I still had a lot left over today and figured I’d freeze the crumbles and throw them into my ice cream here  and there but instead decided to just make a cake with the messy leftovers.  An ice cream cake.  Use this method with any treat that doesn’t turn out well the only caveat being that the failure must actually taste good.  The variations are endless so have fun.  I kept mine fairly simple.  Enjoy –

ice cream cake:

ice cream
cake or brownies

Line a pan with plastic wrap so that it touches the bottom of the cake pan and comes up the sides as well.

Soften your ice cream.  50 seconds under defrost did the trick for me.

Scoop and smooth the ice cream into the lined pan.  Follow with your messy, failed, delicious treat then place back in the freezer.

Add another layer of softened ice cream (a different flavor is nice) and really – you can play around as much as you want.  Add more of your failure to the top (soon to be bottoms) of the cake pan.  (Use another flavor ice cream again if you choose, I only used two different ice creams.)

Freeze again.  Wrap plastic wrap around the cake.  This can sit for a while.

When ready, simple pull the cake from the plastic wrap and place on a cardboard round.  You can press jimmies, sprinkles, ground nuts, m&m’s, on the sides.  You can also make a ganache and pour over the cake as well – so that it has some nice drips around it.  You can also make whipped cream and spread all over.  Delicious.  Cut with a warm knife (run under hot water and wipe carefully with a towel).

Enjoy!

coffee brownie crackle swirl ice cream (using store bought ice cream)

I cheated with this ice cream.  I did.  Didn’t have time to make home-made but wanted something special and different.  You can really be creative at home with mix ins and ice cream.  Use your mixer to help you incorporate the extras.  I loved loved loved this treat.  Not too much coffee flavor since I swirled it with vanilla – and the addition of left over brownie edges and drizzled milk chocolate crackle was just delightful.  Truly.  Friends raved but really it was probably me who liked it the most.  Well, and Sylvie too!  Add a few caramalized bananas and some freshly whipped cream and this would be heaven in a bowl.  Enjoy –

coffee brownie crackle swirl ice cream:

one pint vanilla ice cream
one pint coffee ice cream
brownie bits (homemade is preferable)
1 cup chopped milk chocolate, melted – more or less depending on your taste.

Other ideas include: Oreos, reverse Oreos, Girl Scouts mint cookies, peanut butter cookies, peanut butter, chocolate chip cookies, chocolate chips, graham cracker chunks, grape nuts, raisins, Reeses, m&m’s…I can go on.  Just have fun.

Melt the chocolate in a metal bowl placed over an inch of simmering water.  Melt and let cool a bit.

Soften ice cream – leave out at room temp or the fridge for a bit.  Place ice cream in mixer with paddle attachment.  On the lowest speed, soften the ice cream even further.  Add the brownie bits or whatever you are mixing in and gently incorporate.

Remove from mixer.  As you scoop ice cream into the container, drizzle the melted chocolate on top.  Layer by layer add more drizzles and at the end fold a bit to incorporate all the chocolate.  Sooo good!

Enjoy!

chocolate malted sauce & milkshake

This chocolate sauce is DEE-licious.  So so good.  So easy to make.  Milk chocolate and Ovaltine make this special and different from your regular hot fudge sauce.  It is not too thick and no – not too sweet despite the fact that it is milk chocolate.  I promise. Try it next time you are serving ice cream, pound cakes or profiteroles.  Yum!

I haven’t yet made the very easy looking malted milk-chocolate milk shake, but the author’s of Baked provide a great looking and easy recipe that I will post at the bottom of this one.

chocolate malted sauce (from Baked: New Frontiers in Baking by Matt Lewis and Renato Poliafito)

2/3 cup heavy cream
1/3 cup light corn syrup
1/4 cup chocolate malt Ovaltine
1/4 firmly packed light brown sugar
1/2 teaspoon kosher salt
6 oz. good quality milk chocolate (coarsely chopped)
2 Tablespoons unsalted butter
1 teaspoon vanilla

In a large saucepan mix together the cream, corn syrup, Ovaltine, brown sugar, salt and 4 oz. of the chopped milk chocolate (reserve 2 oz.).  Bring mixture to a boil over medium heat and stir until smooth and the chocolate melts.  Reduce the heat to a simmer and stirring slowly, cook the mixture for about 5 minutes.

Remove from heat and stir in the butter, vanilla and the remaining 2 oz. of chocolate.  Let the sauce cool for at least 5 minutes before you serve.

Store leftovers in the fridge (once cool) – the sauce will keep for about 5 days.  Reheat in micro or over low heat on the stove.

malted milk shake:

Blend together 2 large scoops of ice cream with 2 tablespoons malted milk chocolate sauce (from above)  and 1/2 cup milk until smooth.  Pour into a chilled glass and drizzle one more tablespoon of sauce on top.  Enjoy-

pomegranate grapefruit sorbet

Refreshingly cool.  The first bite is pomegranate, lemon and a little lime; the aftertaste is grapefruit.  YUM.  I love this.  I grew up eating tons of pomegranates and tons of grapefruit – so together in this light dessert, well…happiness!  Greg and Andy liked this a lot too.  Sadly, Rob is not a grapefruit guy – so he liked it until the aftertaste.  Oh well.  I didn’t really share this because I’m kind of hoarding it.  However, if I had a dinner party coming up I’d make meringue shells and pop these in for a pretty, tasty summer sweet.  Alternatively, a half ounce of vodka might be super on this sorbet in a little dish with fresh pomegranate seeds and grapefruit segments. I’m having neither so I’ll just eat plain (although the vodka sounds good this second…hmmm maybe later!)  The POM people were kind enough to send me a case of their juice – which was such a treat both mentally (nice that they like my blog) and physically (well, it is good!)  Last year I made pomegranate sorbet but without grapefruit or citrus notes and that too was good with just juice and a simple syrup.  You can try that if you’re not in love with the added grapefruit.  It was back to Sally Sampson for this recipe – I loved her Recipe of the Week-Cookies, so I purchased her Ice Cream of the Week book which is filled with a lot of awesome looking frozen treats.  Many more to come…Enjoy!

pomegranate grapefruit sorbet (adapted from Recipe of the Week-Ice Cream by Sally Sampson):

3 cups pomegranate juice
1 cup freshly squeezed grapefruit juice (don’t bother if using from a carton), strained
1/3 cup sugar
1 tablespoon lemon juice
1 tablespoon lime juice
pinch kosher salt

Mix together the pomegranate juice, grapefruit juice , sugar, lemon, and lime juice.

Heat until sugar has melted.  You do not need to boil.

Refrigerate until cold – several hours or overnight.

Season with a pinch (or 2) of kosher salt  – taste it.

Run in your ice cream machine.

Enjoy!