
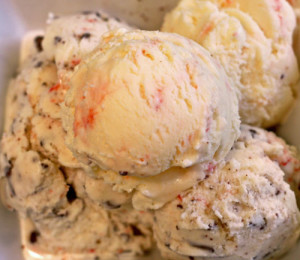
 So if you read this regularly you know that for dessert I generally eat a small amount of ice cream later in the evening in one of my little mugs. Magic in a mug. My little baby magic mugs (given to Greg when he was a baby) are pictured today. Time to share. Now it can’t be any old ice cream. I need mix-ins… brownie bits, cake scraps, chips, jimmies, m & m’s, chocolate flakes… something has to be in there with the ice cream (and the more the better!) I was thinking about a flavor to go with my devils food cake and thought Oreo chocolate drizzle would be decadent and delicious (it was). But I also wanted something for my non-chocolate loving friends (Jason!) as well. So I made a big batch of vanilla ice cream
 (which is really truly the perfect accompaniment to the devils cake) and converted some into Oreo chocolate drizzle and some into a white chocolate graham cracker flavor. Heaven to me. Seriously heaven. Both. Be as creative as you like (you can even buy vanilla ice cream and add the mix ins – doesn’t have to be home-made.) Normally I might not use a vanilla base to make the Oreo – I might use a base with out vanilla (a sweet cream) – but hey – it worked. The vanilla was beautiful with the grahams and white chocolate. Mmm…mmm…mm! The recipe below is for vanilla with directions following for these particular mix ins. Have fun!
vanilla ice cream:
6 large egg yolks (save your whites for meringues or a panna cotta)
1/2 cup sugar (skant)
1/2 teaspoon kosher salt
1 1/2 cups whole milk
2 1/2 cups heavy cream
1 vanilla bean, halved lengthwise and seeds scraped (look to bottom of fruit soup recipe to see a visual)
mix ins–
Oreo cookies coarsely smashed
semisweet chocolate (melted and cooled a bit)
graham crackers coarsely smooshed
white chocolate (melted and cooled a bit)
Prepare an ice bath – a big bowl with ice and water. In it, place another container or bowl with a strainer. This is where the vanilla ice cream base will land once cooked.
In a medium heavy weight saucepan mix the cream, milk, half of the sugar and the vanilla seeds and the scraped pod. Bring until almost a simmer…but do not boil.
In medium sized bowl, place the egg yolks, the other half of sugar, and salt and whisk well.
Slowly very slowly ladle the hot liquid into the eggs and whisk well after each addition. Keep adding the hot liquid until you’ve added it all to the eggs (again slowly so as not to cook the eggs).
Pour the whole mixture back into the saucepan and cook, over medium low heat stirring constantly with a wooden spoon until it thickens slightly (reaches 175 degrees) and lightly coats the back of the spoon. Watch this and constantly stir with your spoon so that you do not scramble the eggs.
As soon as thickened, immediately remove from heat strain the mixture into the prepared bowl. Make sure you use your wooden spoon to squish and smoosh all the vanilla through the strainer and also all the goodness from the pod. Let mixture cool in ice bath until it reaches room temp, then place in the refrigerator overnight (or at least 4 hours).
The next day (or 4 hours later), make sure your chocolate is melted and cooled and your Oreos or grahams are crunched. Or…just leave as plain vanilla. Churn the ice cream and when done in the ice cream maker, add your Oreos or grahams to the machine to incorporate thoroughly.
As you spoon the ice cream into the freezer container – drizzle the ice cream with the melted chocolate, layer by layer. The drizzle will harden immediately. Try to wiggle your spoon around to make some small drizzles and also you can make bigger ones so that you get some big bites of chocolate later. Work fast because the ice cream melts. When you have enough (to your taste) – just cover with plastic and the lid and pop in the freezer.
Place the ice cream in the freezer and oh, although soft, this is delicious the same day (A few hours later). The ice cream will be hard the following day and thereafter so let sit in the refrigerator for 20 minutes to soften before you serve or on the counter for about 1o.
Find a little mug (or a big bowl!) and enjoy 🙂
Enjoy!


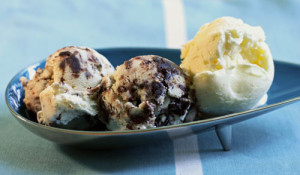
 This is my old friend Dani’s all time favorite. We were lucky growing up – in that both of our families went to Vermont during the winter weekends. Dani from NJ, me originally from MA, these were very special times. But oh, it wasn’t just me and “Eight is Enough” that made her smile – it was the holiday season – and Friendly’s featured Peppermint Stick ice cream – her absolute fave! She requested it a few years ago – maybe for the birth of a baby or a different event (my memory is really fading, sadly) but needless to say she was thrilled. I think I dipped Oreos in chocolate and then crunched them into the peppermint stick. Wow. A friend just mentioned that Trader Joes sells a peppermint version of an Oreo that sounds perfect. Anyway, this ice cream is really very good. I made half just peppermint and the other half with ground bittersweet chocolate. I love that one. Greg loves the pure peppermint and he’s lucky because no one else in our family will eat it, and Dani is still over that bridge! Enjoy this – it is nice for the holidays and although rich, it is quite refreshing.
 OK, so you’ve seen this photo when I wrote about the
 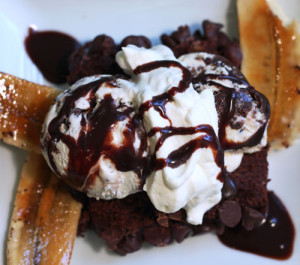 I love coffee – coffee with milk and sugar. This ice cream is just that – but cold. (There is coffee ice cream hiding in this photo.) The ice cream has a great mellow coffee taste that is perfect. In addition, for those of you who don’t want to go through the trouble and time to make a custard (or egg based) ice cream – Philadelphia style ice cream is just right for you. This recipe is quick and easy to make – although I should mention that it is less rich and smooth as its’ custard based counterpart. With all ice cream – but especially Philadelphia style, it is best to really let it soften in the refrigerator 20 minutes before you eat for the best flavor and consistency – unless you eat right after you churn it which is when it is the best. I added melted chocolate to some of the frozen ice cream which gives it another dimension and bite (which I happen to need). I used this ice cream and the espresso brownie ice cream in the above sundae with carmalized bananas, fresh whipped cream and the glazed nutty brownie. Amazing. Have fun – make it Mexican by adding a 1/2 teaspoon cinnamon (with the coffee beans), or add other mix-ins try Oreos or chocolate covered nuts. Yum. Next time. This ice cream also pairs well with the
 Home-made vanilla ice cream is sooo very good. The vanilla beans, cream and milk freshly churned make for an extra special treat. Vanilla ice cream pairs well with most desserts – cookies, crisps, cobblers and pies…with chocolate cake, loaf cakes, brownies and fruits – it is one of my favorite things! (My family is really very tired of hearing me exclaim…”that would be so good with vanilla ice cream!”) But it is true. It is a staple. I cut
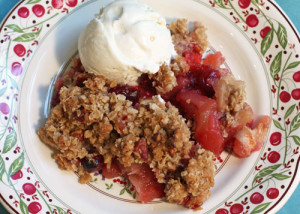 the espresso brownies into little pieces and added some to half of the ice cream and turned it into an espresso brownie swirl (photo above). Really good. And to right is the ice cream with apple cranberry crisp. Really completes the dessert. For a new ice cream mix-in, try Grape Nuts cereal and raisins…I had a version of this at Toscanini’s (my favorite ice cream parlor in Cambridge, MA) many many years ago (and I’m so happy that I can remember). I don’t even love Grape Nuts, or raisins, but together in vanilla ice cream…wow (seriously).
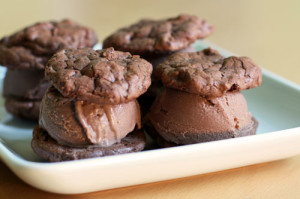 These ice cream sandwiches are delicious. My son Greg asks for them often – and since it is a little work (not crazy work) to make the ice cream, I often blow his request off. But he was very happy last night. He turned to me… gave a quiet groan of delight, looked me in the eyes and simply thanked me. My dad who really only likes Haagen Daaz choc choc chip also loves these little sandwiches. He seemed surprised that he liked them so much – especially given the milk chocolate title. But the addition of bittersweet chocolate and malt really make the ice cream special and not too sweet. The cookies are extra delicious too. A little espresso deepens the flavor and I happen to love the texture of the mini chips. And they are very easy to make. My husband Rob can’t eat/drink milk (sadly) but is very content with these brownie-like cookies alone. I am too! I’ve also made the sandwiches with chocolate sorbet which he truly appreciates. This recipe
 originated from Claudia Fleming – the former pastry chef of Gramercy Tavern. The cookbook is lovely. She suggests adding dried cherries to the cookies which I did (only to a quarter of the batter because my family would not be happy). And they too were yummy. Oh and by the way, you can also crumble the cookies and mix them into the ice cream which is also verrry good!