honey sriracha roasted salmon

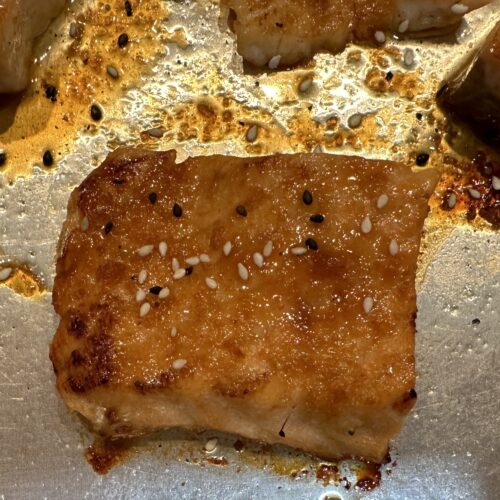
This simple 20 minute recipe gets its flavor from delicious oven broiled salmon, fresh crisp marinated cucumbers and from a delightful sprinkling of furikake (a dried mixed seasoning made from sesame seeds, seaweed flakes, salt and sugar). 

I love this recipe and all the flavors – sweet honey, spicy sriracha, tart rice vinegar, and warm sesame oil – the hot salmon with the cold veggies – that is a successful theme for me.  

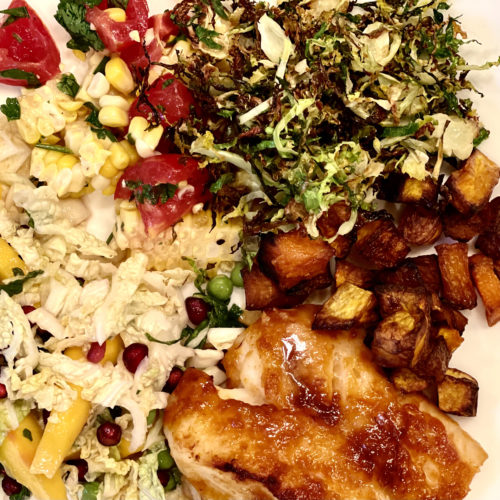
Gina Homolka – the author of all the Skinny Taste cookbooks and blog recommends making this as a bowl – customizing as you see fit.  I kept it very simple but you can add rice or other grains, edamame, tomato, avocado, shaved carrots chopped peppers etc.  

I love all of her recipes and have several of her cookbooks. I just wish it wasn’t called Skinny Taste – only because well the recipes are just good – not only good if you are on a diet.  Gina provides the nutritional value of every recipe which is amazing.  I tend to add more oil than she does – or more cheese and often I double the sauce when I’m cooking from her recipes but easy to stick to the recipe esp if trying to lose a little weight. 

You can find the recipe recipe here.  Just take note of my thoughts below:

I use 1/2 the sriracha the recipe calls for.  I’m a weakling when it comes to spicy food.  You can always add some sriracha at service – let your family or friends take control of their spice level.

Your salmon will cook faster if it is thinner.  Don’t rely on prescribed cooking times.  Peek at the fish – cut a cube in half and remember that it will continue to cook as it sits on the counter after cooking.  Rob likes his cooked through so I gave him all the thin slices and I like mine medium.  We were both happy. 

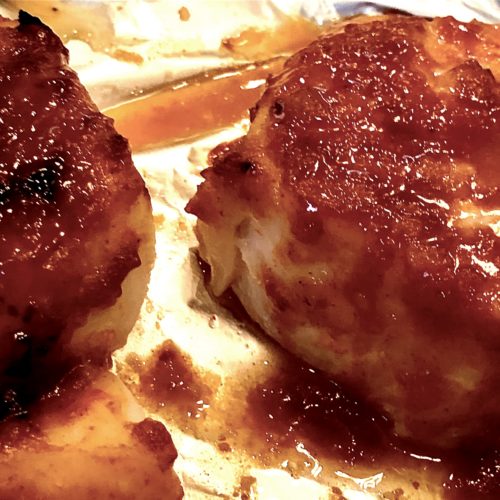
Double the sauce – if you are like me saucy and tasty are the key to making a yummy salmon bowl.  And baste twice!  Not an order of course – you get to do what YOU like!

Enjoy – 

Oh, this is delicious for lunch the next day. 

miso glazed spicy honey cod (20 minutes at most)

My mother must have exclaimed 23 times throughout the meal that “Lisi, this is DELICICIOUS, seriously Lisi, delicious.”  And then about 3 minutes later “this is my kind of taste, Lisi, this is so good!”  And then, “Lisi, I need the recipe – please don’t forget to send me the recipe!”  And so on…  It was hard to actually have a conversation!  But I was delighted that she loved it so as she is one tough critic and a terrific cook.  Oh and my dad liked it too!  I made it again for friends Geoff and Nora and they too said delicious – repeating it only (ha) about 3 times.  

I can’t say I did anything but follow the recipe so it is really the blogger of Foodie with Family who deserves the credit.   The hardest part is to make sure you cook the fish to just right.  Undercooked cod is a real turnoff and overcooked can feel dry (although I honestly don’t mind it).  Other than that it’s a breeze to make.  

The recipe calls for white miso and gochujang which you can now find at most supermarkets – and also online.  If you hit the link for Foodie with Family (above), Rebecca provides resources to find.  After you open, refrigerate and both keep for a long time.  

If you are someone who likes things saucy then double the sauce – I did one of the times and really coated it.  I prefer it that way…but if you like a normal coating then cook with the amount below.

I served this with a delicious napa cabbage/mango/mint/pomegranate slaw that I will write up next.  And also a variety of roasted veggies that I had on hand.  This would also be great with rice, steamed broccoli, and toasted sesame seeds.   

Ingredients

  • 4 cod filets – 5-7 ounces 
  • 2 tablespoons mild honey
  • 1 1/2 tablespoons rice vinegar
  • 1/2 tablespoon gochujang (more to taste – I’m not the spiciest person so add more for more!)
  • 1 tablespoon white miso paste
  • 1 teaspoon soy sauce (or coconut aminos if gluten free)
  • 1-2 garlic cloves, peeled and minced
  • 2 teaspoons grated fresh ginger
  • 1 teaspoon toasted sesame oil
 

Directions

Mix together all of the ingredients and measure out about 2 tablespoons of the sauce.  Brush or use a spoon to coat the cod with the two tablespoons.

  • Set your oven to broil and broil the fish (about 8 inches from heat source) for about 4-5 minutes.  It should look bubbly and a little charred.
  • Change the oven setting to bake 375.  Brush, spoon, pour the rest of the sauce on each filet.  Place in the oven and cook until opaque and easily flaked with a fork.  This can take 5-10 minutes depending on the thickness of your fish.
  • Not in the recipe – but I finished it again for a minute under broil.  I just like that look and taste.
  • You do what you prefer!
  • Sprinkle with sesame seeds or scallions if you like.  
Enjoy – 

snickerdoodles (dairy free, gluten free, no refined sugar)

I’ve made these gems a few times this winter.  I really liked them – the texture and taste.  I crumbed into my vanilla ice cream and it was true bliss.  Andy ate them too – and even vied for them (as they were made really with Greg in mind) which is pretty amazing too.  His friend Steve who is gluten free and Gabi my vegan hair colorist both gave a big thumbs up.  But most importantly, Greg loved them.  He went back to Boston with a little box full and he looked so happy about it.  It was nice to see that smile (for sweets) on my 24 year old as It is hard to bake for Greg given his restrictions (GF, DF).   I found this recipe in Bakerita:100 + No-Fuss Gluten-Free, Dairy-Free, and Refined Sugar-Free Recipes for the Modern Baker by Rachel Conners.  I followed the recipe – although the second time I made them I used refined sugar in the cinnamon sugar blend that you roll the cookies in.  The coconut sugar was fine but the real sugar better – but do what makes you happy.

These are so easy to throw together – but you will probably need to go to the store and get a few things – although if you have food restrictions you may have some of the ingredients already in your pantry.  

Take out your kitchen scale if you have one as Rachel gives us the weighted measurements!

I baked some of these right away and I left some dough in the fridge to bake off as needed.  Fresh baked warm snickerdoodles…well, yum.

Enjoy-

Ingredients

  • 1 3/4 cup (168 g) blanched almond flour
  • 1/4 cup (32 g) coconut flour
  • 1/2 teaspoon baking soda
  • 1/2 teaspoon cream of tartar
  • 1/2 teaspoon salt
  • 1/2 teaspoon cinnamon
  • 1/3 refined coconut oil (67 g), melted
  • 1/3 cup (113 g) maple syrup
  • 1 tablespoon pure vanilla extract 

    TOPPING
  • 1/4 cup coconut sugar (or regular refined sugar)
  • 1 tablespoon cinnamon 

Directions

Preheat oven to 350 degrees and line sheet pan(s) with parchment. 

Whisk together the two flours, the baking soda, cream of tartar, salt and cinnamon.

Melt the coconut oil and mix in the maple syrup and vanilla extract

Mix the wet and the dry until thoroughly combined. 

Prepare the topping by mixing the two ingredients.

With a cookie scoop or spoon, form your cookies.  Roll in your hands a bit then roll around in the topping.  The cookies are delicate so be a bit careful.  I like a lot of sugar and cinnamon so I kind of pressed them into the topping to really coat the cookie.

The size of the cookie depends on you.   Rachel measures about a tablespoon of dough.  You can do that, or smaller if you like.  It will change the baking time a bit (the smaller the cookie the less time to bake).

Place cookies on sheet pan about 2 inches apart (they don’t really spread).  And then flatten a tad with your palm.  

The larger cookie bakes for about 10 minutes.  Mine took a bit longer.  I will say that it is hard to tell when these are done.  You want them to be a nice golden color.  

I decided to use one cookie as a tester and also checked the bottom for clues.  The hard part is that these cookies crumble fairly easily so that tester cookie, although still edible, will likely fall apart.  Anyway, the bottom should look a nice golden brown too.  Try not to overtake though.  This is the trickiest part of making these – trial and error will help.  I hope you like them! 


butterscotch brownie bars

The title in the NY Times said “These Brownies are as sweet as candy” –  chewy, salty and run through with brown butter…   Well, come on, how could I not make them.  My mom sent me the recipe oh, I don’t know maybe 6 different times.  And I had already clipped it. 

I love these.  LOVE.  They are not for everyone because they are definitely on the sweet side.  I made them this summer for a hospital near by and I was told that they were a hit.  They are incredibly easy and use only one bowl so they are ideal for bulk baking.  Additionally they freeze well.  The brownies can be made with or without chocolate chips and with or without nuts – but to me pecans and chocolate are ideal.  There are choices too of vanilla, coffee or rum -and for me coffee hit the spot but you get to pick.  

As mentioned – I found this in the NewYork Times and created by Melissa Clark.  

Have a good time – 

Ingredients

  • 1 cup melted butter (2 sticks) 
  • 1 1 pound box of dark brown sugar (or about 2 1/4 packed cups)
  • 2 large eggs 
  • 2 tablespoons vanilla extract (or a shot of bourbon or espresso)
  • I used espresso – and like that it tamed the sweetness a bit
  • 1/2 teaspoon kosher salt
  • 2 teaspoons baking powder
  • 2 cups (255 grams) all purpose flour
  • optional 1 cup or so chocolate chips
  • optional 1 cup nuts – I used pecans – delicious

Directions

Preheat oven to 350 degrees.  Grease or better yet  foil a 9×9 pan or 9×13 pan. Let the foil have a nice overhang so you can use it to pull the brownies out of the pan.  

  • Put  the brown sugar in a medium sized mixing bowl.
  • Melt the butter in a saucepan and let it bubble and sizzle away until you notice that it gets quiet – at this point it should start to brown, you can swirl your pan around to see the color and allow the butter to brown more easily.  The butter should look amber – or a golden brown.
  • Immediately pour the butter onto the brown sugar.  Whisk until smooth, then let the mixture cool for a few minutes before you add the eggs.  You don’t want to curdle the eggs –
  • Whisk in the eggs and the vanilla extract (or bourbon or espresso) 
  • Add the dry ingredients to the bowl sprinkling the salt and baking powder as you add it – add the flour then gently mix to incorporate.
  • Fold in optional chips and nuts and pour into baking pan.  Sprinkle if you like with a little sea salt – Melissa Clark does this – I didn’t – but do what you like and what suits your taste.
  • Bake until the top is firm and a toothpick inserted in the center comes out without any wet batter clinging to it.
  • In a 9×9 pan this can take 25-35 minutes.  Larger pan 20-30 m.
  • Let rest in the pan and if you used foil you can lift out by the foil overhang and cut and enjoy.  These freeze really well! 
  • I hope you like them!!

blueberry pancakes (one bowl, healthy)

Andy learned how to cook last year- how to make dinner for himself – and breakfast – and well he is pretty good!  Being home however, brings out the little boy in him – pleading (well truly just asking now that he is 21) for me to make him waffles.  At the start of the pandemic with all the kids home I was eager and excited to cook for them.  As time passed, the morning waffles became a bit tiring especially because Andy knows how to make them – and dinners are a handful because of Greg’s dietary needs and Andy eating a ton and everyone wanting leftovers!  Recently though he asked me to please make him blueberry pancakes (he has moved on from chocolate chip).  I have many old recipes in the blog – but I’m always searching for the next best recipe.  Be it brownies, chocolate chip cookies or pancakes – it is a never ending endeavor.  I succeeded I think – I found this recipe from the blog Amy’s Healthy Baking (I fiddled with it a bit) and I have to report that they might be the best to date.  Oh and don’t skip the vinegar.  I know it seems weird but I promise you cannot taste it.  And please don’t compare these to buttery, white flour, decadent pancakes.

For measuring flour it is best to use a small digital scale.  Jamie from My Baking Addiction gives a really thorough tutorial on how to measure flour with a measuring cup – and how that this specific measurement can make or break your cookies (in this case pancakes!) 

Sylvie said “delicious, truly good mom” and Sarah (Greg’s girlfriend) said “I’m really full but I wan’t more – these are REALLY good!”  And Andy said “They are fire”.  So there you have it.  Bake and enjoy – 

Oh, I usually double the recipe – esp if I have a crowd.

20 small pancakes

Prep time: 5 minutes

Easy

ingredients

  • 1 tablespoon unsalted butter, melted 
  • 1 large egg
  • 1.5 teaspoons vanilla extract
  • 1 teaspoon maple syrup
  • 1/4 teaspoon salt
  • 1/4 cup (60 g) plain nonfat greek yogurt 
  • 2 tablespoons milk (I used 1 percent)
  • 1/4 cup water
  • 1 cup plus 2 tablespoons (135 grams) white whole wheat flour (or half whole wheat and half white) 
  • 1 teaspoon baking soda
  • 1/2 teaspoon baking powder
  • 1 cup fresh blueberries

Directions

Melt the butter.  And in a medium bowl, whisk together the butter, egg, vanilla, maple syrup, and salt.

Stir in the Greek yogurt and mix until there are no lumps.  Stir in the vinegar and then the milk and water. 

Pour the flour evenly over the patter and sprinkle the baking soda and baking powder on top.  Stir until just incorporated and fold in the blueberries.

I use my griddle to cook these – and they work fine with or without butter.  You can also use a non stick pan.  You really can make any size you want so have some fun!

If you look at Amy’s Healthy Blog blueberry pancake post  she gives a lot of advice regarding substitutions for special diets.  So check that out too.

banana bread (gluten-free and DELICIOUS)

This banana bread is really very good.  Seriously good.  For real.  Andy was home from school today, studying in his room and started texting me…What are you making! Smells so good!  I informed him that I made the banana bread again, but in muffin form.  Down he came and quickly gobbled up two and oh, BTW, he isn’t even gluten-free (and is a harsh critic).  You will not miss the gluten in this recipe.  Full of banana flavor, a delicious rich tasting crumb – and some extra chocolate chips, well, good good good!  Found myself muttering the good, good good as I tasted and sampled over and over again.

This recipe is from the book Purely Elizabeth and I just LOVE it.  I really do.  Elizabeth promised that you wouldn’t miss your old banana bread, and she is correct.  You do need to get a few special items from your grocery store or from Amazon.  If you are gluten free, I assume you have most of this in the house.  And even if you are not – I urge you to try.

Also – the first time I made this I baked in a loaf pan and it was really delicious – but I felt I needed more control on how cooked the middle was and so tried in muffin tins.  I liked both.  Next time though, I think I would pour most of the batter into the loaf pan, but hold a little back and bake the remaining in a mini loaf tin or make a few muffin shapes on the side.  Cooking time will be affected with all of the different shapes.

Oh, you want to wait for your bananas to be overripe – with dark spots on the skin.

banana bread (from Purely Elizabeth by Elizabeth Stein):

cinnamon sugar (2 T of coconut sugar for every 1 tsp of cinnamon)
1 cup coconut sugar
1/2 cup almond flour
1/2 cup millet flour
1/2 cup brown rice flour
1/2 teaspoon cinnamon
1 teaspoon baking soda
3 very ripe bananas
1/3 cup coconut oil (just melt this if in solid form)
2 large eggs
1 teaspoon vanilla extract
1/3 cup walnuts (I didn’t add because my family doesn’t love)
1/2 cup chocolate chips (I added a cup!  I did, but do what you want)

Preheat the oven to 350 degrees.  Use and oil spray or coconut oil to grease the loaf pan.  Sprinkle the cinnamon sugar to coat the bottom and sides and set aside.

In a large bowl, stir together the coconut sugar, almond flour, millet flour, brown rice flour, cinnamon, and baking soda.  In a separate bowl (or in electric mixer) beat together the bananas, oil, eggs and vanilla until smooth.

Pour the wet into the dry (or if using your mixer you can put the dry into the wet) and stir until combined.  Add the chocolate and walnuts (if using).  Pour into pans – loaf, muffin, mini…and bake until done.  If you put all the batter into a loaf pan, Elizabeth says 45-50 minutes.  If you make the loaf pan less full as I mentioned above, baking time will be lower.  And muffin tins, much lower.  You want the top to spring back gently when touched.

Yum.  Enjoy –


andy’s favorite vanilla cake (of the three…)

Ok, so nice response from all you vanilla fans out there.  I too happen to love vanilla – and as I get older I think I enjoy it even more than chocolate.  Strange.  You go from loving certain things as a child, and it all changes so much as we age.  I now like gorgonzola, olives, pistachios and port.  Who knew such changes were to come.  Anyway, back to vanilla.  So Andy liked this cake.  It is very moist.  Very flavorful.  Now that I think about it, it was Greg’s favorite too.  Came home for break for a minute (or so it felt) and agreed with Andy.  I made a simple glaze with IMG_8943confectioners sugar, milk, vanilla and a dash of kosher salt and it was perfect.

As suggested before, please weigh your flour.  Try it.  So many write in saying their cakes are dry – this is probably why.  Just check it out here.

I got this recipe from Joy The Baker.  She has a great blog and book now (I think) and her write up is perfect and I made no changes.  She frosted hers with chocolate buttercream – so try that too if you like.

everybody’s birthday cake:

Joy The Baker 


classic vanilla pound cake

For Andy’s birthday, I made three vanilla cakes.  A classic pound cake, a vanilla birthday cake and an updated (or fluffier) pound cake.  I loved them all.  All.  Andy liked the vanilla birthday cake which I’ll write about another time.  This pound cake though is classic in its dense crumb and solid mass.  Easy to make and great really for any occasion.  Dress it up with berries and whipped cream or serve it plain.  It is sure to delight.

classic vanilla pound cake (from Rose Levy Beranbaum’s The Cake Bible):

3 tablespoons room temp milk
half of a vanilla bean
3 eggs
1 1/2 teaspoons vanilla extract
1 1/2 cups sifted cake flour (or 5.25 ounces if you have a scale)
3/4 cup sugar (or 5.25 ounces)
3/4 teaspoon baking powder
1/2 teaspoon kosher salt (use half if using table salt)
13 tablespoons unsalted butter, softened

Preheat oven to 350 degrees.  Line a 8×4 loaf pan with parchment and grease.  Or us a 6 cup tube or bundt pan – make sure you grease and flour.

Heat the milk with the seeds of the vanilla bean.  Scald.  Then let cool.

Combine the milk, eggs and vanilla extract.

In the mixer with paddle attachment, combine the dry ingredients and mix for 30 seconds.

On the lowest speed, add the butter and half of the egg mixture…once the ingredients are moistened increase to medium and beat for about a minute.   Add the rest of the egg mixture in 2 batches and beat for 20 seconds after each addition.  Scrape down the bowl, and mix again.

Scoop batter into prepared pan and bake until done.  Toothpick should come out JUST clean.  This time will vary based on your pan but up to an hour – but please, as usual, check before and often.  After about 30 minutes, lay some tin foil on top of the cake to prevent a too brown cake.

It should split up the middle btw.  And if not, that is ok too!

I made a simple glaze by mixing confectioners sugar and milk and a dash of vanilla.  Yum.


oatmeal raisin cookie

Oh so good.  So good!   Back in the early 90’s I worked very close to City Bakery.  I would go there and eat something super healthy and yummy for lunch (on rare occasions because I couldn’t really afford to go there) – and after, I would splurge on a crazy delicious cookies.  And even though I wouldn’t pick oatmeal raisin first, these can tempt.  Andy loves these – and so did Sylvie’s friend Grace.  Gave the rest away!  Enjoy –

city bakery’s oatmeal raisin cookies (very slightly adapted from One Sweet Cookie: Celebrated Chefs Share Favorite Recipes by Tracey Zabar and Ellen Silverman):

I should note that Maury Rubin (who created these) uses all organic ingredients.  Also that these are best if you refrigerate the dough for at least 6 hours before you bake them.

1 and 1/2 cups all purpose flour
1 teaspoon baking soda
1/2 teaspoon kosher salt (use half if using table salt)
2 and 2/3 cups rolled oats
8 ounces (2 sticks) unsalted butter, softened at room temp
3/4 cup sugar
1 cup plus 1 tablespoon packed light brown sugar
1 large egg
1/3 cup dark chocolate chips (I happen to like milk chocolate here, but many prefer dark or semi)
2/3 cup raisins

In a medium bowl, combing the flour, baking soda, salt, and oats and set aside.

With the paddle attachment of a stand mixer (or handheld beaters) cream the butter until lighter and fluffy.  Add the sugar and beat on medium speed for 2-3 minutes.  Add the brown sugar and mix.  Then the egg and mix again.  Scrape down the sides of the bowl.

On the lowest speed, add about half of the dry ingredients.  Then the other and mix until almost incorporated.  Add the chips and raisins and mix just a tad.

Place the dough in the fridge for 6 hours or longer.  You can place in a bowl and cover, then use a cookie scoop to scoop the batter on to the pan.

Or, like me, you can make the dough into logs – so you can slice and bake.  Click here to see instructions on this.

Remove dough from fridge and let come to room temp for 20 minutes.  Or alternatively, you can slice and bake right out of the fridge – just adjust baking time.  They will take longer to bake the colder they are.  Makes sense.

Preheat oven to 350.  Maury made these really big.  2 tablespoons or so.  You can do what you want.  Place scooped or cut dough on lined baking sheets.  Bake 9 -14 minutes (keep checking) until golden brown.

Let cool and enjoy.


holiday brownies

So my mom texted this AM, asking which brownie recipe to make for my dad because he needs to put on weight.  I immediately thought of these goodies.  Looking at the blog, I realize that I had yet to finish the write up.  And when I looked closer at my draft, I realized that my parents actually tried and like them when they were here last.  Kind of funny.

Rob said these are the BEST brownies to date.  This is an extremely compelling reason to try them because Rob is a tough crowd.  And yes, I know there is no crowd in one, but he can feel like a crowd with his chocolate thoughts and opinions.  Andy, Sylvie, my mom, my dad – whoever came by that week truly enjoyed.  These are chewy and chocolatey, and not as rich as my regular fudge brownies.  The brownies have a lovely sheen on top and yummy crisp edges.  It’s a really good brownie.  I called them holiday brownies only because I’m embarrassed to write “brownies again” 🙂  Try them!

I love this cookbook btw – it is filled with terrific, thoughtful, healthy and quick dinner recipes and a few dessert goodies at the end — this being one of them.

holiday brownies (from The Mom 100 Cookbook by Katie Workman) 

1 cup (2 sticks) unsalted butter
3 ounces unsweetened chocolate|
1/2 cup unsweetened dutch processed cocoa powder
2 1/2 cups sugar
1/2 teaspoon kosher salt (if using table salt, cut in half)
1 tablespoon vanilla extract
3 large eggs
1 1/2 cups all-purpose flour
chocolate chips (optional)
toasted nuts (optional)

Preheat the oven to 350 degrees.  Line a 13×9 inch baking pan with foil or parchment or use butter or cooking spray.

Place the butter in a medium sauce pan and over low heat, start to melt it.  Add the unsweetened chocolate by placing on top of the butter and slowly melt the two together.  Do not burn the chocolate or cook it.  If you are too worried doing it this way,  just use a double boiler or a makeshift one (metal bowl on top of a saucepan with an inch of barely simmering water).

Stir in the cocoa powder, sugar, and salt.  Then blend in the vanilla.  Beat in the eggs, one at a time and stir quickly after each one is added.  Then beat again once all incorporated.  Fold in the flour and chocolate chips and nuts if using.  I used chocolate chips.  I always do.  I usually use a darker semi sweet or a bitter-sweet (esp for Rob).

Bake for about 24-30 minutes…check them after 20 minutes.  Bake until the edges start to pull from the sides a tad, and a toothpick comes out just clean.

Let cool and enjoy!