
So John said they are better than the box!!! Success-
Same recipe as yesterday…but got my taster here for the true test…
Happy New Year!
So John said they are better than the box!!! Success-
Same recipe as yesterday…but got my taster here for the true test…
Happy New Year!
Yummy yummy yum! I’m so happy these came out great the second time I made them. Andy, Sylvie and Rob fight over these little guys and I love it because they are filled with goodness. No flour, no dairy, low sugar, and packed with protein these are perfect if you (or your family or guests) suffer from Celiacs Disease or have gluten or lactose sensitivities. Regardless, they are a hit with us and so healthy that I’m ridiculously happy to make them over and over again. The first time I made these they had a pretty bad aftertaste and John my gluten free tester commented that they were fine but his mom’s gluten free pancakes from the box were better. Well, that was tough to hear and a blow to my ego so I tried again this time using fresh almond meal (I think the first one was probably rancid – gross, I know!) And I used agave nectar as recommended in the recipe and well, they were much much better. Well, really tasty! I made these with added cinnamon and tried one with raspberries which were actually the best. I imagine blueberries would be delicious too. But as usual, the kids like them with chocolate chips most.
Best to buy agave nectar in bulk from the health food store or online. Amazon makes it easy. You can find arrowroot powder at the supermarket but also great to buy in bulk at Penzeys.com or Amazon. Lastly – you can find grapeseed oil at the supermarket.
Enjoy –
power packed pancakes (from The Gluten-Free Almond Flour cookbook by Elana Amsterdam):
I double this recipe as it yields only 12 smallish pancakes
2 large eggs
1/4 cup agave nectar
1 tablespoon vanilla extract
1/4 cup water
1 1/2 cup blanched almond flour (almond meal)
1/2 teaspoon kosher or sea salt
1/2 teaspoon baking soda
1 teaspoon cinnamon (or more or less to taste)
1 tablespoon arrowroot powder
chocolate chips, blueberries or raspberries to taste and as desired
2 tablespoons grapeseed oil (for the pan)
In a bowl, whisk together the almond flour, salt, baking soda, arrowroot powder and cinnamon. Set aside.
In a blender, combine the eggs, agave nectar, vanilla extract and water. Process on high for about a minute.
Add the dry ingredients to the blender and process again until thoroughly combined.
I like to use two skillets. Pour a tablespoon of grapeseed oil into each pan and heat at medium low to eventually low. Ladle 1 heaping tablespoon of batter onto the skillet (then add a few chips or berries to each if desired) and cook until small bubbles appear. Then turn over (this can be a little tricky) and gently cook the other side – being careful not to burn.
Repeat with remaining batter and serve 🙂

OK, so I’ve done a lot of chocolate dipping for the blog – and those of you who would temper and dip are probably dipping fresh fruit already. Nothing new here, but just yummy and so easy especially if you have a tempering machine, or if you are up for tempering without one. Wet, sweet […]
Continue reading
 It seems like all of a sudden I have friends with kids or relatives who are on gluten free diet. A reader recently too – asked me for some gluten-free recipes. So I asked my friend Jill – who knows a lot about a lot – and she shared this very easy chocolate chip peanut butter cookie recipe that she enjoys. I made them – and I must say that my family wasn’t in love (well, they are not peanut butter lovers.) But I thought they were pretty good. Different. Zach thought they were a little weird, but OK. However Ali – my neighbor taster (and friend!) gushed about them. She immediately texted me and said heaven! She loved the milk chocolate chips (I tried milk and semi.) Ali thought they were rich and decadent – I’m not sure she even shared with her kids or husband:) So…mixed reviews – and not for everyone, but I wanted to share for all those who have restrictions because maybe this cookie will fit the bill for you or someone you know. Enjoy-
(gluten-free) chocolate chip peanut butter cookies:
1 cup sugar
1 cup natural peanut butter
2 eggs
1-1 1/2 cups chocolate chips (use milk chips or semi or divide the batter and make both)
raisins (optional)
toasted nuts (optional)
Preheat oven to 350 degrees. Line sheet pan with parchment.
Mix together the sugar and peanut butter, then add eggs and mix well. Stir in the chocolate chips. (Add raisins and nuts if using.)
Bake for about 15-20 minutes…
Enjoy-

 These cookies are phenomenal. Seriously beyond anything that I’ve had in a while. I’m so excited to share them! They are flourless which is great for anyone who is gluten free (or for next years Passover.) They are so rich and dreamy I had to double check again and again when I realized that there wasn’t any butter or oil in the recipe. This recipe has just a few ingredients, takes one bowl and a spoon for mixing and just like that you can have a cookie-fest. Rob really really liked these – the kids too. They said chewy gooey goodness! Big hit. Zach loved them so much that even Jodi had to give them a try…she said they were “Outta this world, and way more than a cookie.” Ali too thought pure goodness. The walnuts give the cookies stability and bite – but I decreased the amount and added Guittard semi sweet chocolate chips to my batch which my family loved. If you’re not a nut lover – try the chips and replace the nuts with a dried fruit like cherries…or even coconut. Enjoy!
No…you do not have to beat the egg whites 🙂 many of you are asking…but nope!
Also – these cookies stick. Let cool for a bit, but easier to remove from parchment when still warm.
And btw I put this in the “healthier” category – because it is low in cholesterol – but you should know it has a lot, a lot of sugar!
flourless crazy delicious chocolate cookies (adapted from recipe in tastespotting.com which was adapted from Payard, via New York Magazine)
2 cups toasted walnut pieces
3 cups confectioners’ sugar
1/2 cup plus 3 tablespoons cocoa powder (I used Dutch Processed)
1/2 teaspoon salt
3/4 cup chocolate chips (high quality if possible or chocolate chunks cut up)
4 egg whites – room temp
1 tablespoon vanilla extract
Preheat the oven to 350 degrees and toast the walnuts until fragrant – 7 to 10 minutes. Let cool.
Lower oven to 320 degrees and line sheet pan with parchment or a silpat.
In a medium bowl, mix together the confectioners’ sugar, cocoa powder and salt.
Add the nuts and chips to the dry ingredients and stir.
Mix together the egg whites and vanilla. Add this wet mixture to the dry and mix until just incorporated.
Let the batter sit for 5 minutes. Stir once more to redistribute nuts and chips.
Drop by heaping tablespoons 2 inches apart on sheet pan (they will spread) and bake (rotating the pans halfway through) from about 13-16 minutes. The cookies should look shiny and glossy a little cracked.
Let the cookies cool for a few minutes then transfer to a wire rack to cool. Repeat with the rest of the batter. And really…enjoy these!!

 I’ve said it before and I’ll say it again…there is something truly joyful about a chocolate covered Peep! Plain Peeps, nothing special, but dipped delectably in milk or dark (Rob’s favorite) chocolate — they transform into something spectacular. I played around this time and planted the dipped peep on a bed of mini m&m’s and wow – the kids were fighting over them. Lucky for them I’m meant to be off chocolate for a little bit (to help my ever present dizziness). I also dipped the dark chocolate in cocoa nibs which made
 for a really intense flavor and coarse texture. Reader Lisa wrote in to say she dipped hers then covered with caramel sprinkles to look like a nest. Great ideas are endless…coconut, ground chocolate, candied sugar, pastel cupcake decorations… See the Halloween Peeps, Valentine chocolates posts to learn how to temper chocolate by hand or where to buy a machine. If you invest in a machine
  you will probably make good use of it – finding all sorts of things to dip. Just remember that it takes time, patience and the best chocolate that you can afford. It’s all about the chocolate! Enjoy-
chocolate covered Peeps(inspired by Maria Valente from Chocolations):
tempered milk and dark chocolates
optional-
m&m’s
cocoa nibs
coconut
sprinkles
Dip Peeps in tempered chocolate and place on parchment lined sheet pan to set up.
If using m&m’s or any from the list above, place a mound on the sheet pan first, then settle the dipped Peep on top to set.
Enjoy-

 Delicious. Scrumptious. Soothing. These little pots de creme are worth your time and effort! I made a healthy lunch for my friend Lori and after, I offered her a bite and she said “OhMyGod. This is seriously Amazing! Really.” She proceeded to eat about half and happily exclaimed that her workout allowed this indulgence. Alisa too – gobbled this right up. Suzanne said that it got so very quiet as she and her girls tried and savored. Sweet, delicious and very satisfying she commented. Smooth caramel flavor with a hint of milk chocolate made Mike say hmm…caramel…mocha. Ali said “holy pot de creme or as Leo (who is 3) said with a spoonful dripping down his chin – dat good puddin.” Gotta love that. All ages a major hit. These are a little advanced – in that you have to make a caramel base – but if you just follow the directions – it is easy. Read the recipe through before you start. The real tricky part is baking time. And I messed up a bit (blaming this on my continued vertigo :() — so you might be on your own with timing, but you can do it! (I will make again soon and post a real baking time.) Oh, and these can be made the day before you plan to serve which is nice. Just bring to room temp for 20 minutes or so before you enjoy.
12 servings (if you use 2 1/2 oz cups, I used bigger ones…so had fewer)
burnt caramel pots de creme (from Chocolate Obsession by Michael Recchiuti and Fran Gage):
3/4 cup sugar
2 tablespoons water
3/4 cup whole milk
2 cups heavy whipping cream
5 (3 3/4 oz) extra large egg yolks (just yolks)
2 1/2 oz (41%) milk chocolate chopped fine
Put the sugar and water in a medium heavy pot. Mix together. Over medium heat, cook sugar until it melts – and stir occasionally with a wooden spoon. Once it melts, continue to cook with out stirring – and let it caramelize. You want the sugar to turn a dark amber. This should take about 4-5 minutes. The sugar is EXTREMELY hot. Do not touch it – and take great care when handling it.
While the sugar is cooking, combine the milk and cream and bring to just a boil over medium heat. Reserve until the sugar is ready.
Now you want to combine the two. Again take great care. Wear an oven mitt and use a long wooden spoon.
When the sugar is the correct shade, slowly slowly slowly ladle the hot cream into the sugar – really a little little at a time. The mixture will bubble up and sputter and foam. Again, it is very hot so be careful. When the mixture stops bubbling, add your next ladle-full and continue until completely mixed together.
Place the egg yolks in a medium bowl and mix until blended. Whisk in the caramel mixture – again – ladle then whisk, then ladle then whisk – very slowly so as not to cook the eggs. You will slowly warm them and combine. Add the chocolate and whisk until melted.
Strain the custard with a fine mesh sieve into a bowl or large glass measuring cup. Spoon or pour the custard into 2 1/2 oz (or larger, just cook longer) espresso cups or custard cups or porcelain dishes. Fill about 3/4’s full.
Let the custard cool to room temperature (I missed this step and it cost me!)
Preheat the oven to 300 degrees. Place the custard cups in a large baking pan. Place on middle rack in oven. Then take a pitcher of very hot water and pour hot water into the pan so that it comes 1/2 way up the sides of the custard cups. This is called a bain marie.
Cover with foil (again, I managed to miss this until later…blaming the vertigo here!)
Bake until the tops are set but the whole custard jiggles when a cup is moved. The recipe says 25 minutes – but mine took waaaay longer – I think because I didn’t let them set and cool first – and also I forgot the foil for a while.
Once set – remove the cups from the hot water – with oven mitts. Let cool to room temp.
Cover each cup and refrigerate for at least 5 hours – or overnight. bring to room temp before serving.

 Be creative and have fun! Little chocolate pools covered with nuts, fruits, seeds and berries. Bite sized treats for your friends and family. These are GREAT for a party – you can make weeks prior and they present so well. And most everyone loves a bit sized morsel of goodness. I happen to LOVE pretzels and tart cherries, fig and peanuts and pepitas and cranberries. Oh, and the sunflower almond! These are really fun to make with your kids – creating all different tastes and colors. You do need to temper your chocolate – so look at the Halloween peeps post and the Valentine
 chocolates for more direction and go to town. Enjoy!
mendiants:
tempered dark, milk or white chocolate
nuts
seeds
dried fruits
cocoa nibs
m&m’s
pretzels
Drop tempered chocolate by teaspoonful onto parchment. Smooth with the back of a spoon or a small palette knife. Drop nuts, seeds and fruits as desired. Add a little drop flaky salt if nuts are unsalted – creates a delicious sweet and salty flavor.

 In my teens I loved go to the movies with my (then) new friend Pam (now old friend). We both loved the movie theater popcorn and we both loved peanut and plain m&m’s – and we usually got it all and shared. One day as we sat down, Pam turned to me, giggled and dumped the extra large packs of plain and peanut m&m’s into our humongous popcorn bucket! Well…DELICIOUS. The salty buttery popcorn mixed with the chocolate – oh my. Seriously. About 15 years later, when I was pregnant with Andy, I craved this concoction – so I made some popcorn and poured some chocolate chips into it. They kind of melted and I
  salted them and oh, sold and forever addicted. Over the years, I fiddle. Today I made a milk chocolate popcorn (my favorite) – and one with mini m&m’s. I also made a semi-sweet chocolate popcorn – one with peanuts and one with out. Ideas are endless…you can melt and drizzle as I did or you can pour chunks into the warm popcorn. You can add Raisinets to the melted chocolate or scatter Snow Caps on top. Quite a movie treat! Or an any-day treat. Greg and his friend John sat down to two bowls of it and were in heaven. Andy is eating his now, and Sylvie and I keep munching away. Melissa said…”yummy
  and so good.” And Ali was thrilled to find chocolate in her popcorn. Sadly Rob said, “not my thing.” Oh well, not for everyone I suppose.
 There is no exact recipe but I’ll try let you know what I did and you can use as a guide with your own taste. Enjoy this. I REALLY do.
If you are looking for the best presentation, then temper the chocolate. It will set faster, and for longer and have a prettier sheen. I eat this up so fast I skipped it. And I don’t mind if it is a little sticky or wet 🙂 – up to you.
chocolate popcorn:
popped popcorn (preferably with a little oil)
melted butter (unsalted) – optional
melted milk and/or semi-sweet chocolate
mini m&m’s (optional)
peanuts (optional)
kosher salt to taste
Make popcorn. I really love my Whirly Pop popcorn maker. I was able to use just 2 teaspoons of oil for about 3/4 cup kernels (why I’m worried about the oil is beyond me since I’m slathering with chocolate!) I suppose you can make in an air popper but I do think that a little bit of oil goes a long way with popcorn. I really do.
Spread popcorn onto a sheet pan lined with parchment or foil. Melt and drizzle very very lightly with melted butter if you choose. I did, just a little. But really this is also very good with out butter (especially if you used oil in popping). Lightly lightly salt the popcorn with kosher salt (You will salt again).
Melt chocolate in a metal bowl over a bit of barely simmering water (or double boiler). Drizzle the melted chocolate all over the popcorn. (Use as much as you like. You can use a light touch or a heavy hand. I go heavy but no surprise!)
If using m&m’s or peanuts, scatter them on top of the drizzled chocolate. Lightly salt the popcorn with the chocolate (again). The salt is sooo good with the chocolate. Don’t skip! (Save the extra chocolate for another use — if you have extra!)
Take a spoon, and gently mix the popcorn – or just leave as it is. Again, up to you. You can transfer to a big bowl if it is easier for you to mix. Let the popcorn sit and the chocolate will harden (although it is good wet!) Set by an open window to speed up the process if you are eager.
Turn on the movie (or not), sit down, relax, eat and enjoy!!

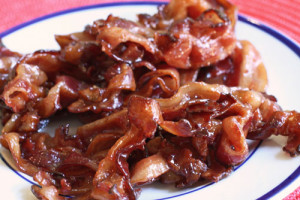 OK, so this isn’t dessert – I know, I do know…but I just had to put it in here because this bacon is scrumptious! There is sugar in it – a lot of sugar so maybe it qualifies just a little bit for this baking blog. My friend Melissa asked me to show her how to make it. We had a bacon making date. My mom makes a delicious salad with spinach, hard boiled eggs, onions and mushrooms. The addition of this bacon is seriously to die for (and I don’t even normally use that expression). She crumbles and adds it to the above ingredients and tops it off with a mayo/olive oil/mustard dressing that completes it. My family loves this bacon in a turkey club – I surprise the kids and put it in their lunches for a treat once in a while. It is great next to eggs and toast and can also hold its own alone. I’ve made an endive, fennel and blue cheese salad with the bacon and oh…equally as good as my moms. So – enjoy this sweet treat. Experiment. This bacon freezes well so make a bunch!
candied bacon:
2 packs bacon – I like to use a thick slice or center cut but anything works
3/4 cup light brown sugar (or more or less depending on your taste)
Spray aluminum foil with cooking spray or grease with a little bit of canola oil.
Place bacon in a large heavy duty skillet. Layer it all around and fill the pan – overlapping when necessary. Over medium high heat cook the bacon, stirring occasionally. After about 3-4 minutes, take the fat out of the pan. Tilt the pan to the side, and with a very big spoon, scoop out all the liquid fat that has been rendered from the bacon (sounds good, right?)
Keep cooking and rendering the fat for probably about 8 minutes in total. Cook the bacon about 2/3’s of the way through.
Add the sugar by sprinkling it all around and over the bacon. Turn the heat to low and continue to cook the bacon and sugar together. Continue to scoop out the fat when needed…and just keep cooking and stirring occasionally for about 25 minutes. This is best done over a watchful eye – so that the sugar doesn’t burn. It’s over if it does.
You can tell the bacon is done and the sugar is “candied” when you see little strings of sugar form around the bacon. Move the bacon around and touch it (with the fork) – see if you can pull these strings to see them…you should. (Should have taken a photo here…will add one next time I make it!) Cook the bacon a little bit more to get it crispier and more or less well done depending on your taste.
Once cooked, transfer bacon onto prepared foil. Let cool or serve warm. It will be VERY hot at first so please don’t pop into your mouth right away…even though you will want to!
To freeze, let cool and wrap the bacon in foil (you don’t have to spray it now) and place in freezer. When ready to eat, place bacon on counter for 10 minutes or in refrigerator overnight – and then reheat for about 5-10 minutes in a warm toaster oven (or oven) at about 350 degrees. Watch it because the bacon/sugar can still burn if re-heated for too long or at too high a temperature. I like to freeze the bacon in units of 2-3 pieces – so that I can pull from the fridge the night before I make the kids their turkey clubs. Ready to roll in the AM. Enjoy!