

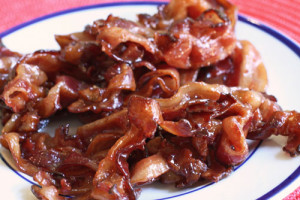
 OK, so this isn’t dessert – I know, I do know…but I just had to put it in here because this bacon is scrumptious! There is sugar in it – a lot of sugar so maybe it qualifies just a little bit for this baking blog. My friend Melissa asked me to show her how to make it. We had a bacon making date. My mom makes a delicious salad with spinach, hard boiled eggs, onions and mushrooms. The addition of this bacon is seriously to die for (and I don’t even normally use that expression). She crumbles and adds it to the above ingredients and tops it off with a mayo/olive oil/mustard dressing that completes it. My family loves this bacon in a turkey club – I surprise the kids and put it in their lunches for a treat once in a while. It is great next to eggs and toast and can also hold its own alone. I’ve made an endive, fennel and blue cheese salad with the bacon and oh…equally as good as my moms. So – enjoy this sweet treat. Experiment. This bacon freezes well so make a bunch!
candied bacon:
2 packs bacon – I like to use a thick slice or center cut but anything works
3/4 cup light brown sugar (or more or less depending on your taste)
Spray aluminum foil with cooking spray or grease with a little bit of canola oil.
Place bacon in a large heavy duty skillet. Layer it all around and fill the pan – overlapping when necessary. Over medium high heat cook the bacon, stirring occasionally. After about 3-4 minutes, take the fat out of the pan. Tilt the pan to the side, and with a very big spoon, scoop out all the liquid fat that has been rendered from the bacon (sounds good, right?)
Keep cooking and rendering the fat for probably about 8 minutes in total. Cook the bacon about 2/3’s of the way through.
Add the sugar by sprinkling it all around and over the bacon. Turn the heat to low and continue to cook the bacon and sugar together. Continue to scoop out the fat when needed…and just keep cooking and stirring occasionally for about 25 minutes. This is best done over a watchful eye – so that the sugar doesn’t burn. It’s over if it does.
You can tell the bacon is done and the sugar is “candied” when you see little strings of sugar form around the bacon. Move the bacon around and touch it (with the fork) – see if you can pull these strings to see them…you should. (Should have taken a photo here…will add one next time I make it!) Cook the bacon a little bit more to get it crispier and more or less well done depending on your taste.
Once cooked, transfer bacon onto prepared foil. Let cool or serve warm. It will be VERY hot at first so please don’t pop into your mouth right away…even though you will want to!
To freeze, let cool and wrap the bacon in foil (you don’t have to spray it now) and place in freezer. When ready to eat, place bacon on counter for 10 minutes or in refrigerator overnight – and then reheat for about 5-10 minutes in a warm toaster oven (or oven) at about 350 degrees. Watch it because the bacon/sugar can still burn if re-heated for too long or at too high a temperature. I like to freeze the bacon in units of 2-3 pieces – so that I can pull from the fridge the night before I make the kids their turkey clubs. Ready to roll in the AM. Enjoy!

 A plain Peep is not something that I love. However…a chocolate covered Peep is divine. Seriously. I did a short stint at Chocolations (a local chocolate shop) last year and Maria, the owner, was dipping Easter Peeps in chocolate. Well, that was it. Done. Count me in. My early resistance to Peeps was no more. I lovingly dip, serve and eat them often. Surprisingly it is not just the kids (and I) who love them. Rob loves them coated in dark bitter chocolate – to cut the sweetness – and both milk and dark make me happy. The ghosts are almost fully dipped in chocolate while the pumpkins are placed on a chocolate disk. While I was at it, I decided to make some chocolate covered Halloween Oreo treats as well.