peach blueberry crisp with pecan topping

This was so beautiful, but really, more importantly, scrumptious!  I brought this crisp with two other fruit desserts to a dinner party and this one was probably the most universally loved.  Fine Cooking Magazine featured this recipe months ago – it was the colors in the photo that propelled me to pull it, save it and eventually bake it.  As we spooned it out, the dessert almost glowed with blue-y purples and yellows, as well as orange and pink hues.  The pecan streusel on top added a delightful crunch and snap to this treat that paired extremely well with the soft juicy peaches and bursting blueberries.  This is great for a dinner party as you can easily reheat later in the day and serve it warm with freshly whipped cream and vanilla ice cream.  Equally good as a brunch dessert with its fruity goodness — at room temperature – also sure, paired with whipped cream and/or ice cream.  This is verrry easy to make which is an added benefit if you are a busy person who still likes to bake.  Enjoy- Double this if you want enough for a crowd – this serves only around 5-7 people (depends on portion size) – using an 8 or 9 inch square pan. peach blueberry crisp with pecan topping (adapted from Fine Cooking magazine): 3 oz (2/3 cup) all purpose flour 1/2 cup packed light brown sugar 2/3 teaspoon ground cinnamon 1/4 teaspoon kosher salt 2 oz (4 tablespoons) unsalted butter, softened 2/3 cup coarsely chopped pecans 3 cups blueberries (washed and drained on paper towels) 5 medium peaches (and or nectarines) peeled, halved, pitted and sliced 1/2 inch thick 1/4 cup sugar 2 tablespoons cornstarch 1/3 teaspoon freshly ground nutmeg 2 pinches kosher salt Preheat oven to  375 – and position rack in the center of the oven.  Lightly butter a 9 (or eight) inch pan.  Metal or ceramic – or glass as I used. In a small bowl, whisk together the flour, brown sugar, cinnamon and salt.  Cut up the butter and mix in with your hands and fingers so that the mixture readily clumps together when pressed.  Mix in the pecans.  Set aside. In a medium bowl, mix together the blueberries and prepared peaches.  In a small bowl, mix together the sugar, cornstarch and nutmeg and salt.  Next, toss this dry mixture into the fruit and mix carefully with your hands to coat. Spread the fruit (and any remaining dry mix) into the prepared pan.  Press the streusel into the fruit – in small lumps and also sprinkle all around and on top to cover. Bake until the fruit in the center bubbles – and the topping is nicely browned (I moved mine to the top rack in the oven for the last 5 minutes).  This should take about 50-57 minutes – but check before – just in case! Let cool, and serve warm.  Or reheat later in a warm oven for 10 minutes or so. Enjoy-

blackberry sour cream pie

What a truly pretty pretty pie!  Major hit. And just in time for summer entertaining (or just for you or your family).  Sylvie LOVED it – especially the graham cracker crust.  Lauren ate only the crust (oye).  But Andy – my chocolate loving son – was starving and asked for a bite which was surprising since he’s never been a pie (and custard) guy and he said, “mmmm….so good!”  Very exciting for me (although he didn’t choose it for dessert that night.)  Anyway – success, even with Rob who is not much of a pie guy either.  Alisa, Mike, Ali, Jonathan, and me – well, we all really loved this.  I keep repeating myself but not much more to say.  The creamy tart sour cream filling paired with the sweetened cooked blackberries and the awesome graham crust – well – you can imagine.  This pie is easy since it is really almost like a cheese cake baked in a pie plate. No dough to roll out and the custard easily bakes in the oven with out any trouble.  It is impressive looking with beautiful purple hues and lovely in its varied texture.  Perfect for company some time soon.  Enjoy this-

This is not difficult but there are a few different steps.  Just organize yourself and plan – and you will see that it will come together quite easily.

blackberry sour cream pie (slightly adapted from Pie Pie Pie by John Phillip Carroll):

graham cracker crust-

1 1/2 cups graham cracker crumbs
2 tablespoons sugar
2-3 pinches kosher salt
1/2 cup (one stick) melted unsalted butter

sour cream custard layer

1 1/2 cups sour cream
1/2 cup minus 2 tablespoons sugar
3 eggs
1 1/2 teaspoons vanilla extract
3/4 teaspoon kosher salt

blackberry topping-

1/2 cup minus 2 tablespoons sugar
1/2 cup water
2 cups fresh or frozen blackberries (do not thaw frozen blackberries)
1 tablespoon cornstarch
1 tablespoon water

Preheat oven to 325 degrees.

Make the graham cracker crust.  Place the crumbs, sugar and salt in a small bowl and add the melted butter and mix to combine.  Transfer crumb mixture to a 9 inch pie pan (FYI, I think mine was 8 inches which was OK, although I wasn’t able to use all of the custard filling) and press firmly into the pan – making sure to keep it even and smooth. Press the crumbs up the sides of the pan – to the top.

Bake 8-10 minutes – until golden and firm.  Set aside to cool completely.  You can make this earlier in the day, or the day before you plan to bake the pie.)

Preheat the oven again to 325 degrees.  In a medium bowl, whisk together the sour cream, sugar, eggs, vanilla extract and salt. Pour the mixture into the cooled pie shell and carefully place in the lower third or middle of the oven.  (If you have too much custard, don’t overfill pie.  You can place the extra in a ramekin – with some berries and bake in a water bath if you’d like an extra treat.  Or just toss the extra if you have.)

Bake for about 34-39 minutes – until the filling doesn’t have a liquidy jiggle when you shake it a bit.  The custard should look set but wet.  Remove from the oven and cool to room temp.  You can also place in the refrigerator at the is point for several hours (if you choose) before adding the berry topping.

Berries next.  In a medium saucepan, over medium high heat, boil the sugar and water, stirring a bit to help the sugar dissolve.  Reduce the heat to low and and add the berries.  Cook gently for about 5 minutes until they soften and some of the juice is released.

In a small cup – mix together the cornstarch and water.  Whisk well.  Add to the berry mixture on stove – let boil gently for about a minute – until the topping is slightly thickened.  Place in a shallow bowl (to speed up the cooling process) – and let sit and cool, stirring occasionally and very gently.

Once cool, spoon the berry sauce and berries over the cooled custard spreading it all over the pie. Refrigerate for at least 2 hours, or overnight and slice and serve.

Enjoy!

doughnut topping (for muffins)

This donut topping is just delicious.  Really simple…just cinnamon and sugar – on top of melted butter.  What is not to like?  Sadly, the muffin I tried was not too terrific, but I needed to share the topping.  Great for blueberry, raspberry, blackberry, apple or pear muffin…this is decadent and an nice change from a plain or streusal topping (although I do love streusal!)  Dip, coat and enjoy!


doughnut topping (from Flo Brakers Baking for All Occasions):
1/2 cup sugar
1 1/2 teaspoons cinnamon
or 1  teaspoon cinnamon, and 1/2 teaspoon cardamom
(you will have leftover dry mix, just bag and save for next time)
2 oz melted butter

When muffins are still warm (10 minutes out of oven), dip tops in melted butter, then roll into bowl of cinnamon sugar to coat.  Place on rack to cool.  Enjoy!

matzoh bark and chocolate covered matzoh

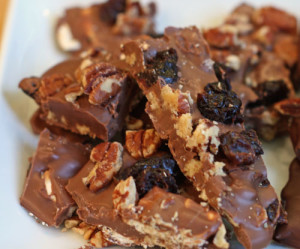
Chocolate matzoh bark.  So delicious and tasty.  I’m not supposed to eat or drink chocolate, caffeine or alcohol (so sad, advice for vertigo)…but I know this is good (I confess, I had to nibble!)  The salty matzoh, the chocolate, fruit and nuts, it is all so seriously good.  Same thing goes for chocolate dipped matzoh.  Different shape, same taste.  A great treat at the end of your Passover Seder.  Tempering chocolate is the only tricky part here.  It takes time, patience and a comfort with the chocolate.  If you have a tempering machine, still takes time and patience, but certainly easier as you can do other things in the kitchen while it runs.  The most important piece here is to purchase high quality chocolate.  Really – get the best you can afford.  I like to use salted matzoh – that sweet/salty thing speaks loudly to me.  See the Halloween Peeps and Valentine Chocolate posts for further instructions on tempering and machines – and tips in general.  If short on time, or prefer an easier treat check out the matzoh candy post.

matzoh bark and chocolate covered matzoh:

tempered milk and dark chocolate
matzoh, I used salted
dried fruit, I used cherries
toasted nuts, I used pecans

other ideas for add-0ns:
chocolate chips
coconut
cocoa nibs
seeds

chocolate dipped matzoh

Dip matzoh pieces in tempered chocolate.  Shake off excess and place on parchment lined sheet-pan.  Add fruit, nuts, chips, cocoa nibs, coconut, seeds or chips.  Let set.  Enjoy.

matzoh bark

Spoon tempered chocolate onto parchment lined sheet-pan.  Place broken matzoh pieces all over.  Cover with more chocolate, nuts, dried fruits…more matzoh if desired and a drizzle of chocolate.  Have fun, be creative.  Let set and cut into pieces.  Enjoy-

(seriously delicious) dried fruit compote with greek yogurt

The subject line in my friend Suzanne’s email read OMG!!! after she tasted this dessert.  “Such a treat,” she said.  “I savored every bite and didn’t want it to end.  One of my overall favorites!”  It really is delicious.  Do not skip this even if you think it isn’t for you.  It’s like that dress that you wouldn’t have tried on, but your friend makes you…and it happens to look great on you.  The fruit and yogurt deliver powerful flavors and texture.  It satisfies your sweet tooth yet makes you feel good at the same time.  Sylvie said it was unexpectedly good (which is great coming from an 8 year old.)  As usual (which seems to be my M.O. of late) it is easy to make.  I happen to be out of commission for a bit with a long bout of vertigo (that still persists) but in the midst (of the more severe week) I thought that baking might calm and restore my senses and equilibrium – so this is one of the many easy things I made when I was spinning.  I also decided that some healthier desserts would be necessary since I was feeling so ill.  Anyway, on I go – try this.  Surprise someone.  Lovely for a casual dinner with friends.  And definitely serve it with the Greek yogurt – it cuts the sweetness of the dried fruits.  On top of ice cream too (for a sweeter sweet.)  Enjoy-

dried fruit compote with greek yogurt (adapted slightly from The Mediterrasaian Way by Ric Watson and Trudy Thelander):

1 cup orange juice (freshly squeezed if you have the time)
1/2 cup water
2 teaspoons brown sugar
1/2 teaspoon cinnamon
1/4 teaspoon ground clove
pinch of kosher salt
1 cup dried apricots
1/2 cup dried figs (some sliced in half)
1/2 cup raisins (mix in gold if you can, or try dried blueberries or cranberries)
Greek yogurt or vanilla ice cream
almond slivers (optional)

In a small saucepan, mix together the orange juice, water, brown sugar, cinnamon, clove, and salt and bring to a boil.  Reduce heat to low-simmer, and add the apricots, figs, and raisins.  Cover the pot and simmer for about 20 – 25 minutes until liquid get syrupy and reduces a bit.

Serve the compote in bowls with a spoon ful of yogurt or ice cream.  Sprinkle with nuts if you choose.  Enjoy-

jeweled winter fruit soup (delicious!)

Oh, I LOVED this.  Make this!  I served it to a few friends on Saturday and it was a huge success.  Very special – especially for a fruit salad (although I do love fruit).  The marinating syrup is delightfully refreshing – with fresh vanilla, ginger and citrus flavors.  It also presents beautifully.  This calls for some fruits you may have to search for – but are well worth it – but of course you can skip or substitute for what you cannot find.  Make this the day before you plan to serve as it needs to chill overnight.  Ali (my neighbor) was looking forward to a taste…but unfortunately (for her) I gobbled it ALL up finishing it Sunday midday!  Mmmm…

(I’m placing this in the medium effort category only because of the time it takes to cut the fruit.  The actual recipe is very easy.  Please taste your purchased fruit before you use it.  Your fruit salad is only as good as your fruits so try to start with the very best.  Seeding vanilla beans and pomegranates are at bottom of the post.)

jeweled winter fruit salad (slightly adapted from the December 2009 issue of the Food Network Magazine):

1/2 cup sugar
2 cups water
1 1-inch piece of fresh ginger, peeled and sliced thin
1 vanilla bean, split and scraped (see bottom of post if you are unfamiliar with vanilla beans)
1 lemon
7 – 8 blood, cara cara or naval oranges (I used 5 blood, 2 cara cara, and one naval – if all large oranges use seven, if small oranges use eight – the blood and cara cara are red hued and look beautiful – taste good too!)
2 mangos, peeled and diced
5 kiwis, peeled and diced into large chunks
8 kumquats sliced very thin – seeds removed
1 – 1 1/2 cup pomegranate seeds (About 1-2 pomegranates. See bottom of post if you are unfamiliar with removing pomegranate seeds.  Try to use them because they add crunch, flavor and beautiful color.  They need to be ripe and good so ask for help in your grocery if you are unfamiliar.)
1/2 cup red currants (or more to taste I love these sour bites) if you can find them
2 firm bananas

Combine the sugar, sliced ginger, vanilla seeds and vanilla pod in a saucepan.  With a wide veggie peeler, remove wide strips of lemon and orange zest (from one of the oranges) and add to the saucepan.  Later you will have to pull these items out – so if you want to wrap up in cheesecloth feel free.  I just fished around the fruit.

Bring all to a boil over medium-high heat.  Once boiling, reduce and simmer for about 5 minutes.  Refrigerate until cold.  (To speed up the process place in an ice water bath in the fridge.)

Peel remaining oranges by cutting off the tops and bottom and then using your knife to peel following the natural curve of the orange so that the segment is revealed.  Over a medium bowl, use your knife to cut along both sides of each membrane to free the segments, letting them fall into the bowl.  Squeeze all remaining juice from the orange.  Repeat with all remaining oranges.

Add the cut mangoes, kiwis, kumquats, pomegranate seeds and red currants and gently toss.  Pour the chilled syrup over the fruit.  Then add the bananas and again, very gently toss.

Let chill overnight.  Before serving, remove the citrus zest, ginger and vanilla pod.  Serve in small bowls and enjoy-

vanilla bean– To seed the vanilla bean, place the long bean on a cutting board.  With your paring knife, slice the bean lengthwise – from top to bottom all the way down and through.  Open it up and you will see soft brown inside.  With the back of your knife, scrape the seed gently (while holding the end of the pod) collecting all the goodness from inside.  These are the seeds and they should be on your knife.  The pod contains more flavor and seeds and is often added to marinating liquids or ice creams – and pulled out later.  You can purchase at the grocery or get a bunch from penzeys.com – store  them in an airtight container or they dry out.

pomegranate– To remove seeds from pomegranate, place it on a cutting board and cut into quarters.  Over two bowls, one for white pith/skin and one for seeds, gently break apart each quarterbending it slightly.  More and more pomegranate seeds will be revealed.  You might get splashed a little bit if you pop a seed which is likely and normal.  (Do not wear your favorite white t-shirt.  Or any favorite shirt.  A dark pj top should do the trick.  Or naked is good!)  Peel away the thin membrane and gently pull the seeds from the shell.  You eat the whole little red thing.  Seed included.  Delicious.

chocolate chip rice krispie treats

OK, yes we all know how to make these – but my kids (or their friends) sometimes mention that mine taste better than those they buy at the bake-sale.  I often say it’s because I bake with looove and give them a big smile.  Truthfully though, the love comes from a little kosher salt and vanilla – and the added chocolate chunks (although if you’re a purist even just the vanilla and salt will heighten your pleasure).  My whole family enjoyed these yummy treats, even Rob who surprises me here.  I haven’t made them in a while – Greg just said…”mom, I’m so glad you made these again.  They are so good.”  I usually cut them up into reasonable portions (otherwise we are all slicing away day and night), wrap them in plastic wrap, and pop in an airtight container.  Good for a while although they do disappear fairly fast!

chocolate chip rice krispie treats(adapted from the Kellogg’s Rice Krispie cereal box recipe):
3 tablespoons unsalted butter
1 package mini marshmallows (10.5 oz)
3/4 teaspoon pure vanilla extract (please high quality here)
1/3 – 1/2 teaspoon kosher salt (or just about)
6 cups rice  krispie cereal
(about) 1 cup semi-sweet chocolate chunks (I happen to prefer Nestle’s chunks here.  Of course you can use chocolate chips instead.)

Spray or butter a 9×9 inch pan.  (I usually double this recipe and use my 9×13 inch pan.)

In a large saucepan, melt butter over low heat.   Once melted, add the marshmallows and stir and until they too have melted.  Watch them – they burn easily.

Add the vanilla and salt, mix to incorporate.  Add the rice krispies and mix.  Add the chocolate chunks and mix in.  (If marshmallow mixture is very warm, some may melt, but that is OK too!)  Pour onto prepared pan. Flatten and push down with the back of a large spoon (easiest if you spray spoon with non stick spray).

Let set for about 45 minutes to an hour.  (Or longer).  Cut into squares and enjoy!

As mentioned – I cut, wrap and place in an airtight container.  But eating right out of the pan is good too.

Another note – sometimes I add some mini chips to the melted marshmallows.  Mix and melt them too – this makes the marshmallow mixture brown and changes the whole look of the bars.  Fiddle a bit.  See what you like to do.  Add peanut butter chips or milk chocolate chips, or maybe even a natural peanut butter laced throughout…next time…

caramel shorties w/sea salt

Ohmygoodness these bars are really tasty!  They are great for a party;  just so pretty to look at.  Everyone loved these – but especially Alisa – who loved the almond version.  The little specs of sea salt bring out the best in caramel and make these very addictive.  I wrapped most of the bars up and popped in the freezer for Gilda’s Club next week.  Perfect to make ahead as these bars freeze really well.  I found this recipe in Nick Malgieri’s Modern Baker and it was his introductory quote that got me…”If I had to choose one cookie above all others, it would be this one.  The buttery dough and creamy caramel filling complement each other perfectly.”  And he is right!  Enjoy-

caramel shorties w/sea salt (adapted only very slightly from  The Modern Baker by Nick Malgieri):

dough
2 sticks (8oz) unsalted butter, room temp
1/2 cup sugar
1/2 teaspoon kosher salt
1 1/2 teaspoons vanilla extract
2 1/2 cups all purpose flour

filling
4 tablespoons unsalted butter
1 tablespoon light corn syrup
1/4 cup dark brown sugar, packed
1 (14 oz) can sweetened condensed milk

Preheat oven to 350 and place rack in lower third of the oven.  Line a 9×13 inch pan with parchment or foil (making sure that the foil or parchment extends above the sides.  Look in baking tips to see a photo of this.)

Butter bottom and sides of foil or parchment.

With paddle attachment of mixer, beat butter with the sugar and salt on medium high speed until lighter – about 3 minutes.  Add the vanilla.  Scrape bowl and mix again for a minute.

On the lowest speed, beat in 2 1/4 cups (reserving 1/4 cup) flour – until flour is just incorporated and the mixture is smooth.

Place 3/4 of the dough into the prepared pan (set aside last quarter of dough) and gently with the palms of your hands spread the dough around and press gently to fill the pan.  Don’t push down hard here – just gently and firmly and evenly.

Place dough lined pan in the refrigerator to rest.

Add the remaining 1/4 cup flour to the remaining 1/4 cup dough and gently incorporate flour and break the dough into small crumbs.  Add 1/2 cup of slivered almonds (optional).  Set aside at room temp.

For the filling, in medium sized saucepan mix together the butter, corn syrup brown sugar, and condensed milk.  Bring to a boil – gently on medium low heat – (this will take about 7-8 minutes.  Then cook gently (on a low simmer)  – stirring often as it bubbles.  It it will darken and get thicker – this should take about 10 minutes or so.  Remove from heat and pour into a stainless bowl and let cool for 5 minutes.

Remove the pan from the refrigerator, and pour the filling into the pan, on top of the dough. Spread with a palate knife or back of a spoon.  Scatter the reserved crumb mixture all over the dough – making sure to hit the sides and corners too!

Sprinkle fine sea salt over the crumb.  Not too much – just little specs here and there.  This will bring out the caramel flavor.

Bake for about 30 – 35 minutes – until the mixture is bubbling gently and and the topping and dough looked cooked through.  If the top needs more color – move the baking rack to the top third of the oven for the last 5-7 minutes or so.

Let cool in pan.  Then gently lift using the foil or parchment as an aid and place on a cutting board and cut as desired.  (If hard to cut – and still soft, let cool a bit more.)  Enjoy-

chocolate popcorn

In my teens I loved go to the movies with my (then) new friend Pam (now old friend).  We both loved the movie theater popcorn and we both loved peanut and plain m&m’s – and we usually got it all and shared.  One day as we sat down, Pam turned to me, giggled and dumped the extra large packs of plain and peanut m&m’s into our humongous popcorn bucket!  Well…DELICIOUS.  The salty buttery popcorn mixed with the chocolate – oh my.  Seriously.  About 15 years later, when I was pregnant with Andy, I craved this concoction – so I made some popcorn and poured some chocolate chips into it.  They kind of melted and I salted them and oh, sold and forever addicted.  Over the years, I fiddle.  Today I made a milk chocolate popcorn (my favorite) – and one with mini m&m’s.  I also made a semi-sweet chocolate popcorn – one with peanuts and one with out.  Ideas are endless…you can melt and drizzle as I did or you can pour chunks into the warm popcorn.  You can add Raisinets to the melted chocolate or scatter Snow Caps on top.  Quite a movie treat!  Or an any-day treat.  Greg and his friend John sat down to two bowls of  it and were in heaven.  Andy is eating his now, and Sylvie and I keep munching away.  Melissa said…”yummy and so good.”  And Ali was thrilled to find chocolate in her popcorn.  Sadly Rob said, “not my thing.”  Oh well, not for everyone I suppose. There is no exact recipe but I’ll try let you know what I did and you can use as a guide with your own taste.  Enjoy this.  I REALLY do.

If you are looking for the best presentation, then temper the chocolate.  It will set faster, and for longer and have a prettier sheen.  I eat this up so fast I skipped it.  And I don’t mind if it is a little sticky or wet 🙂  – up to you.

chocolate popcorn:
popped popcorn (preferably with a little oil)
melted butter (unsalted) – optional
melted milk and/or semi-sweet chocolate
mini m&m’s (optional)
peanuts (optional)
kosher salt to taste

Make popcorn.  I really love my Whirly Pop popcorn maker.  I was able to use just 2 teaspoons of oil for about 3/4 cup kernels (why I’m worried about the oil is beyond me since I’m slathering with chocolate!)  I suppose you can make in an air popper but I do think that a little bit of oil goes a long way with popcorn.  I really do.

Spread popcorn onto a sheet pan lined with parchment or foil.  Melt and drizzle very very lightly with melted butter if you choose.  I did, just a little.  But really this is also very good with out butter (especially if you used oil in popping).  Lightly lightly salt the popcorn with kosher salt (You will salt again).

Melt chocolate in a metal bowl over a bit of barely simmering water (or double boiler).  Drizzle the melted chocolate all over the popcorn.  (Use as much as you like.  You can use a light touch or a heavy hand.  I go heavy but no surprise!)

If using m&m’s or peanuts, scatter them on top of the drizzled chocolate.  Lightly salt the popcorn with the chocolate (again).  The salt is sooo good with the chocolate.  Don’t skip!  (Save the extra chocolate for another use — if you have extra!)

Take a spoon, and gently mix the popcorn – or just leave as it is.  Again, up to you.  You can transfer to a big bowl if  it is easier for you to mix.  Let the popcorn sit and the chocolate will harden (although it is good wet!)  Set by an open window to speed up the process if you are eager.

Turn on the movie (or not), sit down, relax, eat and enjoy!!

dark chocolate sorbet

Years and years ago – Rob and I had our first meal at Picholine in NYC.  The meal was awesome, but the chocolate sorbet was sublime.  We became somewhat friendly with the chef, Terrance Brennan, because my mom is terrifically chatty and loves discussing food and meeting new people.  By our 5th visit, she told the chef that she was from Boston, that I worked as a pastry cook in NYC, and that we love the sorbet – and wow, can we please have the recipe?  He smiled indulgently and listed a few ingredients (those common in chocolate sorbet!)  No measurements, no method.  I wrote them down – water, chocolate, cocoa and sugar – determined that one day I would fiddle and play and make Rob very happy (since he can’t eat ice cream – and loves chocolate).  I’ve tried over the years, taking notes and comparing recipes from all my books and today, I think it is done!  I do.  This sorbet is rich, dark, chocolaty, and intense.  Fresh out of the machine…ridiculous.  Seriously.  I used Valrhona cocoa powder and I do think that it makes a difference – so go all out (with a high quality natural cocoa powder) if you decide to make it.  Oh, and Rob loved it.  Loves it.  Next time I might let the kids try it – and certainly my parents when they come for a visit!

Note that this sorbet is lovely the day you make it – soft and delicious.  But it does firm up very hard over night.  So remember to pull from the freezer a solid 20 minutes before you serve – or place in fridge for a gentler softening for a bit longer.

dark chocolate sorbet:
2 1/3 cups water
8 oz sugar (1 cup plus 2 tablespoons)
6 oz bittersweet chocolate – coarsely chopped
4 oz natural cocoa powder (1 cup)
1/2 teaspoon kosher salt

Stir and heat the water and sugar until the sugar dissolves.  Bring to a boil, and remove from heat.  Whisk in the cocoa powder until smooth and set aside to cool.

Melt the chocolate in bowl over a pot of barely simmering water (or a double boiler).  Melt the chocolate gently.  Remove from heat when a few chunks remain – and stir to complete the melting process.  You do not want this to get too hot.  Set aside to cool.

Let the chocolate and the water, sugar, cocoa mixture sit at room temp to cool.  Let cool for about 30 minutes or so.

Slowly add a little bit of liquid to the cooled chocolate and whisk to incorporate.  Really just a little.  Add little by little and really go carefully here so that you don’t break the chocolate.

Once all of it has been added – whisk in the salt and place in the refrigerator for at least 4 hours or overnight.

Run in your ice cream machine and oh…soooo good.  Enjoy-