smores cookie bars

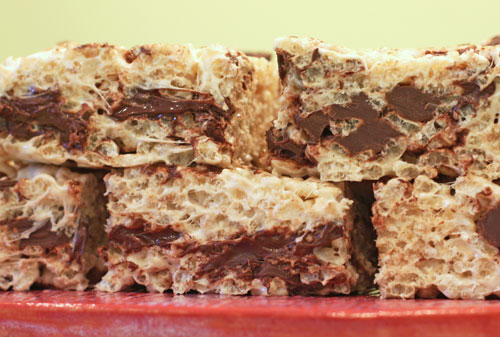
I stumbled upon these on noshwithme.com and I’m so happy that I did!  Hilary’s write up was cute and I was eager to try.  These were a hit with most – especially kids.  Adults had varied comments…please, more chocolate, or how about semi-sweet or dark chocolate and others said please less fluff, but the general consensus was delish.  Tasty and child-like, these smores bars will definitely satisfy your sweet tooth.  They are soft and moist,chewy and wet, and really so very very easy to make (as usual).  Sylvie said “I like these sooo much – can you pack in my lunch??”  These would be great at a bake sale as they present well too – with the fluff and chocolate oozing out of the center.  Enjoy –

Oh, the original recipe was adapted from Hershey’s.

smores cookie bars (slightly adapted from noshwithme.com):

1/2 cup (one stick) unsalted butter – room temp
3/4’s cup sugar
1 egg
1 teaspoon vanilla extract
1 1/3 cup all purpose flour
3/4 graham cracker crumbs (you can buy the crumbs in a box, or you can make your own crumbs in a food processor)
1 teaspoon baking powder
skant 1/2 teaspoon kosher salt
6 (1.55 oz each) milk chocolate candy bars (or use dark chocolate.  or use a little less or more depending on your taste.)
1.5 cups marshmallow fluff

Preheat oven to 350 degrees.  Line 8×8 pan with foil so that it comes up the sides of the pan.  (Look at baking tips for photos of this – makes it much easier to remove bars from pan and cut neatly – if you care.  Otherwise grease then struggle.)

Beat the butter and sugar in the mixer with paddle attachment – or with hand held beaters.  Mix for 5 minutes or so – until lighter and fluffier.  Add the egg and vanilla and mix again – scrape and mix.

Whisk together the flour, graham crumbs, baking powder and salt.  Fold this into the butter mixture – and mix until just blended.

Press half of this dough into the prepared pan.  Then gently press the candy bars into the dough to cover.  Then spread the fluff over the chocolate (this is sticky and not so easy, but do your best.)

Lastly, sprinkle and patch the remaining dough on top of the fluff and chocolate and try to over and press to form a top layer (there might be holes).

Bake about 35 minutes – may take 5 less or 5 more – so watch and check carefully.  Bars should look lightly browned.

Once cool, pull the foil (and brownies) from the pan and set on the counter to easily cut and serve.  These are even better the next day for some reason.

Enjoy-

brownie pudding

This is heaven.  Serious chocolate heaven.  I know I say that a lot – but I REALLY mean it (not that I haven’t before!)  And this photo does not do it justice.  It was taken at the end of the night after one glass of wine too many.  Oh well, unimportant because this will make everyone go nuts.  A cross between a brownie, a cake and a pudding with a hard crispy top that covers a succulent molten brownie, nothing compares.   I served this with Rob’s favorite chocolate sorbet, chocolate chip ice cream, freshly whipped cream and caramelized bananas – to make a decadent chocolate extravaganza.  My absolute favorite.  A few friends came over for this and they really couldn’t get enough.  Really.  Mark said this is crazy!  I mean crazy!  And it is.  This recipe is from Ina Garden’s Back to Basics and I have to tell you that everything she puts in each of her many books is a hit.  Ina writes that this recipe is from Anna Pump – who has a store called Loaves and Fishes and was happy to share it with her.  Make this for company.  Make this for your family. Make it just for you!  YUM.  Delicious.  Enjoy-

brownie pudding (from Ina Gartens Back to Basics – the only change I made was the addition of a little kosher salt):

1/2 pound (2 sticks) unsalted butter, plus little extra for buttering the dish
4 extra large eggs, room temp
2 cups sugar
3/4 cup good quality cocoa powder
1/2 cup all purpose flour
1/2 teaspoon kosher salt
seeds from one vanilla bean (scraped)  look at the fruit soup post for instructions and photos to scrape seeds

Preheat oven to 325 degrees.  Lightly butter a 2 quart oval baking dish (9x12x2 inch).

Melt the 2 sticks of butter and set aside to cool a bit.

With the paddle attachment of your mixer, beat the eggs and sugar on medium high speed for about 5 -7 minutes until it becomes very thick and light yellow.  While beating, whisk together the cocoa powder, flour and salt and set aside.

Reduce the speed to low (once the eggs are thick and light yellow) and add the vanilla seeds and the dry ingredients – mix until JUST combined.  With the mixer still on low, add the melted (and cooled) butter and again, mix until just incorporated.

Pour the brownie mixture into the prepared pan and place it in a larger baking pan or baking sheet.  Fill a pitcher with hot tap water -and carefully pour the water into the baking pan (do this in the oven, on the rack it is easier) so that it come about 1/2 way up the sides of the brownie dish.  This is called a bain marie.

Bake for 55 m to an hour.  A cake tester inserted 2 inches from the side will come out 3/4’s clean.  The center will seem very under-baked but that’s what makes this a brownie pudding!

Cool and serve with vanilla ice cream, whipped cream, chocolate chip ice cream, or sorbet.  Have some fun and caramelize some bananas too!

Enjoy –

lemony lime bars

Tangy an sour – with a crisp buttery base – these citrus bars are delicious!  Deeelicious. True love for me.  Alice Medrich warns readers that these have a serious pucker and bite and wow, they really do.  You can make these with lemon juice or lime juice, or as I did, with both.  In the past I’ve tried to make lemon bars but with little success.  The filling would creep under the crust and the top would be a mushy mess, but these were perfect! Very very easy to make and refreshing with their zing. Jonathan LOVED these.  Sylvie, Greg, Ali and Edith (my mother-in-law) too – we all enjoyed. Rob thought the crust might be too buttery but I think nice with the sour filling.  So now you know, buttery and sour.  Up to you…if for you!  Enjoy-

Store in refrigerator – in an airtight container.  They will keep for about a week – although after about 3 days will loose their crispy crunch (the crust).

lemony lime bars (from Alice Medrich’s Pure Dessert):

crust

8 tablespoons (1 stick) unsalted butter, melted
1/4 cup sugar
3/4 teaspoon vanilla extract
1/4 teaspoon kosher salt
1 cup (4.5 ounces) all purpose flour

topping

1 cup plus 2 tablespoons sugar
3 tablespoons all purpose flour
3 large eggs
1 1/2 teaspoons freshly grated lime or lemon zest (wash and dry the fruit first), I used lime zest
1/2 cup strained fresh lime or lemon juice, I used 3 oz lime juice and 1 oz lemon juice but you can do all lemon or lime whatever you want
2 pinches kosher salt
powdered sugar for dusting

Preheat oven to 350 degrees and place rack in lower third of oven.  Line the bottom of an 8 inch pan with tin foil.  (If you turn your pan upside down – press the foil over it to make the square shape – then flip pan over and gently press the shaped foil in it. Look at baking tips as well.)  You want enough of a foil overhang to be able to pull the foil (and bars) out easily.

Crust – In a medium bowl, combine the melted butter with the sugar, vanilla and salt.  Add the flour and mix until just incorporated.  Press the dough evenly onto the bottom of the pan.  Bake for 30-35 minutes until the crust is nicely browned at the edges and golden in the center.

Make the topping while the crust is baking.  Stir together the sugar, flour and salt in a large bowl until well mixed.  Whisk in the eggs and mix well.  Stir in the lemon or lime zest and juice as well.

When the crust is ready, slide the rack out and pour the filling into the pan – onto the hot crust.  Reduce the oven temp to 300 degrees  and bake for 20-25 minutes.   You want the topping to be set – no jiggles in the center when the pan is tapped.

Let cool on rack in pan.  Once cool – lift foil liner (and giant lemon square) and transfer to cutting board.  If the top has a thin layer of moisture on it, you can gently remove with a paper towel by gently placing it on top to blot.  Use a long sharp knife to cut the bars.  Sift powdered sugar on top if desired.  Again, store in refrigerator in an airtight container.  Enjoy-

chocolate chip rice krispie treats

OK, yes we all know how to make these – but my kids (or their friends) sometimes mention that mine taste better than those they buy at the bake-sale.  I often say it’s because I bake with looove and give them a big smile.  Truthfully though, the love comes from a little kosher salt and vanilla – and the added chocolate chunks (although if you’re a purist even just the vanilla and salt will heighten your pleasure).  My whole family enjoyed these yummy treats, even Rob who surprises me here.  I haven’t made them in a while – Greg just said…”mom, I’m so glad you made these again.  They are so good.”  I usually cut them up into reasonable portions (otherwise we are all slicing away day and night), wrap them in plastic wrap, and pop in an airtight container.  Good for a while although they do disappear fairly fast!

chocolate chip rice krispie treats(adapted from the Kellogg’s Rice Krispie cereal box recipe):
3 tablespoons unsalted butter
1 package mini marshmallows (10.5 oz)
3/4 teaspoon pure vanilla extract (please high quality here)
1/3 – 1/2 teaspoon kosher salt (or just about)
6 cups rice  krispie cereal
(about) 1 cup semi-sweet chocolate chunks (I happen to prefer Nestle’s chunks here.  Of course you can use chocolate chips instead.)

Spray or butter a 9×9 inch pan.  (I usually double this recipe and use my 9×13 inch pan.)

In a large saucepan, melt butter over low heat.   Once melted, add the marshmallows and stir and until they too have melted.  Watch them – they burn easily.

Add the vanilla and salt, mix to incorporate.  Add the rice krispies and mix.  Add the chocolate chunks and mix in.  (If marshmallow mixture is very warm, some may melt, but that is OK too!)  Pour onto prepared pan. Flatten and push down with the back of a large spoon (easiest if you spray spoon with non stick spray).

Let set for about 45 minutes to an hour.  (Or longer).  Cut into squares and enjoy!

As mentioned – I cut, wrap and place in an airtight container.  But eating right out of the pan is good too.

Another note – sometimes I add some mini chips to the melted marshmallows.  Mix and melt them too – this makes the marshmallow mixture brown and changes the whole look of the bars.  Fiddle a bit.  See what you like to do.  Add peanut butter chips or milk chocolate chips, or maybe even a natural peanut butter laced throughout…next time…

caramel shorties w/sea salt

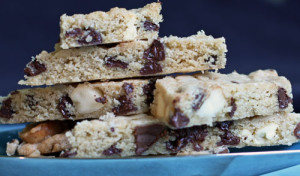
Ohmygoodness these bars are really tasty!  They are great for a party;  just so pretty to look at.  Everyone loved these – but especially Alisa – who loved the almond version.  The little specs of sea salt bring out the best in caramel and make these very addictive.  I wrapped most of the bars up and popped in the freezer for Gilda’s Club next week.  Perfect to make ahead as these bars freeze really well.  I found this recipe in Nick Malgieri’s Modern Baker and it was his introductory quote that got me…”If I had to choose one cookie above all others, it would be this one.  The buttery dough and creamy caramel filling complement each other perfectly.”  And he is right!  Enjoy-

caramel shorties w/sea salt (adapted only very slightly from  The Modern Baker by Nick Malgieri):

dough
2 sticks (8oz) unsalted butter, room temp
1/2 cup sugar
1/2 teaspoon kosher salt
1 1/2 teaspoons vanilla extract
2 1/2 cups all purpose flour

filling
4 tablespoons unsalted butter
1 tablespoon light corn syrup
1/4 cup dark brown sugar, packed
1 (14 oz) can sweetened condensed milk

Preheat oven to 350 and place rack in lower third of the oven.  Line a 9×13 inch pan with parchment or foil (making sure that the foil or parchment extends above the sides.  Look in baking tips to see a photo of this.)

Butter bottom and sides of foil or parchment.

With paddle attachment of mixer, beat butter with the sugar and salt on medium high speed until lighter – about 3 minutes.  Add the vanilla.  Scrape bowl and mix again for a minute.

On the lowest speed, beat in 2 1/4 cups (reserving 1/4 cup) flour – until flour is just incorporated and the mixture is smooth.

Place 3/4 of the dough into the prepared pan (set aside last quarter of dough) and gently with the palms of your hands spread the dough around and press gently to fill the pan.  Don’t push down hard here – just gently and firmly and evenly.

Place dough lined pan in the refrigerator to rest.

Add the remaining 1/4 cup flour to the remaining 1/4 cup dough and gently incorporate flour and break the dough into small crumbs.  Add 1/2 cup of slivered almonds (optional).  Set aside at room temp.

For the filling, in medium sized saucepan mix together the butter, corn syrup brown sugar, and condensed milk.  Bring to a boil – gently on medium low heat – (this will take about 7-8 minutes.  Then cook gently (on a low simmer)  – stirring often as it bubbles.  It it will darken and get thicker – this should take about 10 minutes or so.  Remove from heat and pour into a stainless bowl and let cool for 5 minutes.

Remove the pan from the refrigerator, and pour the filling into the pan, on top of the dough. Spread with a palate knife or back of a spoon.  Scatter the reserved crumb mixture all over the dough – making sure to hit the sides and corners too!

Sprinkle fine sea salt over the crumb.  Not too much – just little specs here and there.  This will bring out the caramel flavor.

Bake for about 30 – 35 minutes – until the mixture is bubbling gently and and the topping and dough looked cooked through.  If the top needs more color – move the baking rack to the top third of the oven for the last 5-7 minutes or so.

Let cool in pan.  Then gently lift using the foil or parchment as an aid and place on a cutting board and cut as desired.  (If hard to cut – and still soft, let cool a bit more.)  Enjoy-

cocoa brownies (w/chewy shiny top)

Another brownie – I know…but they are all so good and different.  I promise.  These brownies were a HUGE hit with kids.  (Great for a Hanukkah party if you’re celebrating.)  All who tried absolutely loved them.  Zach and Lauren were fighting over the edges, Will and  Hanna  loved them too as well as Greg and Sylvie.  Andy said these brownies were his all time favorite!  And me, yes, a small one in my little mug with peppermint ice cream (post soon to come) – after dinner watching Glee – verrry happy.  I didn’t share with my adult friends since I have a bunch of charity events over the next two weeks and decided to save.  I’ll take a poll then…but I can assure you – these brownies are great.  The whole top layer is a sweet shiny chewy crust.  Mmmm…so very good.  Enjoy!

(Good quality natural cocoa is best here – makes for a complex brownie.  I used Valrhona and they came out dark and delightful.  Scharfenberger would be another good choice as well as many others. You can also use a Dutch processed cocoa which will lend to a more basic and old fashioned flavor.  I bet good as well.  Next time!)

cocoa brownies w/chewy shiny top (just a teeny tiny bit adapted from Bittersweet by Alice Medrich – she is a genius):

10 tablespoons (1 1/4 stick) unsalted butter
1 1/4 cups sugar
3/4 cup plus 2 tablespoons unsweetened cocoa powder
1/2 teaspoon kosher salt
1 teaspoon vanilla extract
2 cold large eggs
1/2 cup all purpose flour
2/3 cup semisweet chocolate chips (optional)

Preheat oven to 325 and place baking rack in lower third of the oven.  Line the bottom and sides of an 8 inch square pan with parchment or foil – making sure there is an overhang so you can pull the brownies out at the end using the overhang as an aid.  (Look to baking tips and pan prep for more information and photos.)

In a medium heatproof bowl, place the butter, sugar, cocoa and salt.  Place the bowl over a large pot of barely simmering water.  Stir the mixture from time to time and continue to heat until the butter has melted and the mixture gets hot.  Remove the bowl and set aside to cool to warm (vs hot).

Stir in the vanilla and then the eggs, one at a time, stirring well after each one.  When the batter looks shiny and cohesive, add the flour and stir well – until you cannot see any more flour.  Then beat this batter vigorously for a minute or so with a wooden spoon.  Stir in the chocolate chips.

Spread into pan and and bake until a toothpick comes out slightly moist with batter.  Anywhere from 20-28 minutes.  Let cool completely.

Once cool, remove brownies by the overhang of foil or parchment and place on cutting board.  Cut into squares and eat!

triple chocolate macadamia nut cookie bark

I saw this recipe and immediately thought of a platter filled with both these cookies and the rocky road cookie bark.  One dark, one light, both free form cookies.  Success!  These are more chewy and dense than a regular cookie and the macadamia nuts really make them pop with flavor and texture.  (Although they are good with out the nuts too.)  I knew these would be especially good with vanilla ice cream (as usual) and I was so eager to try I actually had a little teeny tiny afternoon snack bite (I usually wait until after dinner…just like I tell my kids).  But I couldn’t resist… and yum!  These cookies are not too sweet – which is a nice change from the blondies which are very sweet (which I also love – I do like it all).  I froze and brought a batch of these to our families for Thanksgiving and wow…my niece Alex ate them up sooo fast.  Loved them and wanted the recipe.  At 16 I’m happy to do anything to hold onto that love.  And my niece Emily – who has a severe nut allergy was verrry happy on Thanksgiving with her nutless bark.  She too asked for the recipe and was all smiles.  So next time you need a pretty cookie platter make both these and the rocky road.  Your friends and families will be in for a real treat!   Enjoy-

triple chocolate macadamia nut cookie bark (adapted from The Good Cookie by Tish Boyle):
2 cups plus 2 tablespoons all purpose flour
1/2 teaspoon baking soda
1/2 teaspoon salt
1 cup (2 sticks) unsalted butter, melted and cooled a bit
3/4 cup sugar
1/2 cup firmly packed light brown sugar
2 teaspoons vanilla extract
1 large egg
2 ounces good quality white chocolate, cut up into small pieces
2 ounces good quality milk chocolate chips or cut into pieces
3/4 cup semi sweet chocolate chips or cut into pieces
3/4 cup toasted (if you can) and coarsely chopped unsalted macadamia nuts (if you can only find salted, just rinse with water and dry thoroughly)

Preheat oven to 350 degrees.  Line a baking sheet with parchment.

Now is a good time to toast your nuts…I often do them in my toaster oven.  325 degrees on foil for 4-6 minutes.  This really brings out their flavor.

Melt the butter and set aside to cool a bit.

Whisk together the flour, baking soda, and salt.

With the paddle attachment in your mixer, beat together the melted butter, the white sugar and brown sugar.  Mix well – for a minute or two on medium high speed.  Mix until incorporated.  Add the vanilla and the egg and mix well again.

On the lowest speed, add the flour mixture, mixing until just incorporated.  Then with a spoon, mix in the 3 types of chocolates and the cooled macadamia nuts.

Spread the dough onto the pan and flatten with a knife or your hands.  Try to get the batter as thin as you can  (This is messy).

Tish Boyle said to bake from 15-18 minutes, but my cookies took a lot longer.  This might be because I had two sheet pans (I doubled the recipe) in the oven.  I switched racks and turned often.  And then I forgot to check the time when I pulled out!  Sorry.  So…check at 15 minutes…but if no where near ready, give it more time.  Much more time.  The bark should turn a nice light golden brown color and should still be quite soft to the touch.  Try not to over bake as the cookie will firm up nicely as it cools.

Break bark by hand or cut erratically with a knife (this is what I did).

And enjoy!

(my favorite) brownie sundae with carmalized bananas

OK, so you’ve seen this photo when I wrote about the coffee ice cream, and the caramelized bananas…but you haven’t heard me talk about the sundae itself.  Well, pretty self explanatory really.  Right?  Just look at the picture.  What is better?  Ice cream of your choice atop the glazed nutty brownie…with freshly whipped cream and the caramelized bananas.  A little chocolate sauce to top it off and oh my.  Really oh my.  This is the ultimate (clearly for me).  Although chocolate chip is my favorite ice cream out there…(irrelevant I know).  Chat 19 – a local restaurant, was my inspiration for this.  I happen to love and order their sundae whenever I’m with a group (usually girls) who will share it with me (almost always).

Not sure you need a recipe here.  You’ll find most of the ingredients in the blog and of course you can buy the ice cream.  But don’t skimp on the the whipped cream please.  Get those beaters out.

Enjoy!

blondies

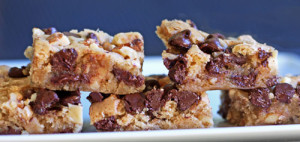
I just love love love blondies.  And they make everyone in my family happy.  Greg will eat them because they are not too chocolaty, Andy likes them because there is chocolate in them (although he is really developing a palate for other flavors :)), Sylvie who really likes it all (like me), Rob too enjoys a good blondie as long as it doesn’t have white chocolate or butterscotch in it and Alisa our au pair too.  She just loves the nuts in these.  I’ve tried many blondie recipes over the years, and I’ve often bought blondies to try when out and about but I’m usually disappointed.  But…I’m done searching.  I tried and found these sweet blondies in Alice Medrich’s Cookies and Brownies book.  Forever done.  I hope you like them as much as we do.  And of course, yes, so yummy with vanilla ice cream!blondie-tray

Oh and btw – I often multiply this recipe by 4!  Yes, a lot I know…but they freeze really well.  I bake in my half sheet pan lined with parchment and save some for unexpected company, for charity or for gifts.  But the recipe below is for one 8×8 inch pan.

blondies (very slightly adapted from Cookies and Brownies by Alice Medrich):
1 cup all purpose flour
3/4 teaspoon baking powder
1/2 teaspoon salt
1 stick (8 tablespoons) unsalted butter
1 cup firmly packed light brown sugar
1 large egg
1 teaspoon vanilla extract
1 1/2 teaspoons dark rum (optional)
2/3 cup chopped walnuts or walnut pieces (divided)
3/4 – cup semisweet chocolate chips (more if you want)

Preheat the oven to 350 degrees.  Line an 8×8 inch pan with parchment or foil so that it comes up all the sides of the pan.  That way, when cooked, you can pull the blondies from the pan – holding onto the foil/parchment – in one quick and easy effort.  Then smooth down the sides of the foil, and easily cut and serve.  If you don’t care about appearance, then just butter the bottom of the pan – and you can dig them out later.  Up to you.  (Look to pan prep in baking tips to see a photo of this pan prep with cranberry cake.)

In a small bowl, whisk together the flour, baking powder and salt.  Set aside.

In a saucepan, melt the butter and remove from heat.  Add the brown sugar and mix well.  Add the egg, vanilla, rum (if using) and mix well.

Gently stir in the flour mixture and half of the walnuts and 1/4 cup of the chocolate chips.  Pour batter into prepared pan and then top with the rest of the walnuts (other half) and remaining 1/2 cup of chocolate chips.

Bake for 20-25 minutes or until the nuts look toasted and golden and the edges have pulled away from the pan a bit.  Let cool.

Lift the edges of the parchment or foil and pull the blondies out and onto a cutting board.  Fold down the edges of the foil and cut as desired.  These are rich – I recommend cutting them in fairly small squares – but then try not to eat two!

glazed nutty brownies

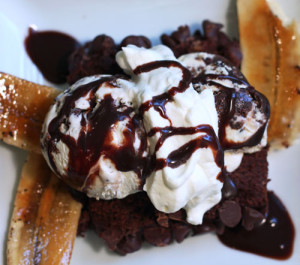
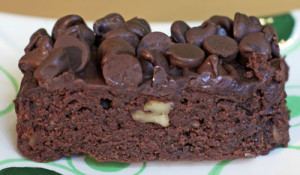
I’m always on the lookout for a good frosted brownie.  Always.  I love my fudgy brownies  and they are my “go to” brownies…but Rob loves and often asks for a frosted one.  I made these thinking they were frosted, but they were really glazed – so I’m actually still on the lookout for Rob.  But despite the glaze/frosting misunderstanding, these were delicious!  Our friend Rob (another Rob) liked them so very much.  He was impressed that with all the other desserts I offered – that a simple brownie stood out.  Waaay out.  I found these in Great Cookies by Carole Walter.  Carole’s write up was so compelling that I had to try them.  I didn’t change too much although I really loved the glaze in the espresso brownies so I put the two together.  I added some chocolate chips to the top – just to continue the chocolate overdose theme and wow, great.  These are a little bit crumbly – but if I can say so –  in a really good way.  I loved them as the base of a mini brownie sundae I ate Sunday night.  Super mini, but delicious with my coffee ice cream. I will however, continue to try and test for a true frosted brownie, and a cakey brownie as well as a cracked topped brownie…as that is half of the fun!  Enjoy-

glazed nutty brownies (adapted from Great Cookies by Carole Walter):
8 oz bittersweet chocolate – coarsely chopped
1/2 cup plus 2 tablespoons (1 1/4 sticks) unsalted butter – room temp for 15 m
3/4 cup firmly packed light brown sugar
1 1/2 teaspoons instant espresso powder
1 teaspoon vanilla extract
1/4 teaspoon finely ground black pepper (optional)
1/2 teaspoon kosher salt
3 large eggs (room temp)
3/4 cup all purpose flour
1 1/2 cups coarsely chopped walnuts (best if toasted first for 6-10 minutes in a 325 degree oven – until fragrant)

icing
4 tablespoons butter
1/4 cup milk
1/2 cup sugar
1/2 cup light brown sugar
1/3 cup cocoa powder
1 teaspoon vanilla extract
1/3 teaspoon salt

chocolate chips – 1/2 cup to 1 cup depending on you (optional)

Preheat the oven to 325 degrees and line your pan with foil so that it comes over the edges of the pan.  You can do this with parchment too.  (That way, when cooked, you can pull the brownies from the pan – holding onto the foil – in one quick and easy effort.  Then smooth down the sides of the foil, and easily cut and serve.)  If you don’t care about appearance, then just butter the bottom of the pan – and you can dig them out later.  Up to you.

If you plan to toast the nuts now is a good time – in a preheated oven at 325 degrees and place nuts in a single layer on a foil lined sheet pan (less cleanup).  Cooking time varies based on the size of your nut so check these often – you want them to be fragrant and have a warmer color – but do not burn (obviously).  This can take from 6-10 minutes.

Melt the chocolate in a metal or heatproof bowl atop a small amount of simmering water.  (Or a double boiler.)  Slowly melt the chocolate and stir occasionally.  Remove when melted and set aside to cool a bit.

In your mixer – with paddle attachment, beat the butter until smooth then add the brown sugar, espresso powder, vanilla, pepper, and salt.  Mix well.  Scrape down the sides of the bowl, and mix again.

Add the eggs one at a time (wait to add next egg until you can’t see the egg before).  Scrape down the bowl, and mix again – for another minute or two on medium speed.  The mixture will look curdled but don’t worry.

I like to do the rest by hand, but either way by hand or the mixer on low, lightly mix the melted chocolate into the batter.  Fold the flour in very gently and mix until almost  incorporated.  Add the cooled nuts and fold in as well incorporating the nuts and the rest of the flour.  Do not over mix.

Place in prepared pan and bake for approximately 30-35 minutes.  Mine took 33 – Carole’s took 35 so as usual check often and before…checking every 2 minutes or so towards the end.  These brownies should come out slightly wet with a toothpick.  You want them that way – and they will continue to cook a little bit more on the counter.  Let cool a bit maybe 15 minutes or so.

In the meantime, make the icing.  Bring the butter, milk, sugars, cocoa, vanilla and salt to a boil in a small saucepan.  Continue to stir and whisk as it comes to a boil.

Pour the  icing over the warm brownie (you may not need all of it – but save it!  Use it with something else).  I then scattered semisweet chocolate chips all over the glaze – for an extra extra chocolate explosion.  This is really optional!  I’m just crazy about texture.  Then let all set and harden for a few hours.

When cool and set, using the foil as an aid, pull the brownies from the pan and place on cutting board.  Smooth down the edges of the foil and there you go – no fighting to get them out of the pan.  All pretty and all neat (if you care!)

Feel free to freeze.

Enjoy!