gingerbread and white chocolate chunk blondies

Soft moist gingerbread with sweet chunks of white chocolate throughout make these a little different and extra special.  Please don’t discount these based on the white chocolate because I love them!  I really love them.  Sylvie is right on board with me. Rob’s brother Eric  said “delicious!”  and Kathy and Thomas agreed.  They speak to us.  If you use high quality white chocolate (a must) I promise that even you white chocolate haters will enjoy.  Rob is one of those haters – and guess what, he likes them a lot!  (OK, he did pull out some of the white chunks, but kept some in too.)  Linda and Patrick were super reluctant to try but after much prompting they did, and they thought waay better than expected.  Of course they mentioned that dark chocolate would be fabulous next time.  But I really enjoy the sweet creamy white chocolate combined with the warm winter spices.  Next time I might add cranberries to pucker the flavor a bit.  Perfect for holiday celebrations as they are very easy to make and a great addition to a festive holiday cookie platter.  Oh, and they freeze well too.  Enjoy-

This recipe makes two 8×8 pans.

gingerbread and white chocolate chunk blondies (originally from Martha Stewart Living, December 2007 – but found on one of my favorite blogs, Technicolor Kitchen)

2 3/4 plus 1 tablespoon flour (395 grams)
1 1/4 teaspoon baking soda
1 1/4 teaspoon kosher salt
1 1/4 teaspoon ground cinnamon
1 teaspoon ground ginger
1/4 teaspoon ground cloves
2 1/2 sticks unsalted butter, room temp
1 1/4 packed light-brown sugar (218 grams)
1/2 cup plus 2 tablespoons sugar (124 grams)
2 large eggs
1 large egg yolk
1 1/4 teaspoons vanilla extract
1/3 cup unsulfured molasses
9 ounces good quality white chocolate chopped (I like both big and small pieces throughout).  Or white choc chips.

Preheat oven to 350 degrees.  Line two 8×8 square pans with foil so that it hangs over the edges.  Look toward the bottom of  baking tips for a visual.  Lightly butter the foil.

Whisk together the flour, baking soda, salt, cinnamon, ginger, and cloves.  Set aside.

Beat the butter and brown and white sugars with the paddle attachment of you mixer.  Beat on medium high speed until paler and fluffy – about 5 minutes.  Scrape the bowl down every now and then.

Add the eggs, and yolk, one at a time – beat well after each addition and again, scrape down bowl.  Beat in the vanilla and molasses .  On the lowest speed, add the dry ingredients and mix until just combined.  Do not over-mix.  Fold or mix in the white chocolate chunks.

Spread the batter evenly between the two pans.  Bake until a toothpick comes out just clean and the edges are golden.  About 32-37 minutes.

Let cool and then pull out from pans with the foil overhang.  Cut into squares when completely cool.  Serve.  Delicious.

They last for about a week in an airtight container and they freeze well too.

Enjoy-

eggnog snickerdoodles

Crisp and tasty, these cookies look and taste like winter holiday fun!  They are a great addition to any cookie platter – looking so festive, and a nice contrast to heavier and chippier cookies (which I happen to adore).  These are great for all those vanilla fans and those who enjoy a butter cookie with great flavor.  Although there is no actual store bought eggnog in this recipe, there is a nice healthy dose of rum and a sprinkling of nutmeg that is the essence of eggnog.  Sylvie and Alisa really liked these a lot.  Our friend Mike did too as he carefully placed one cookie after the other in his mouth – one at a time and about 5 times in a row.  A finalist in the cookie contest in the December issue of Cooks County Magazine these are a winner… Enjoy!

As usual, remember that you can make this dough in advance and roll it into logs and slice and bake fresh on the day you need it.  Look at the bottom of the oatmeal raisin cookie post for tips on how to do that.

Remember to look at baking tips for how to measure flour properly.  Makes a huge difference in butter cookies…well, all cookies, well all desserts!

eggnog snickerdoodles:

2 1/2 cups all purpose flour
2 teaspoons cream of tartar
1 teaspoon baking soda
1/2 teaspoon kosher salt
2 sticks unsalted butter, room temp
1 1/2 cups sugar
2 large eggs
1 1/2 teaspoons rum
1/2 cup confectioners’ sugar
1/2 teaspoon ground nutmeg

Preheat oven to 400 degrees.  Line baking sheets with parchment.  In a small bowl, whisk together the flour, cream of tartar, baking soda and salt.  Set aside.

With the paddle attachment of your mixer (or hand held beaters) beat the softened butter with the sugar on medium high speed until light and fluffy – about 3-4 minutes.  Scrape down the bowl midway and continue to beat.  Add the eggs one at a time followed by the rum and mix until incorporated.

On the lowest speed, add the dry ingredients and mix until just combined.  Try not to overwork the dough.

At this point, you can roll into logs and freeze and complete the rest on cooking day. (Let sit in fridge or counter to soften as you do have to form these into balls – hard directly from freezer.)

Roll 1 tablespoon of dough into a 1 inch ball – and repeat with dough.  Lightly press each ball down – or use a measuring cup (lightly greased on bottom) to push these down into a 1/2 inch round.

Bake until the edges are nice and golden about 8-10 minutes.  Remember to switch and rotate baking pans throughout cooking.

As the cookies cool, make the dusting powder.  Combing the confectioners’ sugar with the nutmeg and using a fine mesh strainer, then dust the cookies generously with the spiced sugar.

These retain their crisp for about 3 days in an airtight container.  Enjoy –

cranberry shortbread cake

So I really wasn’t sure how this would come out, but good news….yummy!  A somewhat sweet, but more tart and refreshing cranberry filling nestled between two layers of soft and moist vanilla shortbread cake – so verrry tasty.  I happen to love cranberries and here mixed with orange zest and fresh orange juice just made me happy.  I can eat the filling alone (or on top of some ice cream!)  This cake had great flavor and texture for 5 days!  And as it sat it almost seemed to get moister.  And really, it is so pretty for the holidays – well worth your time and effort.  Patrick seemed to enjoy this the most – and actually my mother in law Edith too.  Rob and Linda liked as well, but unfortunately, they don’t love cranberries.  And well, you do have to like em to enjoy this.  But change the filling – Rob and Patrick are eager for a blueberry filling which I will try in the summer.  Fill it with a cooked apple or pear filling – mix them with sugar and cinnamon – or ginger – that too would be super.  Serve this warm or at room temp with vanilla ice cream and enjoy-

You need to plan ahead when you make this as the cranberry filling needs to cool to room temp and the dough needs to rest in the fridge for 30 minutes.  You can make both filling and dough ahead of time (the filling 2 weeks ahead and the dough the day before.)

I doubled the recipe and placed in a 9×13 inch pan.  But I do think the original recipe a 9 inch spring form would be better which I will write below.  If you want to double it- just make 2-9 inch pans.

cranberry shortbread cake (from Dorie Greenspan’s Baking From My Home To Yours):

filling

1 navel orange
about 1/4 cup orange juice (from the orange)
1 12-ounce bag of cranberries, fresh or frozen (but not thawed if frozen)
3/4 cup plus 2 tablespoons sugar
2 pinches of kosher salt

cake

2 1/2 cups all purpose flour
1 teaspoon baking powder
3/4 teaspoon kosher salt
1 stick plus 5 tablespoons unsalted butter, room temp
1 cup plus 2 tablespoons sugar – divided
1 large egg
1 large egg yolk
1 teaspoon pure vanilla extract

For the filling

Wash and dry the orange.  Then grate the zest – a microplane (see baking tips) is great.  Be sure to just take the orange part of the peel and not the white pith since it is bitter.  Put the zest in a saucepan.  Next, peel the orange using a knife –  removing the white pith from the outside of the orange, then slice between the membranes to release the orange segments.  Cut the segments into 1/4 pieces and add to the zest.  Squeeze the juice from the orange into a measuring cup – you should aim for 1/4 of a cup and if you don’t have enough juice then add additional juice from another orange or some water to equal 1/4 of a cup. Add the juice to the saucepan.

Place the cranberries in the pan as well – and stir in the sugar.  Over medium heat, bring the mixture to a boil and stir frequently.  Then cook the cranberries stirring constantly until the cranberries pop and the back of you spoon leaves tracks – this should take about 5 minutes.

Place cranberry mixture in a bowl to cool to room temperature.  Add the pinches of salt.  Taste it (while warm) – and if it is too tart, add a little more sugar.  (This can be made up to 2 weeks ahead and stored in the fridge until assembly.)

For the shortbread cake –

Whisk together the flour, baking powder and salt.

With the paddle attachment of you mixer, beat the butter on medium speed until it is soft.  Add one cup of the sugar (save the 2 T for later) and beat until the sugar dissolves into the batter – about 3-4 minutes.  Reduce speed to low and then add the egg and egg yolk.  Once absorbed, add the vanilla.

On the lowest speed, add the flour mixture and beat until just incorporated.  Do not overbeat – in fact you can do the tail end by hand.

Place the dough onto a smooth surface (I like my cutting board) – and then divide it in half.  Wrap each half in plastic wrap and form into a disc – and let rest in fridge for 30 minutes.  (If you did this yesterday, just pull the dough 20 minutes before you plan to roll it.)

Preheat the oven to 350 degrees. Lightly butter a 9 inch spring-form pan (pref non stick).  Place the pan on a baking sheet.

Assembly –

On a lightly floured surface roll half the dough to form a rough circle and carefully place in the baking pan.  Press the dough in so that it covers the bottom completely.

Next, pour the cooled cranberry filling and spread evenly on top of the dough – making sure to cover all of it – even the edges.

Take the other piece of dough and again – roll into a nice circle that will fit  on top of the filling.  I needed to use a lot of flour on the bottom and top to prevent it from sticking.  Then make sure to brush off the flour.   If you don’t like rolling the dough you can leave it on the plastic wrap and just press it into a circle with your hands.  Then you can carefully invert the pressed dough onto the cranberry filling and peel off the plastic.

Lastly – sprinkle the remaining 2 tablespoons of sugar on top of the dough.

Bake for 35 – 40 minutes or until the top is a nice golden brown and a toothpick comes out with nice moist crumbs.

Transfer to a cooling rack for about 20 minutes, then run a blunt knife around the edges and release the sides of the pan and let cool.

Serve warm, or room temp – no need to refrigerate.  This lasts well for 5 days wrapped well.  Enjoy-

(grandma’s) mandelbread cookies

My grandma was a great cook and baker – and lived till she was 97!  Before she passed away, she handed me a glad bag filled with index cards – all written in her not so neat scrawl, but with many notes in the margins and “Excellent” written next to this one. These have been on my to-bake list for about 2 years…and today – this first day of high school for Greg – I was feeling jittery and unsettled and decided that baking these would be a perfect thing to do.  (Even though I had MANY many other things I should do.)  I can’t compare with other mandelbreads because I’ve never had any other but these were good!  Addictive.  Alisa really liked these a lot.  She loved the nuts and chips and the feel of the cookie.   Ali and her extended family enjoyed them too!  Mandelbread is shaped like Italian biscotti – but it is lighter, less dense and much softer (well, my grandma’s recipe is) than biscotti.  Cake-ier too.  These are great for those who don’t love things too sweet but love a taste of something homey and simple at the end of the meal.  These cookies are also easier on your teeth than biscotti which is (sadly) nice as we age.  You can keep these plain – or add nuts, chips, coconut or anything else you can think of.  My friend Ellie said her grandma put in candied cherries – another idea!  Enjoy –

Oh, and btw – these are non dairy.

(grandma’s) mandelbread cookies (from my grandma Ruth’s index card):

3 large eggs
1 cup plus 2 tablespoons sugar
1/2 cup canola oil (or vegetable)
3 cups sifted flour
1/2 teaspoon kosher salt
1 teaspoon baking powder
1 teaspoon vanilla extract

optional – 1 cup mix – ins –  (I used 1/2 cup toasted chopped pecans and 1/2 cup mini chocolate chips but plain is also good or with just nuts.  Also coconut might be nice if you are a coconut lover.)

Toast nuts first if you are using.  Chop.

Preheat oven to 350 degrees.  Place rack in middle of oven.  Beat 3 eggs with whisk attachment – or with hand held beaters – for about 5 minutes until thicker and yellow.  Slowly add sugar and continue to beat for another 5 minutes.  In the meantime measure the flour, baking powder and salt and set dry ingredients aside.

I switched to the paddle attachment  at this point – but you can do the rest by hand as well.

Add the oil on lowest speed and then the vanilla extract.

Gently fold in the dry ingredients in 3 additions – being careful not to over-mix.

Add nuts, chips – or whatever mix-ins you prefer.

Place the dough in a big mound on a parchment lined sheet pan – making a long large log (you can also make 2 smaller logs).

Bake for about 35-39  minutes until lightly browned and the top is hard and you can try a toothpick too.  It is a little tough to judge – but try your best.

Let cool on pan for a bit, then slice the log as you do in the blue corn biscotti (there are photos there) and place on sheet pan – laying down each cookie – packing them in – then bake these again – for about 4 – 5 minutes on each side @375 degrees.  (My grandma wrote “broil until brown” but I decided to just bake again for a bit – nervous to broil as she also wrote “watch it!!).  Pick what you prefer.  The more you bake the harder the cookie will be.  I wanted these soft so I only baked for a little bit.

Let cool and enjoy with coffee or yes, in vanilla ice cream too!

matzoh bark and chocolate covered matzoh

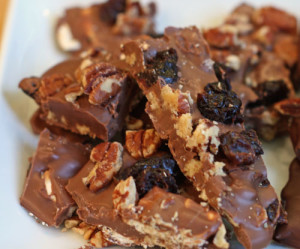
Chocolate matzoh bark.  So delicious and tasty.  I’m not supposed to eat or drink chocolate, caffeine or alcohol (so sad, advice for vertigo)…but I know this is good (I confess, I had to nibble!)  The salty matzoh, the chocolate, fruit and nuts, it is all so seriously good.  Same thing goes for chocolate dipped matzoh.  Different shape, same taste.  A great treat at the end of your Passover Seder.  Tempering chocolate is the only tricky part here.  It takes time, patience and a comfort with the chocolate.  If you have a tempering machine, still takes time and patience, but certainly easier as you can do other things in the kitchen while it runs.  The most important piece here is to purchase high quality chocolate.  Really – get the best you can afford.  I like to use salted matzoh – that sweet/salty thing speaks loudly to me.  See the Halloween Peeps and Valentine Chocolate posts for further instructions on tempering and machines – and tips in general.  If short on time, or prefer an easier treat check out the matzoh candy post.

matzoh bark and chocolate covered matzoh:

tempered milk and dark chocolate
matzoh, I used salted
dried fruit, I used cherries
toasted nuts, I used pecans

other ideas for add-0ns:
chocolate chips
coconut
cocoa nibs
seeds

chocolate dipped matzoh

Dip matzoh pieces in tempered chocolate.  Shake off excess and place on parchment lined sheet-pan.  Add fruit, nuts, chips, cocoa nibs, coconut, seeds or chips.  Let set.  Enjoy.

matzoh bark

Spoon tempered chocolate onto parchment lined sheet-pan.  Place broken matzoh pieces all over.  Cover with more chocolate, nuts, dried fruits…more matzoh if desired and a drizzle of chocolate.  Have fun, be creative.  Let set and cut into pieces.  Enjoy-

chocolate/caramel matzoh candy with sea salt

Many of my friends (and kids friends) keep Passover, so I wanted to try this recipe that I’ve heard about throughout the years.  I like the idea of a handy treat for those who celebrate.  My friend Stephanie happily shared the recipe from her “Passover Stuff” book and I must tell you that this is really good and I thank you (Stephanie).  Really good.  Sweet, yes, but I added some bittersweet chocolate and some delicious sea salt and I have to say this is better than I expected and utterly addictive.  I had friends over this weekend – none who happen to celebrate Passover and they were munching away and loving it.  I mentioned that it didn’t look so pretty but they were undeterred.  They all loved and commented on the salty caramel and nutty chocolate (the matzoh just holds it together).  I used toasted pecans…but really most nuts will do – walnuts, almonds, pistachios – maybe even some raisins too.  You can go really crazy here and have fun.  Serve for your family and friends who happen to celebrate (or not!)  Happy Passover.  Enjoy-

If you have time – find some Maldon sea salt.  It is great – flaky and tasty.  You can order online but pretty certain whole foods sells it.  (Great for salads too – with olive oil.)

chocolate/caramel matzoh candy with sea salt (slightly adapted from Stephanie’s “Passover Stuff”)

4 Matzoh boards (I used salted, but believe unsalted OK too)
1 cup (2 sticks) unsalted butter
1 cup packed dark brown sugar
2 cup chocolate chips or chunks (I used half semi and half bitter – but use what you like – Stephanie said she’s tried milk chocolate too)
1 cup (or more to taste) toasted pecans, walnuts, or almonds (raisins too optional)
1/2 teaspoon good quality flaky sea salt – or kosher salt

Preheat oven to 450 degrees.  Line a sheet pan with parchment.  (Reader Jessie said she made this without the parchment and the toffee spread to the underside…she said it was fantastic.)

Arrange matzoh in a single layer – break if necessary and try to cover the whole sheet pan.

Combine the butter and brown sugar in a small sauce pan over medium heat and bring to a boil – stirring constantly.  Cook until syrupy — about 3 minutes or so.

Pour the toffee mixture over the matzoh and spread it out evenly (this is hot be careful.)

Place in oven and bake until bubbly – about 4 minutes (now it is extra hot).  Remove from oven and sprinkle the chocolate over the hot bubbly mixture.  Place in the oven again for about 30-60 seconds more.  (The second time I made this I did not place the chocolate back in the oven.  I let it be…prettier appearance and the chips all over were delicious.)

Now you have a choice…leave as is – or you can spread the chocolate around.  Either way – its a matter of appearance.  I happen to like to see the chocolate chips and chunks.  Sprinkle the toasted nuts over and then the flaky salt.  (Reader Michelle used salted peanuts and said it was AMAZING.)

Refrigerate until the chocolate is firm about 30 minutes to and hour.  cut or break into pieces.  I happen to like this cold – so I store in the fridge.  The chocolate discolors over time, but it is tasty!

Save the crumbs for an ice cream topping.

Enjoy-

valentine chocolates (kid style)

I love dipped stuff.  Soon I’ll make more grown up chocolates – and dipped dried fruits and nuts, but oh, there is nothing like a chocolate covered Oreo, potato chip, pretzel, marshmallow or graham cracker… I love it all.  So do my kids, their friends and my friends and anyone who came over last week.  Conor happily took a bag home and Jodi and Mike loved their goodies.  Temper your chocolates (follow directions in the Halloween Peeps post) and go to town.  Look to the bottom of this post for a photo of untempered chocolate.  The sweet and salty thing is addictive and delicious.  My personal favorite is crunched up pretzels with white chocolate and dried tart cherries.  Wow.  I decided to sprinkle half with Valentine hearts and colors for an idea for Valentines day and left some plain just for munching.  This chocolate (if tempered) will keep in an airtight container for a while (well, the potato chips kind of loose their crunch).  So make ahead and let everyone know that you love them!  Enjoy-

chocolate dipped goodies (kid style):

tempered: white, milk, semisweet and/or bittersweet chocolate (there are some great tempering videos out there – just google it and if you love dipping then invest in a tempering machine.)

things to dip
marshmallows (big and mini)
kettle corn
crunched pretzel pieces, flat pretzels, pretzel rods, pretzels thin
Oreos (whole or crunched)
potato chips (I like Cape Cod)
dried fruits
graham crackers whole or smooshed
cocoa nibs (my new favorite!)
m & m’s
mini chocolate chips

I think you can figure most of this out.  But just in case, prepare a few sheet pans lined with parchment.

Oreos – if you have a mold you can cover them using it.  If not, simply dip them in the tempered chocolate.  Alternately, crunch them up and pour chocolate over them, mixing all together.  Scoop out little spoonfuls onto the parchment, or into cupcake liners.  Top with m&m’s if you choose or chocolate shavings or drizzle.

Graham crackers – individually dip – then add on m&m’s, or cocoa nibs, or really anything.  Alternatively, smash them up and combine  with chocolate and mini marshmallows and plop little spoonful down on parchment or again, in a cupcake liner.

Pretzels – dip the whole pretzel in the chocolate.  Leave as is, or coat chocolate with mini m&m’s or mini chips and let set.  You can also smash up the pretzels into bits, add dried cherries and pour chocolate over (esp good with white chocolate) – and drop by spoonful onto parchment (or into cupcake liners).

Cocoa nibs – I love love these.  I loved them simply mixed with white chocolate and then poured into mini cupcake liners.  Alternatively, add to dipped grahams or marshmallows for added texture and flavor.

Marshmallows – simply dip big ones 3/4’s way down into chocolate.  turn upright to set and top with a treat if you choose (m&m’s, mini chips, cocoa nibs).  As mentioned above, combine mini marshmallows, graham crumbs and chocolate and place by spoonful onto parchment.

Kettle Corn – spread some kettle corn on parchment and drizzle chocolate over it.  Delicious!

Potato chips – dip and place on parchment to set.

chocolate NOT tempered

If you do not temper the chocolate, it will take many hours to set – and even when set it will feel tacky and slimy.  The chocolate will streak and not have a good snap or bite.  The chocolate is not as viscous and is heavier to work with.  If you look carefully at the photo to the left and below, you’ll see streaks and spots on the chocolates.  Hopefully you can also see that the chocolates have a duller appearance than their tempered counterparts and just look pretty unappealing.  No one ate these!

the same Oreo a few days later...

peppermint stick ice cream

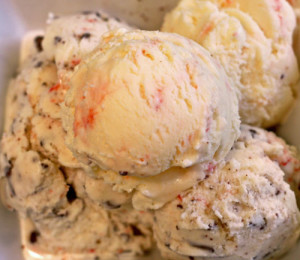
This is my old friend Dani’s all time favorite.  We were lucky growing up – in that both of our families went to Vermont during the winter weekends.  Dani from NJ, me originally from MA, these were very special times.  But oh, it wasn’t just me and “Eight is Enough” that made her smile – it was the holiday season – and Friendly’s featured Peppermint Stick ice cream – her absolute fave!  She requested it a few years ago – maybe for the birth of a baby or a different event (my memory is really fading, sadly) but needless to say she was thrilled.  I think I dipped Oreos in chocolate and then crunched them into the peppermint stick.  Wow.  A friend just mentioned that Trader Joes sells a peppermint version of an Oreo that sounds perfect.  Anyway, this ice cream is really very good.  I made half just peppermint and the other half with ground bittersweet chocolate.  I love that one.  Greg loves the pure peppermint and he’s lucky because no one else in our family will eat it, and Dani is still over that bridge!  Enjoy this – it is nice for the holidays and although rich, it is quite refreshing.

peppermint stick ice cream
2 1/4 cups heavy cream
3/4 cup milk
3/4 cup sugar
4 large egg yolks (room temp)
3/4 teaspoon kosher salt
2 peppermint candies (I used peppermint candies in this recipe because I thought they would be easier for the home cook to buy.  You can also use peppermint oil, or extract to taste if you prefer.  Just add 2 extra tablespoons of sugar if so.)

mix in
1/4 cup ground peppermint candies (ground coarsely or to your liking)
ground bittersweet chocolate (amount to taste – and optional)
crushed Oreos (also, to taste and optional)

Prepare an ice bath – a big bowl with ice and water.  In it, place another container or bowl with a strainer.  This is where the custard ice cream base will land once cooked.

In a medium heavy weight saucepan mix the cream, milk and half of the sugar.  Bring until almost a simmer…but do not boil.

In medium sized bowl, place the egg yolks, the other half of sugar, and salt and whisk well.

Slowly slowly ladle the hot liquid into the eggs and whisk well after each addition.  Keep adding the hot liquid until you’ve added it all to the eggs (again slowly so as not to cook the eggs).

Pour the whole mixture back into the saucepan and cook, over medium low heat stirring constantly with a wooden spoon until it thickens (reaches 175 degrees) and lightly coats the back of the spoon.

Strain the mixture into the prepared bowl and immediately add the two candies.  Mix until dissolved.  Let mixture cool in ice bath until it reaches room temp, then place in the refrigerator overnight.

The next day, churn the ice cream and when hard, add the ground peppermint candies (with or with out the chocolate or Oreos).

Place the ice cream in the freezer and oh, although soft, this is delicious the same day.  (If hard the following day, let sit in the refrigerator for 20 minutes to soften before you serve.)

Enjoy!

eggnog pound cake (w/rum glaze)

I wanted to make this cake ever since I saw it on the cover of Flo Braker’s new cookbook Baking For All Occasions.  I thought perfect for the holidays, and oh, it really is!  Filled with rummy raisins (currents if you can find them) and a terrific crystallized glaze that looks like way more work than it is – makes this cake stand out in both appearance and taste.  The eggnog, nutmeg, vanilla…mmm…all of it makes for one serious treat.  My friend Mindel in return for a lift (I seem to barter sweets for rides lately) – exclaimed “we all ate it (the four of us) within 5 minutes in the car.  It was soo good!”  My friend Wendy confessed that she tasted her slice after dinner and dessert on Saturday night – and although full – she said it was delicious.  Jason called and very seriously said, “Lisi, what did I just eat?  Oh my God.”  Flo Braker’s book is a great read.  It is filled with so very many tips, hints and methods – I urge especially novice bakers to take a look at it.  There is a lot to learn and so many mouth watering recipes.  Make this during the holidays if you can.  A nice departure from chocolate and surely a hit with family and friends.

eggnog pound cake w/rum glaze (slightly adapted from Flo Braker’s Baking For All Occasions):

3/4 cup dried currents (or raisins)
3 tablespoons dark rum
3 cups all purpose flour
2 teaspoons baking powder
1 teaspoon salt
3/4 teaspoon ground nutmeg (freshly grated if possible)
2 sticks (8 oz)  unsalted butter,  room temp
2 cups sugar
3 large eggs, lightly beaten, room temp
1 cup store-bought eggnog, room temp (from refrigerated section in mkt – not canned)
1 1/2 teaspoons vanilla extract

glaze

3/4 cup sugar
2-3 tablespoons dark rum
2 tablespoons water

Preheat oven to 350 degrees (and 325 if using a pan with a dark or black finish).  Butter (well) and flour a 10×3 inch bundt pan.  You can also use a 10 by 4 1/2 inch tube pan.

Soak raisins or currents in the 3 tablespoons of rum.  Set aside.

Whisk together the flour, baking powder, salt, and nutmeg.  Set aside.

In mixer with paddle attachment – beat butter for 2 minutes on med speed.  Add sugar and continue to beat for 5-7 minutes – until light and fluffy.  Scrape down the bowl two times during this and continue to beat and incorporate all of the butter.

Add the eggs, bit by bit – on medium speed until each addition is incorporated.  Scrape down bowl and mix again.

Mix the eggnog and vanilla.

On the lowest speed, add the dry ingredients in 4 additions and the eggnog in 3 additions.  Alternating between and starting and ending with the dry ingredients.  Mix after each addition until just incorporated.  Remove from mixer.

With a spatula, gently fold in the raisins (or currants) and rum.  Spoon the batter into the prepared pan and smooth the top evenly.

Bake in lower third of the oven – for about 55-65 minutes.  Mine took 60 exactly.  The cake should pull away from the sides a bit and have a good spring to the top when touched lightly.

Let the cake sit for 10 minutes.  In the meantime, make the glaze.  Mix together the sugar, rum and water.

Invert the cake carefully (after the 10 minutes) and place on wire rack over a piece of foil or wax paper to catch the drippings.  Gently brush the glaze all over the cake – sides, and top – the center too – with a pastry brush.  Use all of the glaze.

Let cake cool completely.  Enjoy!

gingerbread pudding cake

I really wanted to sneak this one in before Thanksgiving because it is so easy to make yet really delivers.  This moist pudding like cake is full of ginger flavor and when paired with freshly whipped cream or ice cream…oh so very good.  While it bakes – the top turns cakey while the bottom creates a sticky syrup.  I’ll admit that sometimes it doesn’t look too beautiful (although to me – the sticky look is immediately appealing).  I read about this a few years ago in Bon Appetit – it was in the readers’ favorite restaurant recipes – and brought it to our families for Thanksgiving.  Huge hit especially with Rob’s family!  Over the past few weeks I’ve received e-mails from almost every member of his family – urging me to share this recipe and to please bake it again for Thanksgiving.  OH, and by the way, you can make this the day before you plan to serve and just re-heat in the oven for service.  This recipe makes one 8×8 pan – I often double the recipe making two pans – or bake doubled in a 9×13 pan – just watch the baking time…

gingerbread pudding cake:
1 1/4 all purpose flour
1 1/2 teaspoons ground ginger
3/4 teaspoon baking soda
1/2 teaspoon cinnamon
1/2 teaspoon ground nutmeg
1/4 teaspoon ground allspice
1/4 teaspoon ground cloves
1/2 teaspoon kosher salt
1/4 cup (1/2 stick) unsalted butter, room temp
1/4 cup sugar
2 tablespoons beaten egg – (from 1 egg)
1 teaspoon vanilla extract
1/2 cup mild molasses
1/2 cup water
3/4 cup packed light brown sugar
1 1/2 cups hot water
5 tablespoons unsalted melted butter
freshly whipped cream and or vanilla ice cream

Preheat the oven to 350 degrees and butter an 8×8 pan.

In a small bowl, whisk together the flour, ginger, baking soda, cinnamon, nutmeg, allspice, cloves, and salt.  Set aside.

In your mixer or with hand beater, beat the 1/4 cup (room temp) butter and granulated sugar until blended.  Beat in the little bit of egg, scrape and mix well.  Scape and mix again.

In a glass measuring cup (for ease) mix together the vanilla, molasses and the 1/2 cup water.  Add the flour mixture to the butter mixture in 3 additions alternately wit the molasses mixture (in 2 additions) – starting and ending with the flour.  Gently beat to blend between additions.  Do not over-mix.

The batter will be thick.  Spread it into the prepared pan, and sprinkle all over with the brown sugar.

Stir 1 1/2 cups hot water water with the 5 tablespoons of melted butter and carefully pour this over the top of the batter.  There will be a lot of liquid and you’ll be worried about this – but don’t be!

Bake until the gingerbread is cracked on top and bubbly on the bottom – about 38-45 minutes.  Scoop the warm pudding cake into bowls and serve with whipped cream…yum.  Enjoy-