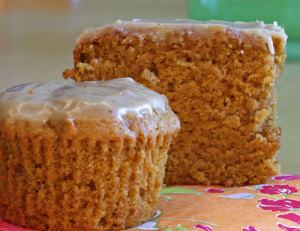
 So if you’ve been reading my blog – you’ll remember that although we all really liked the orange pumpkin cake — it wasn’t overwhelmingly pumpkiny. I had to try again. It’s not that I even (personally) love pumpkin flavor so much but feel that the kids should know what pumpkin tastes like. (Since they were clueless with the last cake!) Plus I know that many adults really like pumpkin. I scoured my cookbooks and finally found a good looking pumpkin cookie recipe from Martha Stewart. These cookies came out great and were a huge hit with family and the many friends who tried them. I had a feeling that the cookies would have a cake like consistency (which many people loved, although I do not) so I also baked them in a muffin and mini loaf cake shape. Both cakes and cookies were delicious – pumpkiny and have all the spicy warm fall flavors – ginger, nutmeg and cinnamon which round out the pumpkin so nicely. The brown butter icing completes them. Enjoy!
pumpkin cookies or cake with brown butter icing (barely adapted from Martha Stewart’s Cookies):
2 3/4 cup all purpose flour
1 teaspoon baking powder
1 teaspoon baking soda
1 1/4 kosher salt
1 1/2 teaspoon ground cinnamon
1 1/4 teaspoons ground ginger
3/4 teaspoon freshly grated nutmeg
1 1/2 sticks (3/4 cups) butter – room temp
2 1/4 cups packed light brown sugar
2 large eggs
1 1/2 cups canned pumpkin (14 oz)
3/4 cup evaporated milk
2 teaspoons vanilla extract
icing–
2 cups confectioners’ sugar
5 tablespoons unsalted butter
1/8 cup plus a few teaspoons evaporated milk
2 teaspoons vanilla extract
pinch kosher salt
Preheat the oven to 375 degrees and line sheet pan with parchment. Or, prep mini loaf tins with butter and parchment and/or line your cupcake pans.
In a small bowl, whisk together the flour, baking powder, baking soda, salt, cinnamon, ginger, and nutmeg.
Cream the butter and brown sugar on medium high speed in the mixer for about 3 -4 minutes until light and fluffy. Reduce to medium and add the eggs one at a time until each is incorporated. Scrape down the bowl and mix again. Reduce the speed to low and add the pumpkin puree, evaporated milk, and vanilla – mix well.
Add the reserved flour mixture – and mix until just combined. Now here Martha (Stewart) advises to put the batter in a pastry bag and pipe out the cookies. I know this can overwhelm 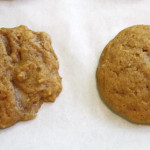
 some people. Soo…now you have your muffin pans or loaf pans! Problem solved. Or…drop by spoonfuls onto parchment. I did a side by side comparison to show you the difference – the right side is the cookie that was piped, the left dropped. Honestly no biggie here…right? Plus, once you add the icing it makes even less of a difference. 🙂 If you do decide to pipe the cookies, here are some tips: 1 – do not overfill piping bag. You will lose control of the batter. 2 –
 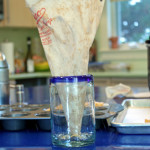 to fill the bag, place it in a large container – a glass or measuring cup or vase – so that you have two hands to fill it. 3 – twist the end of the bag and with light pressure, squeezing from the twist, gently pipe the cookies. Use a round 1- 1 1/2 inch tip – I just used the coupler but do what makes you happy.
Bake cookies about an inch apart and for about 12-18 minutes. As usual check often and before – and rotate the pans to ensure even baking. The muffins took about 30 minutes and the loaf cake took about 40 minutes. The cake or cookies should have a good spring to the top – or use a toothpick to check the crumb.
Let cool on rack. Invert the cake (if you made a cake) after it has cooled for about 10 minutes. In the meantime make the icing.
Place the confectioners’ sugar in a bowl and melt the butter in a saucepan over medium high heat. Cook the butter swirling it occasionally and keep cooking until you brown the butter. Now I went very far here – and really took it as brown as I could go because I love the nutty taste of brown butter. But be careful, you do NOT want to burn the butter. Cook it as long as deep as you want – or feel comfortable with (at least a golden brown) which should take about 3 minutes. When browned, immediately add to the confectioners’ sugar and mix – add the evaporated milk, vanilla and the pinch of salt and mix and whisk until smooth. Add evaporated milk as you see fit – you can make this loose here and just like a glaze – or keep it thick – more like a frosting. I like it runny and glazy. Again, do what you like!
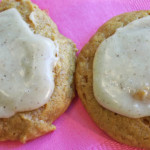
Once the cookies/muffins/cakes are cool – frost with the brown butter icing. If the frosting gets too hard to work with, you can heat it in the microwave for 10 seconds to re-soften – or add more evaporated milk if too dry.
Yum. Jason was here just now (the guy and friend who inspired my first post on oatmeal cookies) and said – “Oh, I LOVED those cookies. I just love that pumpkin with all those flavors…my favorite!” I hope you like them too!

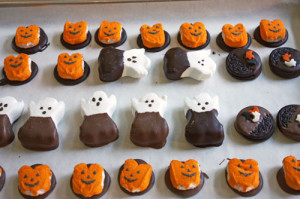
 A plain Peep is not something that I love. However…a chocolate covered Peep is divine. Seriously. I did a short stint at Chocolations (a local chocolate shop) last year and Maria, the owner, was dipping Easter Peeps in chocolate. Well, that was it. Done. Count me in. My early resistance to Peeps was no more. I lovingly dip, serve and eat them often. Surprisingly it is not just the kids (and I) who love them. Rob loves them coated in dark bitter chocolate – to cut the sweetness – and both milk and dark make me happy. The ghosts are almost fully dipped in chocolate while the pumpkins are placed on a chocolate disk. While I was at it, I decided to make some chocolate covered Halloween Oreo treats as well.