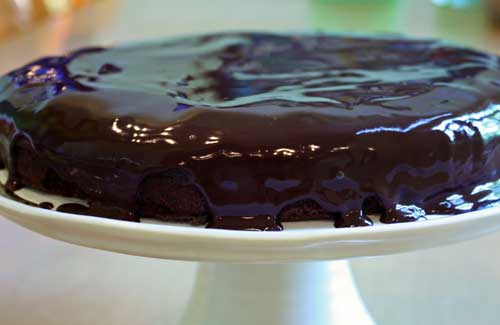
chocolate decadence cake

Chocolate chocolate decadence.  Delicious, delightful and rich.  Rob loved it and was thankful for a chocolate dessert in the midst of summer crisps and cobblers.  The kids too I think, unless I’m making that up.  (Made this a long time ago and lost my notes!)  I was a bit lazy this summer…my vertigo was mostly gone, nothing was hurting too much body wise save for the tend0nitis in my bum (I have to say bum now because the kids hate it when I say ass. Or butt. They are funny.)  I did bake though, but not a lot.  I photographed, but didn’t edit.  And then I just could not seem to write.  I’m sorry!  I don’t have much more to write since I’m terribly forgetful – however I do remember that I was upset because the cake took a lot less time than it stated in the recipe.  And although I checked on it 10 minutes early, it already seemed over-baked.  I fretted because I had friends coming over but Rob said DO NOT toss it and with a little ice cream all would be OK (as usual!)  The cake in the end, I do remember, was delicious.  Really good, and yes, slightly over-baked so it will be even better for you since you will learn from me.  OK, I can ramble on and on, but I’ll stop and just tell you that I found this recipe on the blog Joy The Baker.  As I’ve said before, I happen to be a fan and this cake looked too good to ignore.  Joy found this recipe from Tuesdays with Dorie back in 2008 and I happen to have Dorie’s cookbook that also holds the recipe.  It will be a perfect fall dessert that will be sure to bring many smiles on your chocolate lovers faces.

Enjoy –

Continuing on this lazy theme, I’m going to send you the link to Joy’s blog.  I followed her directions, but I used a simple ganache for the glaze.  And that recipe is below.

Oh, and please check the cake 15 minutes early.  Maybe mine was a fluke – but check and double check so as not to over bake.

almost fudge gateau from Joy the Baker (click on link below for recipe):

JOY THE BAKER

simple ganache:

3/4 cup heavy cream
6 oz bitter or semi sweet chocolate (chopped up)

Place chocolate in a heat proof bowl.  Heat cream until it just almost boils.  Pour over the chopped chocolate.  Let sit for a minute then gently whisk to combine.

berry summer pudding

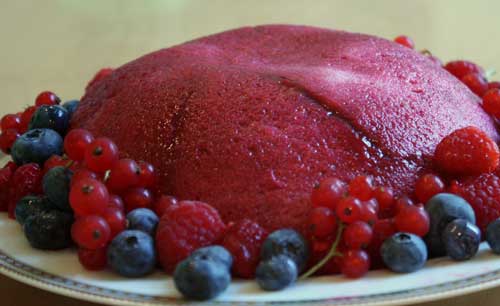
Scrumptious berries with very little adornment, cold and tasty, pure and simple surrounded by a layer of white bread – now sweet red bread.  This one really intrigued people.  “What is that?”  “What’s on the outside.”  “What’s on the inside.”  I said well, the outside is bread.  “That’s bread, white bread?” Debbie exclaimed.  Shari and Nancy kept repeating “bread bread?”  Yes, bread bread surrounding an obscene amount of berries and berry juices that sit for a night or two and turn into beautiful and interesting bright red dessert.  Sylvie said she liked it but the outside was the best.  (She does love white bread.)  Darren muttered good good and and Nancy and Rob echoed him.  Someone said awesome and that it looks heavy but its not.  And Jeff said it was perfect for 108 degree day (it was hot and he grilled for us).  I brought this to another BBQ and everyone who tried it gave it the thumbs up.  Jason and Marco especially – my fruit-loving friends.  Serve with freshly whipped cream this is a lovely light and different summer dessert.  Alice Medrich once again really prompts me to try new things.  She said that this summer pudding was described in Helen Gustafson’s memoir The Agony of the Leaves.  And Helen herself recited the recipe to her.  Give it a whirl, it certainly begs for discussion 🙂

This is best if you let it sit for two days although one is fine too.

This serves only about 5 or 6 people – feel free to double it and make two like I did.

berry summer pudding (slightly adapted from Alice Medrich’s book Pure Dessert):

3-4 slices white sandwich bread with a tight crumb
4 cups ripe berries (mixture of raspberries, blackberries and a handful of red currents if possible)
blueberries – I added some fresh blueberries to the recipe — you can ignore or use –
Alice also suggests boysenberries if you have them to put in the mix
1/2 cup sugar (well, to taste)
2 pinches kosher salt

serve with freshly whipped cream

Grease a 1 quart bowl (5-6 inches across the top and 3-4 inches deep) and line it with plastic wrap.  Try to press it into the bowl as crease free as possible.  Make sure there is overhang too.

Cut the crusts off the bread. then cut the bread in wedges.  Place the wedges in the bowl – trying to minimize space in between.  Feel free to press the bread together to make a tight fix.

In a nonreactive saucepan (big enough so that the berries are only 1-2 layers deep) heat the berries and sugar.  Turn them gently so that they throw off their juices.  You want to do this slowly and do not boil.  As Alice says, ” the aim is not to cook the berries but only to warm them and coax forth their juices.”

Adjust the sugar if necessary, add the pinch or 2 of salt.  At this point I threw in a few uncooked blueberries just for fun.  Up to you.

Spoon the prepared berries into the bread lined bowl.  Then fit more bread on top to cover.  Then fold the plastic wrap over to cover.  Next place a small saucer on top and weight it with a can of beans or something heavy.  Then place in the fridge at least overnight – 1 or 2 days even better.

To unmold, pull back the wrap and invert bowl onto plate – center it because it is hard to move after you invert it.  Serve with fresh berries and freshly whipped cream.

Enjoy –

chocolate chip crumb cake

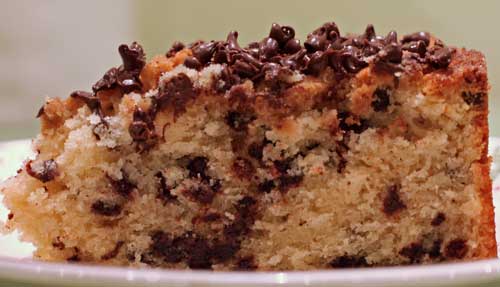
It was Zach’s birthday and we decided that we should all sing and celebrate together.  And although Jodi told me repeatedly that I didn’t have to bake (Lauren made a cake at a bday party that she would bring), I really wanted to because Zach (and Lauren) are probably my biggest fans.  I whipped this up super fast – peeked in Cake Keeper Cakes by my fave Lauren Chattman and served up this chippy chocolate chip cake.  Delicious.  Simple.  Tasty.  Easy.  Pretty.  What more can you want?  Enjoy –

Oh, and I think this would be great as a cupcake.  Next time.

chocolate chip cake (slightly adapted from Lauren Chattman’s Cake Keeper Cakes):

streusel

1/3 cup all purpose flour
1/2 cup packed light brown sugar
1/4 teaspoon kosher salt
4 tablespoons (1/2 stick) unsalted butter, cut into pieces and chilled
1 teaspoon pure vanilla extract

cake

2 cups all purpose flour
2 teaspoons baking powder
1/4 teaspoon baking soda
1/2 teaspoon kosher salt
3/4 cup (1.5 sticks) unsalted butter, room temp
1 cup sugar
2 large eggs
2 teaspoons pure vanilla extract
3/4 cup buttermilk
1 3/4 cup mini chocolate chips

streusel-

Preheat the oven to 350 degrees.  Butter a 9 inch spring form pan.  Then combine the flour, brown sugar and salt in a large bowl.  Add the butter and vanilla and smoosh the ingredients with your fingers.  Keep rubbing until large crumbs form.

Transfer to a smaller bowl, and place in fridge until time for topping.

cake

Whisk together the flour, baking powder, baking soda and salt in a medium bowl.

With the paddle attachment of your mixer (or handheld beaters) cream together the butter and sugar together on medium high speed until light and fluffy.  This should take about 5-6 minutes and scrape the bowl down here and there.

Lower the speed and add the eggs, one at a time and then the vanilla.

Scrape and mix again.

With the mixer on the lowest speed, add 1/3rd of the flour mixture, then 1/2 of the buttermilk.  Repeat, alternating flour and buttermilk and end with flour.  Scrape and mix a second more.

Remove from the mixer and fold in one cup of mini chips.  Try not to overwork the batter.

Pour into prepped pan and smooth with a spatula.  Squeeze the cold streusel through your fingers – onto the batter.  Try to spread it evenly and some big chunks are good too.

Bake until the cake is slightly golden and a toothpick comes out just clean.

My cake took only 47 minutes and the recipe calls for 55-60.  So I’d actually check after 45 minutes next time.

Place cake on a rack.  Immediately sprinkle the remaining 3/4 cup of chocolate chips over the top of the batter.

Let cake cool for 10 min, then remove from pan (run a knife around the edges first) and continue to cool.  Yummy.

Enjoy-

banana toffee cake

Yum yum yummmmmmy.  Even some of the men said yummy (which is typically not a word that they tend to use) but it is a MUST here.  What can be better than bananas, caramel and chocolate?  Not much!  This cake oozed with sticky sweet caramel, had a delicious and distinct banana flavor and was even further enhanced by chocolate chips.  Not sure I need to say more about this.  But I will.  I saw the picture in the March issue of Bon Appetit and immediately knew it going to be a hit.  I then noticed that the recipe came from Lauren Chattman and I was even more committed to trying it.  Well, again, as I stated…delicious.  Beth and Mark loved it the most.  But most everyone who tried it raved.  Warm with my vanilla ice cream this was so very good.  Make it soon while it’s cool out as it is a good one to warm up with and hunker down and enjoy in elastic waist pants!

BTW, you can make the sauce 2 days ahead of the cake and store in the fridge.  Just reheat lightly before using.

banana toffee cake (slightly adapted from Lauren Chattman’s recipe from the March issue of Bon Appetit):

toffee sauce –

1 1/4 cup plus 3 tablespoons heavy whipping cream
1/2 cup light brown sugar (packed)
1/2 cup dark corn syrup
1/4 cup (1/2 stick) unsalted butter
1/2 teaspoon kosher salt

banana cake

2 cups all purpose flour
1 1/2 teaspoons baking powder
1/4 teaspoon kosher salt
3/4 cup (1.5 sticks) unsalted butter, room temp
2/3 cup dark brown sugar (packed)
2 large eggs
1 cup mashed very ripe bananas (about 7 oz. – or about 2 bananas)
1 tablespoon dark rum
1 1/2 teaspoons vanilla extract
chocolate chips (optional)

toffee sauce

Bring 1 1/4 cups cream, brown sugar, corn syrup, butter and 1/8 teaspoon salt to boil in a heavy small saucepan over medium heat.  Whisk until the sugar dissolves.

Once boiled, cook over medium low heat for about 15 minutes, whisking occasionally – until the sauce coats the back of a spoon (heavily) and the sauce is reduced to about 1 1/2 cups.  It is very hot and can burn you easily so please be careful.

Once thick, remove from heat and let cool.  Add up to 4 more tablespoons of cream to thin the sauce to desired consistency.  Now make the cake.

banana cake

Preheat oven to 350 degrees.  Butter and 8x8x2 inch metal baking pan.  Dust pan with flour and pat out excess.

In a small bowl, whisk together the flour, baking powder, and 1/2 teaspoon salt.

On medium high speed and with the paddle attachment of your mixer (or with handheld beaters), beat the butter and sugar until well blended.   Scrape and mix again for another minute.  Add the eggs, one at a time until each is incorporated.  On medium low speed, beat in the mashed bananas, rum and the vanilla.  Scrape and mix again.  At this point the mixture may look curdled but don’t worry.

Next, add the dry ingredients in 3 additions, beating on the lowest speed and just to blend.  I think if you add chocolate chips here it would be nice.  I didn’t – I added them at the end,  but will probably stick them in the batter next time.  A few or a lot, that is your call.  This is also delicious without chocolate!

Spread the batter into the prepped pan and bake until a toothpick comes out just clean.  (The recipe says 35-38 minutes but it took me only 30 and I should have checked even a few minutes early…so watch carefully and know how your oven cooks.)

Spread about 1/2 cup of the toffee sauce evenly over the cake and return cake to the oven for 3-6 minutes – until the sauce bubbles thickly.  Remove from oven and place desired amount of chocolate chips on top (if you choose).

Allow the cake to cool in the pan for about 30 minutes.  Cut and serve warm (or not) with the leftover toffee sauce.  You can top with sliced bananas and/or whipped cream, or ice cream.  Wowee.  Enjoy –

pancake cake

This is one BIG pancake!  A pancake cake!  Dense, moist and truly tasting like pancakes, this was a funny treat.  Perfect for Andy’s birthday.  I decided to treat him to a breakfast dinner that included my mom’s candied bacon and chocolate chip pancakes.  Sylvie reminded me of this recipe that we saw years ago during my discovery of the crock pot.  We found it amazing that you could bake a huge pancake in a crock pot!  Now was the time to try.  Although I usually opt for whole wheat pancakes and waffles I decided to go all white, and not only all white, I started with Bisquick which I would never normally do – but I wanted to play it safe since the printed recipe was concocted with a ready made mix.  Next time I’ll try my own!  This is fun and silly and is sure to bring a smile to you, your family and friends.  Enjoy –

pancake cake (from Make It Fast, Cook It Slow by Stephanie O’dea):

18 ounces of a pancake mix
add whatever the box calls for but measure other ingredients out  based on 18 ounces- be it egg, oil, whatever…
next time i’ll make my own mix – and measure out the 18 ounces
chocolate chips or blueberries or raspberries

Use a buttered 4 quart slow cookier.

Add the dry ingredients from above and whatever wet the recipe calls for and mix gently.  Add your chips or berries (they do sink to the bottom…you can try adding them half way through – I will next time).

Cover and cook on high for 2 hours – or when the pancake is browned on top and a toothpick comes out just clean.

Slice into wedges – be careful as it is hot – and remove with a spatula.

Serve with butter, maple syrup, or jam and enjoy –

chocolate molten cake

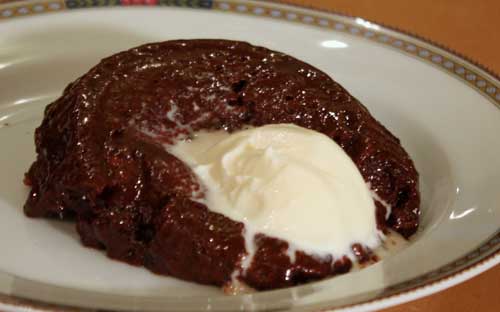
Don’t look at the photo and judge poorly.  The ice cream kind of squished the cake down.  Also, my cakes were a little undercooked (but yummy) and Zach ate the perfect one before I could photograph it!  Anyway, in my opinion, nothing can beat a chocolate molten cake that is rich, dark, decadent, and oozing with chocolate love as you dig in.  My entire family takes true delight in these little warm cakes.  Andy is most vocal, forever begging me to make them and I figured now was a terrific time since Valentines Day is around the corner.  Unlike many a molten cake, these are not simply under-baked cakes.  Instead, each one contains a little ball of ganache (solid chocolate and heavy cream) that turns to liquid chocolate as it cooks.  Deeelicious.  Chocolaty, smooth, moist and so so good were the comments the other night when I served them up.  I invited Jodi, Zach and Lauren to come and help us with the tasting.  When I asked the room if blog-worthy, I got a very loud, collective and resounding YES.  As I said, perfect for Valentines Day or really any time to make those you love feel very loved.  Including yourself!

We all ate ours with ice cream.  Most of us with vanilla or chocolate chip (my fave) but a few (my boys) with chocolate ice cream which is just too much for me…but might be nice for you!  Home-made whipped cream would also be nice.

Remember that you need to prep the ganache before you begin.  Give yourself a 30 minute head start – in preparing this recipe 0r make the ganache the day before so it sets up.

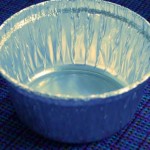
OK and lastly, you can use 6 oz ramekins or the little silver disposable cups from the supermarket (these actually worked best).

chocolate molten cakes (slightly adapted from Saveur Magazine #135 – recipe originally adapted from Jean-Georges Vongerichten):

This recipe makes 6 cakes – I doubled for 12 and I rec that you do too!

2 oz. semisweet chocolate, finely chopped
3 tablespoons heavy cream
8 tablespoons (1 stick) unsalted butter, plus a little more for greasing
1/4 cup flour
6 oz. bittersweet chocolate
1/2 cup sugar, plus extra for ramekins
1 teaspoon pure vanilla extract
1/4 teaspoon kosher salt
3 eggs
confectioners sugar, freshly whipped cream and/or ice cream

Put semisweet chocolate into a bowl and set aside.  Heat the cream in a small saucepan over medium heat until it begins to simmer.  Pour the hot cream over the chopped chocolate and let sit for about a minute.  Stir slowly until smooth and cover with plastic wrap and refrigerate until chilled.  Once chilled (and solid), divide the chocolate into 6 portions and roll each into a small ball and place back in the fridge.

Preheat the oven to 425 degrees.  Grease (with melted butter) the bottom and sides of each ramekin or metal cup and then coat with sugar (the bottom and sides) tapping out the excess.  Place on a baking sheet and set aside.

Melt the butter and bittersweet chocolate in a small saucepan over medium heat.   Heat until just melted (we are not cooking it) and then remove from the heat and let cool for 10 minutes.

In a large bowl, beat together the sugar, vanilla, salt and eggs – you can beat with a hand mixer on medium high speed until thick and pale- about 5-7 minutes.  Or with whisk attachment of stand mixer, beat until thick and pale – about 7-10 minutes.

Remove from mixer and fold in melted and cooled chocolate mixture.  Next add the flour and again, fold until smooth.

Fill each ramekin or cup with batter – about 3/4’s full.  Place a ganache ball on top and then cover with a little more batter to almost reach the top.

Bake until just set – the recipe calls for 15 minutes – but I pulled mine at 20.  Might need 22 minutes – but check often – and rotate pans.

When done, they will look slightly dry on the top and will have pulled away on the sides.  Its a little tricky – but even if undercooked or overcooked (then def serve with ice cream) – they will be delicious.

Let sit for about 4-5 minutes then run a knife around the edge of each ramekin – place a serving plate on top and invert the cake.  Dust with confectioners’ sugar and serve immediately.

Serve with ice cream or freshly whipped cream for an added treat.

And oh, if very undercooked and they plop like pudding, place in a martini glass and a spoon and a little whipped cream.  Just as good so try!

Enjoy-

cranberry shortbread cake

So I really wasn’t sure how this would come out, but good news….yummy!  A somewhat sweet, but more tart and refreshing cranberry filling nestled between two layers of soft and moist vanilla shortbread cake – so verrry tasty.  I happen to love cranberries and here mixed with orange zest and fresh orange juice just made me happy.  I can eat the filling alone (or on top of some ice cream!)  This cake had great flavor and texture for 5 days!  And as it sat it almost seemed to get moister.  And really, it is so pretty for the holidays – well worth your time and effort.  Patrick seemed to enjoy this the most – and actually my mother in law Edith too.  Rob and Linda liked as well, but unfortunately, they don’t love cranberries.  And well, you do have to like em to enjoy this.  But change the filling – Rob and Patrick are eager for a blueberry filling which I will try in the summer.  Fill it with a cooked apple or pear filling – mix them with sugar and cinnamon – or ginger – that too would be super.  Serve this warm or at room temp with vanilla ice cream and enjoy-

You need to plan ahead when you make this as the cranberry filling needs to cool to room temp and the dough needs to rest in the fridge for 30 minutes.  You can make both filling and dough ahead of time (the filling 2 weeks ahead and the dough the day before.)

I doubled the recipe and placed in a 9×13 inch pan.  But I do think the original recipe a 9 inch spring form would be better which I will write below.  If you want to double it- just make 2-9 inch pans.

cranberry shortbread cake (from Dorie Greenspan’s Baking From My Home To Yours):

filling

1 navel orange
about 1/4 cup orange juice (from the orange)
1 12-ounce bag of cranberries, fresh or frozen (but not thawed if frozen)
3/4 cup plus 2 tablespoons sugar
2 pinches of kosher salt

cake

2 1/2 cups all purpose flour
1 teaspoon baking powder
3/4 teaspoon kosher salt
1 stick plus 5 tablespoons unsalted butter, room temp
1 cup plus 2 tablespoons sugar – divided
1 large egg
1 large egg yolk
1 teaspoon pure vanilla extract

For the filling

Wash and dry the orange.  Then grate the zest – a microplane (see baking tips) is great.  Be sure to just take the orange part of the peel and not the white pith since it is bitter.  Put the zest in a saucepan.  Next, peel the orange using a knife –  removing the white pith from the outside of the orange, then slice between the membranes to release the orange segments.  Cut the segments into 1/4 pieces and add to the zest.  Squeeze the juice from the orange into a measuring cup – you should aim for 1/4 of a cup and if you don’t have enough juice then add additional juice from another orange or some water to equal 1/4 of a cup. Add the juice to the saucepan.

Place the cranberries in the pan as well – and stir in the sugar.  Over medium heat, bring the mixture to a boil and stir frequently.  Then cook the cranberries stirring constantly until the cranberries pop and the back of you spoon leaves tracks – this should take about 5 minutes.

Place cranberry mixture in a bowl to cool to room temperature.  Add the pinches of salt.  Taste it (while warm) – and if it is too tart, add a little more sugar.  (This can be made up to 2 weeks ahead and stored in the fridge until assembly.)

For the shortbread cake –

Whisk together the flour, baking powder and salt.

With the paddle attachment of you mixer, beat the butter on medium speed until it is soft.  Add one cup of the sugar (save the 2 T for later) and beat until the sugar dissolves into the batter – about 3-4 minutes.  Reduce speed to low and then add the egg and egg yolk.  Once absorbed, add the vanilla.

On the lowest speed, add the flour mixture and beat until just incorporated.  Do not overbeat – in fact you can do the tail end by hand.

Place the dough onto a smooth surface (I like my cutting board) – and then divide it in half.  Wrap each half in plastic wrap and form into a disc – and let rest in fridge for 30 minutes.  (If you did this yesterday, just pull the dough 20 minutes before you plan to roll it.)

Preheat the oven to 350 degrees. Lightly butter a 9 inch spring-form pan (pref non stick).  Place the pan on a baking sheet.

Assembly –

On a lightly floured surface roll half the dough to form a rough circle and carefully place in the baking pan.  Press the dough in so that it covers the bottom completely.

Next, pour the cooled cranberry filling and spread evenly on top of the dough – making sure to cover all of it – even the edges.

Take the other piece of dough and again – roll into a nice circle that will fit  on top of the filling.  I needed to use a lot of flour on the bottom and top to prevent it from sticking.  Then make sure to brush off the flour.   If you don’t like rolling the dough you can leave it on the plastic wrap and just press it into a circle with your hands.  Then you can carefully invert the pressed dough onto the cranberry filling and peel off the plastic.

Lastly – sprinkle the remaining 2 tablespoons of sugar on top of the dough.

Bake for 35 – 40 minutes or until the top is a nice golden brown and a toothpick comes out with nice moist crumbs.

Transfer to a cooling rack for about 20 minutes, then run a blunt knife around the edges and release the sides of the pan and let cool.

Serve warm, or room temp – no need to refrigerate.  This lasts well for 5 days wrapped well.  Enjoy-

golden fudge cake

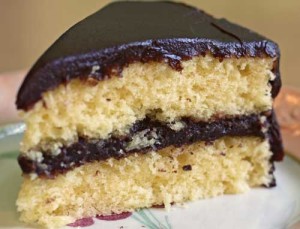
“Really good” and “really really really good” and “oh my this is really delicious Lisi!” were the varied comments (actually not varied – but overall great accolades) for this cake!  My father visited this past weekend and I wanted to make him a cake he would love for his birthday.  True love – ate it for dessert after we sang, and ate it for breakfast the next two mornings after his workout.  Although a serious chocolate lover, my dad happens to love golden fudge cake.  When I was young, he would eat half an Entenmann’s cake in one sitting (I’m not kidding).  While he was at work, I would shave the other half slowly — taking a knife to the frosting and kind of cut horizontally – hoping no one would notice.  My father would come home ready for his other half and exclaim “who ate the top of my cake!?” (looking right at me) and I’d reply, “gosh, I don’t know!” with a smile.  We always had this battle and he had to eat it fast in order to get some of his beloved chocolate icing.  I was worried that this cake really didn’t taste like the classic one he loved, and thought the slight taste of caramel in the chocolate frosting would put my father off…but he said this was not only delicious, but way better than Entenmann’s.  Thank goodness. This cake is incredibly moist and even now, 4 days later still delightful and lip smacking good.  Only have a little bit left (my mom and dad regret not bringing the last bite back to Boston for their Celtics viewing treat). Not sure if I should share it or just eat it all!  Enjoy-

The cake is very easy to make – and the icing a little bit harder – but I put this in the medium category since it all takes a bit of time to put it all together.

Oh, and this kept well on my counter – I did not refrigerate.  If you do…you must bring the cake to room temp for 40 minutes before you serve it.

You will have a little extra frosting to pipe decorations if you choose, or save in fridge for next time you could use some frosting.

golden fudge cake (from Baking Unplugged by Nicole Rees):

cake

2 1/2 cups cake flour
2 teaspoons baking powder
1/2 teaspoon kosher salt
1 cup plus 2 tablespoons unsalted butter, softened at room temp
1 2/3 cup sugar
2 large eggs, room temp
2 large egg yolks, room temp
1 cup (whole) milk, room temp
2 teaspoons vanilla extract

fudge frosting

12 tablespoons unsalted butter (divided)
1 cup packed light brown sugar
1/4 cup light corn syrup
1/3 teaspoon kosher salt
1 cup heavy whipping cream
1 oz unsweetened chocolate, finely chopped
7 oz bittersweet chocolate, finely chopped
2 teaspoons pure vanilla extract

Cake – Preheat oven to 350 degrees.  Butter and flour two round 9 inch cake pans (I also added a parchment lining, up to you).

In a small bowl, whisk together the cake flour, baking powder and salt.  Set aside.

With the paddle attachment (or reg beaters) beat the butter and sugar on medium high speed until light and fluffy.  About 4-6 minutes.  Add the eggs, and yolks, one at a time, beating well for about 20 seconds after each addition.  Scrape and mix again.

Combine the milk and vanilla.  Then on lowest speed or fold by hand, add the flour in 3 additions – alternating with the milk in 2 additions.  Begin and end with the flour.  Do not overmix.  Scrape the bowl and mix to incorporate.

Pour the batter into the prepared pans (half in each) and place in the oven in the mid to lower third of the oven.

Bake until the top is golden and a toothpick comes out with moist crumbs – after about 18-23 minutes…(but check often and before – as all ovens vary – in fact a reader said it took 35 min for her cake to be done.  So check, mine only took 20 but maybe it’s me!)

Let the cakes cool for 15-20 minutes, then invert onto a wire rack to let cool completely.

Frosting – In a medium heavy saucepan melt 6 tablespoons of the butter over medium heat.  Add the brown sugar, corn syrup, and salt and stir until dissolved.  Bring the mixture to a boil – and then continue to boil for about 4-5 minutes without stirring but swirling the pan until the mixture reaches 260 degrees F.

Remove from the heat and verrrry slowly and carefully (with a long wooden spoon), add the heavy cream just a little by little (this will sputter and foam as you add it so step back) – and keep adding until you have incorporated it all.

Next, add the chocolates and the vanilla to the mixture (still off heat) and whisk until melted and smooth.  Whisk in the remaining 6 tablespoons of butter.

Transfer the mixture to a bowl and let cool on counter for 20 minutes or so.  Then place in the fridge and continue to cool the frosting down – until it is spreadable.  Mix it every 5 minutes or so until it is a spreading consistency – this should take 15-25 minutes.

Assemble cake.  I place my cake on cardboard cake rounds.  (You can buy these at sugarcraft.com)  Or go to your local bakery and ask if you can buy a few.  You can also cut a cardboard round from you boxes, and cover with foil.  Or, you can simply forgo this and place the cake on a plate.

If you have a domed top to your cake, then carefully cut it off horizontally and enjoy the scraps!  (I did not have).  Next, place one layer down, then top with about 1 cup of the fudge frosting and spread it to cover the layer.  Then carefully place the second layer on top and then place another cup of frosting on top of the cake -and continue to spread the rest of the icing around the sides.  Leave as is, or pipe decorative features with the remaining icing.  You can also cover sides with mini chips or jimmies if you choose following the method in the devils food cake.

(delicious) devils food cake

It was Dani’s and Melissa’s birthday so I asked…what can I make for you?  Melissa said your meringues please and Dani said anything chocolate!  So I made the meringues easily enough – then found this devils food cake in Rose’s Heavenly Cakes that looked perfect.  (Funnily enough Rose adapted it from chef Joanna Chang who owns Flour in Boston and worked under Rick Katz after I did.  I feel connected in a way.  The recipe is a non traditional way of making devils food.)  Anyway, I paired it with some Oreo chocolate drizzle ice cream (soon to be posted), dark chocolate sorbet, chocolate sauce and freshly whipped cream – and well, I think they were pleased 🙂  This cake is very chocolaty, moist and “just very good” Rob said when I asked him for a description – and he is a picky chocolate cake eater.  Enjoy this – it is a keeper!

devils food cake from Rose Levy Beranbaum’s Heavenly Cakes:

(Rose includes grams and ounces which I love because it is more accurate.  I will share with you but use whatever form of measurement that you like.)

cake
1 oz unsweetened chocolate (or 30 g), chopped into small pieces
3/4 cup plus 1.5 tablespoons dutch processed cocoa powder – sifted before you measure (2.2 oz, 63 g)
1 cup boiling water
2 large eggs at room temp
1/4 cup creme fraiche (I used) or sour cream (2 oz, 58 grams)
1 teaspoon pure vanilla extract
2 1/4 cups sifted (into the cup) cake flour (or 8 oz, 225 g)
1 1/2 cups firmly packed light brown sugar (11.5 oz , 326 g)
1/2 teaspoon salt
1 teaspoon baking soda
2 sticks (16 tablespoons) butter, room temp

ganache
(You can probably get away with half of the following ganache recipe for this cake if you are careful.  I happen like extra because if I need more or I get messy or sloppy, I don’t have to make it again.  It is also nice to drizzle (warmed) over a plated devils slice with a scoop of ice cream or whipped cream.  Nice too as a chocolate sauce or a dip for fresh fruit.  It can keep in the fridge for about 2 weeks.  Just warm in microwave or over a pot of barely simmering water.)

12 oz choppped semi sweet (or bitter if you prefer) chocolate
1 1/2 cups heavy cream

extra (for sides of cake)
mini chocolate chips (optional), or chocolate sprinkles, chopped nuts, or another confection your choice.

cake – Preheat oven to 350 degrees.  Line the bottom of two 9 inch round cake pans with butter or spray, parchment, and butter or spray again, then a little flour.  Tap out excess.

If you have cake strips, use them (these slow down the baking at the perimeter of the pan which helps avoid peaked cakes – you can make your own by wrapping wet paper towel inside tinfoil and wrapping them around the cake.  But buy them if you can.  You can also bake with out and trim off the dome after baking.)

In a medium bowl, whisk the chopped chocolate, cocoa and boiling water until smooth.  Cover with plastic wrap and cool to room temp (about an hour) – to speed the cooling place in the fridge but bring back to room temp if it gets too cool.

In another bowl, whisk the eggs, yolks, creme fraiche (or sour cream), and vanilla until combined.

With the paddle attachment of your stand mixer gently mix the flour, sugar, baking soda and salt on low speed for 30 seconds.  Add the butter and mix on low until the dry ingredients are crumbly.  Add the egg mixture and beat on medium speed for about 2 minutes – until light and incorporated.  Scrape down the bowl and mix another 30 seconds.

With the mixer on low – add the the chocolate mixture gradually.  Raise the speed to medium and beat for 30 seconds until fully incorporated.  Scrape and fold in any leftover chocolate by hand and pour into the prepared pans.

Bake the cakes for about 30-35 minutes (using cake strips), might be less with out – so check often and before with a wooden toothpick.  The cake should spring back lightly when touched in the centers.

Let the cakes cool in pans for 10 minutes.  Then run a knife around the edges and invert and unmold.  Set upright again.  Let cool completely before icing.

ganache – Place chopped chocolate in a bowl.  Heat the cream over medium high heat until it almost boils (scalds).  Pour the hot cream over the chopped chocolate.  Let stand 30 seconds.  Working from the center gently stir or whisk to melt and blend all until smooth.  Let the ganache sit (at room temp) until thickens about 30+ minutes.

assembly – If cakes are domed, slice horizontally with a bread knife to even out the layers and remove the dome.  Save the domed shavings in the freezer to add as a mix-in to ice cream 🙂

Place cake layer on a cardboard round (with a little bit of ganache on it so it will stick) for best icing results.  You can buy cardboard cake rounds at sugarcraft.com.  If you don’t have, make one with a cardboard box by cutting a circle the same size as the cake and cover with foil.

Alternatively, you can ice on a plate, but it is trickier –  line the cake with strips of wax paper or parchment (all around) so that the falling ganache has a place to land.  When complete, pull the strips away – to have a clean looking plate.

If you have the cake round, place it (with the one cake layer) on a wire rack set over parchment and on top of a cookie sheet (the covered sheet will catch the leftover ganache that you can re-use to ice the cake, or scrape into a container for later use.)

Pour some ganache on top of the layer.  (I like a lot!)  Place the second cake layer on top.  Now spread the ganache on top and around the cake as best you can.  Do this bit by bit using an offset spatula if you have (look to baking tips for where to purchase).  Then place in the fridge to set this “crumb coating.”  It does not have to be perfect…you will come back to it.  After 20-30 minutes, pour ganache on top of the cake again -and with an offset spatula, coat the top and sides as best you can.  Level off the top to make clean and pretty.

You can leave as is, or cover the sides with a confection.  I usually opt for this since my sides never look that fabulous.  Place a bunch of mini chips (or confection or nut of your choosing) on top of a large piece of parchment or tin foil.  Hold the cake with your left hand (or vice versa if you are lefty) and with your right hand gently scoop up chips and press into the cake sides so that they stick.  Repeat and turn the cake with your left hand – so that you complete all.  (Next time I will try to video this.)  Place on plate or cake stand to set.

Finally done!  Enjoy-

Oh and serve at room temperature for tastiest cake.  If you make in advance, pull from fridge for 1 hour before service.

(This cake freezes well if you have leftover.)

banana rum trifle (or cake)

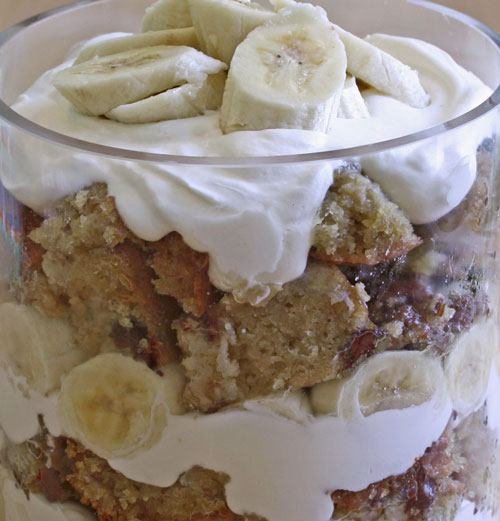
I should start by mentioning that this lovely trifle started out as a severely under-cooked cake.  I think it was the worst I’ve done … in terms if timing.  The first day of school break Sylvie really wanted to bake from a new book titled Sticky, Chewy, Messy, Gooey (great title, right?)  We picked this yummy sounding banana rum cake (we happened to have 3 extra bunches of bananas in the house do to a Fresh Direct delivery mistake!)  She mashed the bananas, broke the pecans into bits, and measured and played with the flour.  While we baked, we talked about not wanting to fight when she is a teenager.  But I really screwed up.  The cake felt done, looked nice and brown, but I must have been distracted with all the kids about and pulled it from the oven way too soon.  As I inverted the cake, I knew.  It clumped out a big messy heap onto my wire cooling rack.  Determined to figure out a way to salvage the dessert, I glazed as instructed then gave it some thought.  I happened to have heavy cream in the fridge and many more bananas on hand, so I whipped the cream, sliced the bananas, broke off the cooked pieces of cake and layered it all in a pretty glass bowl.  The cream, the fresh bananas, the wet rummy banana cake and pecans all mixed together were delicious.  Really and truly.  (You can keep as a cake and it is equally as good!  Just bake it thoroughly – obviously.)  Enjoy-

banana rum trifle (or cake) adapted from Sticky, Chewy, Messy, Gooey by Jill O’Connor:

cake
1 1/4 cup chopped pecans (toasted please.  preheated 350 degree oven for 4-6 minutes.  until fragrant)
1 1/2 cups (3 sticks) unsalted butter, room temp
2 cups sugar
1 cup light brown sugar (packed)
5 large eggs, room temp
1 cup mashed ripe bananas – about 3-4 bananas
2 teaspoons vanilla extract
3 tablespoons dark rum
3 cups all purpose flour
1 teaspoon baking soda
1 teaspoon baking powder
3/4 teaspoon salt
3/4 cup sour cream
1/2 cup chocolate chips (optional)

rum glaze
1/2 cup (1 stick) unsalted butter
1/4 cup water
1/2 cup light brown sugar (packed)
1/2 cup sugar
1/3 cup dark rum
1/4 teaspoon salt

trifle ingredients
about 3 more bananas
1 pint heavy cream, whipped.  see freshly whipped cream for help.

Preheat oven to 350 degrees.  Toast pecans if you haven’t already.  Spray a 10 inch tube pan with non stick cooking spray.  Sprinkle the toasted pecans in the bottom of the pan and set aside.

Beat the butter and sugars with paddle attachment on medium high speed until light and fluffy – about 4-6 minutes.  Beat in the eggs, one at a time.  Mix well after each addition and scrape down the sides of the bowl and mix again.

Beat in the mashed bananas, vanilla and the rum.  Remove from mixer.

Whisk together the flour, baking soda, baking powder, and salt and fold it into the wet ingredients.  Fold in the sour cream and the chocolate chips (if using).

Spoon and spread the batter over the prepared pan and pecans.  Bake in the center of the oven for 60-80 minutes – until a toothpick comes out with only a few moist crumbs.  (I removed mine after 52!  What was I thinking?).  In the meantime make the glaze…

For the glaze, combine the butter, water and sugars in a heavy bottomed saucepan over medium high heat.  Bring  the ingredients to a boil and then reduce the heat to medium low and simmer for 5 minutes.  Add the rum and cook for another 3 minutes.  Add the salt.  Set aside.

When the cake is done, let sit on rack for about 5 minutes.  Then poke holes all over the bottom of the cake and pour about 1/4 cup of the warm glaze over the holes.  Let the cake cool for about 5 minutes more and then invert cake onto a serving dish.  Spoon the remaining glaze over the cake, a little at a time.  Keep going until the glaze (or most of it) is absorbed.  If it falls and pools onto the plate, just scoop up with a knife or spoon and place on cake again.  (If you have extra sauce hold onto it – it is great with vanilla ice cream!)

Let cake cool completely, the glaze will harden and it is yummy.  The cake will last 2-3 days if covered well.

If you are making the trifle, let the cake cool.  Whip the cream, slice the bananas and layer in a glass dish (preferable).  If you have extra glaze you can layer that in as well.  Place in the refrigerator let sit for an hour and serve.  Enjoy-