
 Back in September, my friend Amy said…OK…the lemon cake? Ever since then it’s been on my “to do” list but I was all over the place with my posts. But when Amy invited our family for dinner…it was done. Penciled in and on the updated list. This cake is really so good and so lemony. People say there are two categories of dessert eaters – lemons or chocolates, but I am both! Lucky me. Amy too. Her family as well (well, maybe not Jordan). Sherry Yard – the pastry chef who created this cake is so talented, and her cookbooks are filled with technical hints and great guidance. I highly recommend them. Anyway – this cake stands alone very well, but is also quite good (as a dinner party dessert) with fresh berries and a dollop of freshly whipped cream (which you now can make!) In my baking tips I recommend setting your ingredients out in front of you so that you don’t forget anything. I did that, I do that, but somehow (I must admit) I ignored the 4 eggs sitting on the counter! At the end I had to add them (which makes for heavier crumb and cake) but luckily my family said still good. And Rob said he
 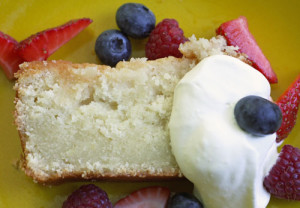 prefers the cake a little dense like that. (Maybe also a little under-baked.) Oh well…next time I’ll get it right – we all flake out now and then. Especially me. OK, enjoy-
(luscious) lemon pound cake (slightly adapted from The Secrets of Baking by Sherry Yard):
This makes two 9×5 loaf pans. One to serve, one to freeze. Or enough for a party. Cut recipe in half if you don’t want so much cake.
cake–
1 1/2 cups all purpose flour
1 1/2 cups cake flour
1 teaspoon baking powder
1/2 teaspoon kosher salt
1 pound (4 sticks) unsalted butter, slightly softened at room temp
2 cups sugar
1/4 cup finely grated and chopped lemon zest (I added a little bit of orange zest too)
4 large eggs, room temp
2 tablespoons fresh lemon juice
1 cup buttermilk
2 teaspoons vanilla
lemon syrup–
1/2 cup freshly squeezed lemon juice
skant (meaning just about) 3/4 cup sugar
1/8 teaspoon kosher salt
Preheat the oven to 350 degrees and line two 9×5 loaf pans with butter and parchment and butter again. Adjust baking rack to the center of the oven.
In a small bowl, whisk together the flours, baking powder, and salt. Set aside.
Zest the lemons. Make sure to wash the fruit first. Also try not to grate the white part of the lemon peel (the part right under the yellow) because it is bitter. (Look to baking tips for good graters.)
With paddle attachment beat the butter on medium high speed until softened a bit – about a minute. Add the sugar and zest and continue to beat until very light and fluffy…(more than normal) for about 10 minutes. The batter is almost white.
While beating, squeeze the lemons and make the lemon juice (while you are at it, make enough for the syrup below). And add together the 2 tablespoons lemon juice, buttermilk and vanilla and set aside.
Scrape down the batter and mix again. On medium speed, add the eggs, one at a time until each egg is incorporated. Scrape, and mix again.
On lowest speed, add one third of the dry ingredients to the batter and mix until just incorporated, then add 1/2 of the buttermilk mixture (again, till just incorporated) and repeat process again, ending with the last one third of dry ingredients.
Pour the batter into the prepared pans and bake for about 1 hour and 55-70 minutes – until a toothpick comes out clean.
Let cool in pan for 7-10 minutes. Then carefully invert on rack. Run a sharp knife around the edges if you think they are stuck to the sides first.
In the meantime, make the syrup. Boil the lemon juice and sugar in a small saucepan and cook over medium heat for about 3 minutes – and the sugar is dissolved.
While the cake is still warm, poke little holes all over the cake with your toothpick…all over…and with a pastry brush apply the lemon syrup. (I suppose you can spoon it on if you don’t have a brush.) Repeat a few times. The warm syrup will fall in all the little holes as well as the top of the cake…yum. (I had a little leftover syrup…but save it for something!)
Serve warm or at room temp and it will last in freezer for 3 weeks if wrapped airtight.
Enjoy-

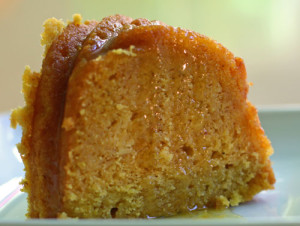
 I wanted to make this cake ever since I saw it on the cover of Flo Braker’s new cookbook Baking For All Occasions. I thought perfect for the holidays, and oh, it really is! Filled with rummy raisins (currents if you can find them) and a terrific crystallized glaze that looks like way more work than it is – makes this cake stand out in both appearance and taste. The eggnog, nutmeg, vanilla…mmm…all of it makes for one serious treat. My friend Mindel in return for a lift (I seem to barter sweets for rides lately) – exclaimed “we all ate it (the four of us) within 5 minutes in the car. It was soo good!” My friend Wendy confessed that she tasted her slice after dinner and dessert on Saturday night – and although full – she said it was delicious. Jason called and very seriously said, “Lisi, what did I just eat? Oh my God.” Flo Braker’s book is a great read. It is filled with so very many tips, hints and methods – I urge especially novice bakers to take a look at it. There is a lot to learn and so many mouth watering recipes. Make this during the holidays if you can. A nice departure from chocolate and surely a hit with family and friends.
 I noticed this recipe in Fine Cooking’s Sweet Cakes magazine because of the beautiful photograph of the cake – it looked delicious and pumpkiny – perfect for fall. I was also curious about the mix of orange, pumpkin and cornmeal. So off I baked. This cake is rich in color and texture and so very very moist. I will say that it is not as pumpkiny as I hoped. But agreed by all – especially the kids – that it was yummy. I asked Greg’s friend Alex if he tasted the pumpkin and he replied “well, what does pumpkin taste like?” Greg then followed with…”it doesn’t matter – it is good!” Friends (kids) Lauren and Zach had equally positive things to say – but again, not about the pumpkin more like “oh, is it lemon?” and “oh, I like carrot cake!” and more…”doesn’t matter, it’s good.” Another taster commented how long the
 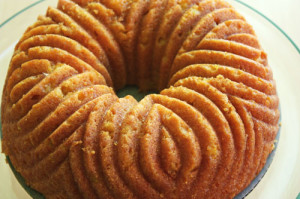 cake stayed moist and that it was perfect in the afternoon with her tea. Regardless of the pumpkin business…it is good. (Just wanted full disclosure.) This recipe has a few different steps, but each fairly easy. Enjoy this fall treat with surprising notes of citrus. Serve with vanilla yogurt to add another dimension to this sweet.
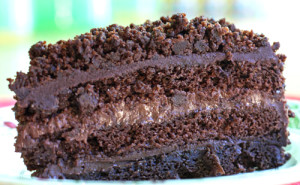 When I asked Ali (my friend and neighbor) what I could bake for her birthday, she looked hard and focused and said “chocolate.” I said like chocolate chocolate crazy chocolate? And she replied with a good happy grunt. So I started to hunt for a cake recipe that would suit both of us since I was going to celebrate too! I can get lazy with cakes and pies – which is why I’m psyched about this blog. It forces me to really bake out of my box. And I can be very tentative about cakes because I unfortunately do not have that artistic flair that makes it all just look good. But the blackout cake is perfect because you get to cover your cake with lots of cake crumbs,
 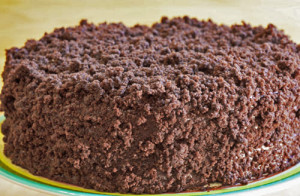 hiding any imperfections. I found and slightly adapted this recipe from the Nordstrom Flavors cookbook. I cook from this cookbook all the time – really great recipes here – but this is my first dessert. And wow, what a success. We ALL loved it. Ali and her husband Jonathan, their daughter Danika (their little guy Leo just wants Dove chocolates so no cake for him), my kids Andy and Sylvie (not Greg because he won’t even try chocolate cake), my husband Rob and my daughters piano teacher too (who I happened to give a piece to). Oh, and me! I overate and actually still feel slightly sick but it was worth it! If you make it in stages it is not overwhelming. I made the pudding first day, the cake the next day, and the ganac
 he and assembly the third. But if you’ve got the time you can make it happen in a day. Just read the recipe all the way through – so you can get yourself very organized.
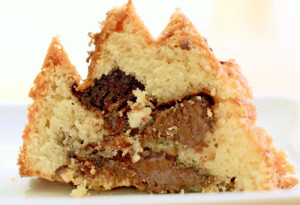 Daniel, my nephew, loves Nutella. His eyes light up when he sees that jar. So when I saw a write-up for a new cookbook that featured Nutella-Swirl Pound Cake, I knew I had to make it for him! I decided to double the recipe so I could keep one and also give one to Gilda’s club – a charity that I often bake for. My family really enjoyed the cake. For me – a warm toasted slice was heaven. I should have swirled the batter a bit more – I think the result would have been even better. Sadly Daniel didn’t even get to try the cake – but for his next visit I’ll be ready — Nutella jar in hand!