Vietnamese baked fish

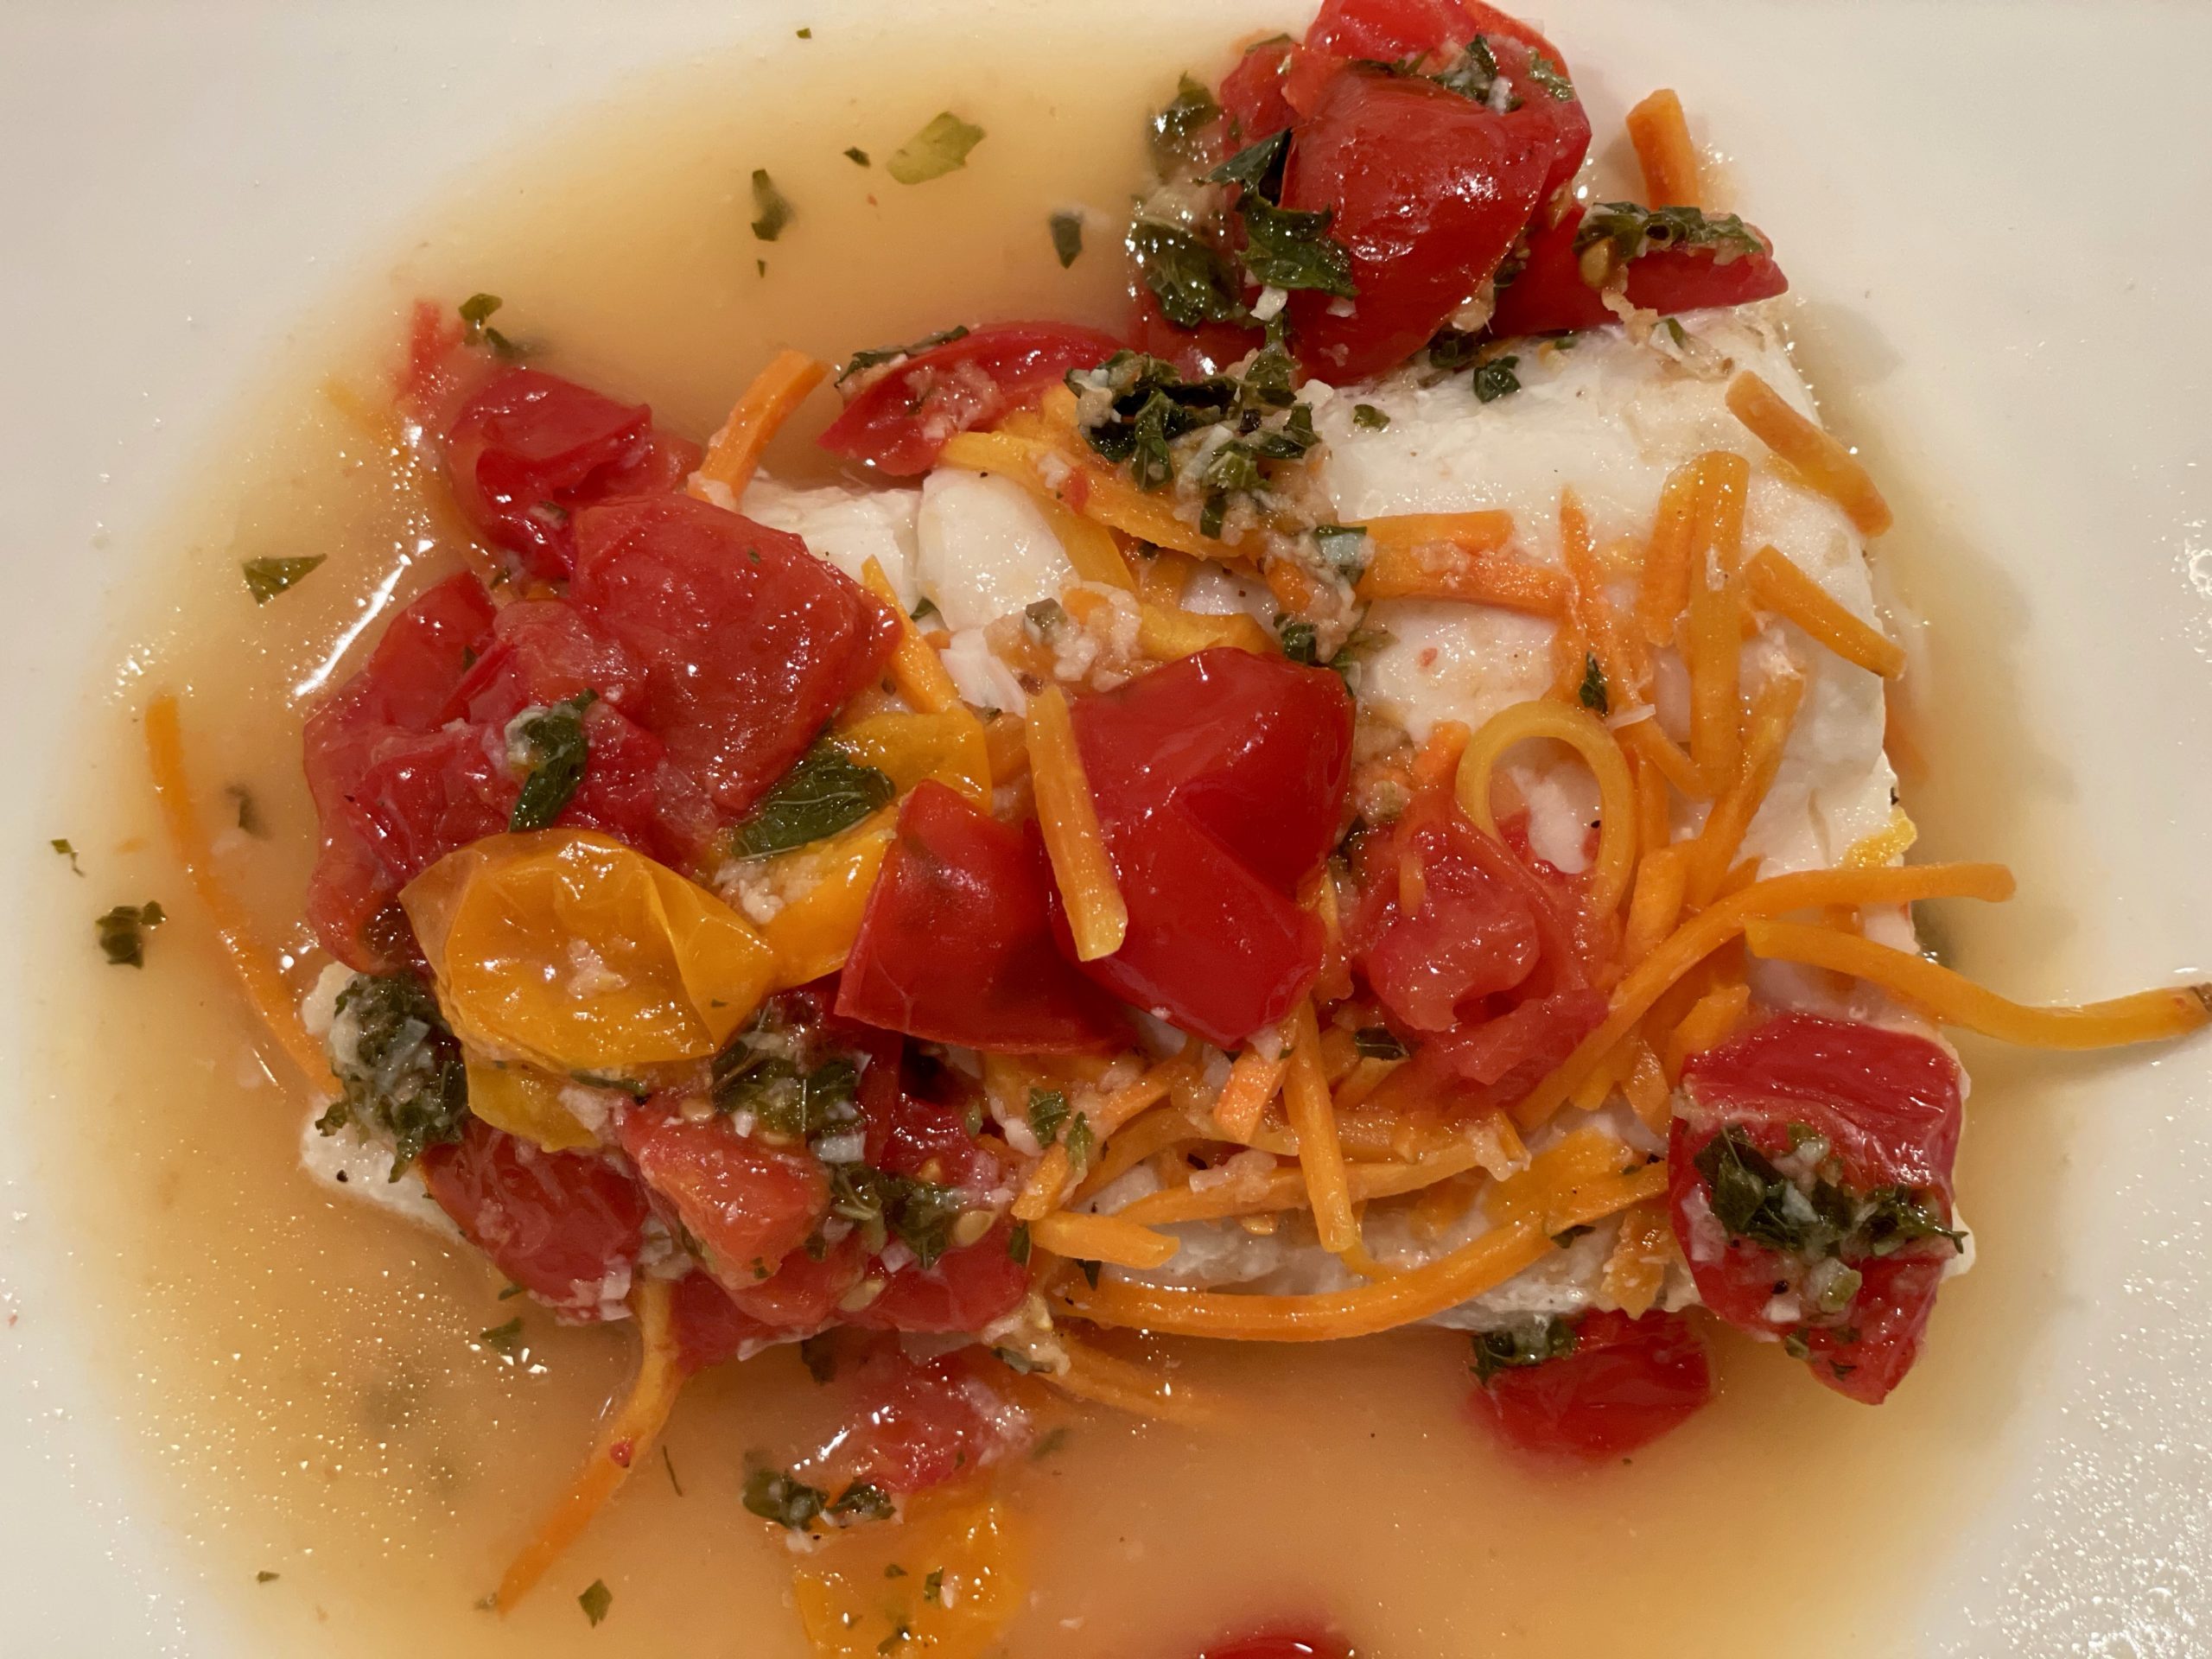
Bursting with flavor this fish dish is my new favorite.   I love love love it.  It is bold and intense with garlic, ginger, fish sauce and mint.  All of these ingredients meld together in and on top of the fish in a little foil packet that you cook for only about 16 minutes.  Seriously easy once you have the ingredients in the house.  Do not add any salt to the dish as the fish sauce does the trick.  And again – please don’t be afraid of fish sauce.  But also, maybe don’t smell it from the bottle.  Here is some fish sauce brand info.  I just learned a lot from the article myself.

I made this recipe with flounder (it fell apart but tasted great!), halibut, cod and haddock.  All so so good.  Of course the thicker the fish the longer it takes to cook so use 16 minutes only as a guide.

This is delicious with rice although I happen to just like it as it is – I added more tomatoes and carrots because I’m a little veggie crazy.  The last time I made this dish I used fresh peas instead of carrots and it was a hit.

This recipe, like the Thai Fish Curry is from my Mediterranean Way cookbook.  One day I’ll venture out of the Asian and into one of the Mediterranean dishes.  Maybe.  

This recipe calls for 6 pieces of fish but feel free to double or cut in half (as I do).  

Trying to think if anything else…but I think that is it!  Enjoy –

Serves: 6

Prep time: 15 minutes

Cook time: 16-20 minutes

Medium

Ingredients

  • 4 ripe tomatoes, diced (and more if you like)
  • 4 tablespoons fish sauce
  • 2 tablespoons lemon juice
  • 2 teaspoons sesame oil (I use a tad less as I find the flavor very strong – but do as you wish
  • 4 teaspoons freshly grated ginger
  • 2 cloves garlic, minced (I use a little less but if you are a garlic fan go for it all
  • 2 tablespoons chopped mint
  • 1 teaspoon sugar
  • 1/2 teaspoon ground pepper or more to taste (I like more) 
  • 4 6-ounce firm white fish fillets (haddock, snapper, cod) 
  • 2 julienned carrots (I used grated carrots)
  • another time I used fresh peas 

Directions

Preheat oven to 440 degrees. 

In a medium bowl, mix together the tomatoes, fish sauce, lemon juice, sesame oil, ginger, garlic mint, sugar and pepper.

Take a decent sized piece of tin foil and make a little boat for the fish.  Set the open foil packets on a baking pan.  You want plenty of extra foil as you need be able to seal the foil at the end.  This may take a few tries.  Next time I’ll take a photo of mine.

Put a fish fillet into each packet of foil.  Top with the julienned or shredded carrots.  Follow with the tomatoes and marinade portioning it equally among the fish. 

Cook for 16 minutes.  Take a peek inside but be carful as the steam inside the packets is hot.  Super hot.

If the fish is thick and looks too opaque, cook a few more minutes. If not, slide the fish and all it’s cooking liquid onto a plate and enjoy. 

I do hope you like it as much as I do!

ground turkey taco meat

Andy made this turkey taco meat last week (above – the two pics on the right) and several times last fall.  It’s versatile and easy and oh so good.  I made it last week for me and Rob – and it was good!  I had it in iceberg lettuce and a salad the next day. 

 The taco meat also tastes great on top of rice, in a taco salad bowl, as a topping on baked potato, as well as for tacos.  Any which way you can add guacamole, salsa, chopped cucumbers, chopped pineapple, red peppers, sour cream or greek yogurt…and more!  

He and I often add veggies to the dish – we might cook them separately and double the spices and liquid – mushrooms are great in there – or a bunch of frozen peas at the end.  Andy is partial to carrots as you can see.

This recipe calls for 2 pounds of meat but Andy usually doubles it while at school so he has a ton of leftovers.  When everyone was home I made 5 pounds.  It lasted 2.5 days!  Oh, and you can sub ground chicken or beef.  

Enjoy – 

Serves: a lot

Prep time: 10 m

Cook time: when it's done! But about 20 m

Easy

Spices

  • 4 tablespoons chili powder
  • 2 tablespoon ground cumin
  • 4 teaspoons paprika
  • 4 teaspoons kosher salt
  • 1/2 teaspoon garlic powder
  • 1/2 teaspoon onion powder
  • 1/2 teaspoon cayenne pepper (more or less depending on your taste)

Ingredients

  • 2 pounds ground turkey meat
  • 1 1/2 cups water
  • 2 tablespoons apple cider vinegar
  • 1 tablespoon brown sugar
  • serve with chopped cucumbers, guacamole, salsa, greek yogurt (or sour cream) and chopped pineapple for some excitement.  

Directions

Mix all the spices together and set aside.

  • Cook the meat in a large skillet – use a little oil (2 teaspoons) if you are using a stainless pan. No oil necessary if you are using a non stick pan.
  • Cook turkey in a large skillet over medium heat – stirring to break up clumps. When the turkey is cooked (no more pink spots), stir in the spice mix and water. Reduce the heat and simmer stirring here and there until most of the liquid has been absorbed – maybe 10 minutes.
  • Stir in cider vinegar and brown sugar – simmer to let the flavors merge –
    If using beef then you may want to strain the beef of fat before you add the spices.
  • serve with guacamole 

triple chocolate banana bread

Wowee.  This is delicious.  Rich in flavor and color and texture – you can’t  miss this one. I mean it.  Best chocolate banana bread ever.  As mentioned in the post from Liv for Cake (below) you can certainly skip the chips and ganache for a less chocolatey experience.  And/or add walnuts to cut some of the richness and sweetness.  But we loved as is.  These days when I bake the sweet often sits on our counter and eventually looks sad and dry (after several days of being ignored).  This dessert never had a chance to sit and kids argued over who got the last piece.  Yum.  I plan to make again this week.

I used half the ganache in the recipe fyi – but saved the rest and will use tomorrow when I make this again.

Here is the recipe...chocolate banana bread.

I followed almost exactly – but used natural Valrhona cocoa powder.  Oh, I also doubled the recipe but baked one cake in a larger loaf pan than in the recipe.   I find I don’t have to bake as long and I have more control with the overall moistness of the cake.  Muffin/cupcake shape would be great as well.  You can follow my lead or follow the recipe.  Also, remember to read my baking tips (esp measuring flour!) before you bake.

orange cookies

These are Lidia Bastianich’s yummy little gems.  Simple little citrus cookies with a sweet and delightful orange glaze.  These are so pretty and perfect with coffee or tea, or crumbled up over vanilla ice cream – or simply on a cookie platter.  These are from my new favorite cookie book: One Sweet Cookie: Celebrated Chefs Share Favorite Recipes.  I just love this book.  I really do.  Each recipe collected by Tracey Zabar has a blurb about the origin of the cookie and/or how much it is loved.  It such a gift that the author was able to gather these recipes from some very famous chefs to share with us.

FYI, the dough need a little time to set up in the fridge.

orange cookies (from Lidia Bastianich via One Sweet Cookie by Tracey Zabar):

3 cups all purpose flour
2 teaspoons baking powder
1/2 teaspoon kosher salt (use 1/4 if using table salt)
6 ounces (1 and a half sticks) unsalted butter, softened
1/2 cup plus one tablespoon sugar
3 large eggs (room temp is best)
1 teaspoon vanilla extract
2 tablespoons fresh orange juice
2 tablespoons fresh lemon juice
1 tablespoon grated orange zest

glaze
2 and 1/2 cups confectioners’ sugar
1/4 cup orange juice (as needed)

Whisk together the flour, baking powder and salt in a medium bowl.

With paddle attachment (or handheld beater) cream the butter and sugar on medium speed until light and fluffier – about 2 minutes.  Add the eggs, one at a time beating well after each addition.

Add the vanilla, orange juice, lemon juice and orange zest.  Beat to combine.

Add the flour to the mix and on the lowest speed possible, mix until just incorporated.

Remove from mixer and fold to incorporate all of the dry ingredients.

Roll the dough into logs as shown here.

Place in fridge or freezer until firm enough to cut with out losing their shape.

Preheat oven to 350 degrees.  Line sheet pans with parchment paper.  Cut the logs into 1/2 inch round and place on sheet pans.  Bake for about 15 minutes or so – until the cookies are golden.  Cool completely.

For the glaze, whisk together the oj and confectioners’s sugar – add a dash of sea salt if you feel like it.

Once cooled, dip each cookie in the glaze (upside-down) then shake off excess and place sticky side up on parchment to set and dry.  If glaze is too thick or thin, adjust with more juice or less.

Save some batter for another day – and save for longer in the freezer.

Enjoy –


apple crisp (another one)

I loved this.  Loved the simplicity of this crisp.  Probably my favorite.  Cored and sliced apples, skin intact, simple simple streusel topping – done.  Yes, no need to peel these apples, the skin enhances the flavor of the crisp and the colors that follow are awesome.  Like Autumn in a dish.  I served this with freshly whipped cream and it was delightful.  Truly.  I made this with a variety of apples…honeycrisp, tango, fugi, and jazz.  Have fun with it – just be sure that your apples are firm and hard so they don’t break down to applesauce while they cook.  Enjoy –

Oh, this is from Ruth Reichl’s new book My Kitchen Year and it is great!

5 heirloom apples
lemon
2/3 cup flour
2/3 cup brown sugar
1/2 teaspoon kosher salt
1/2 teaspoon cinnamon
6 tablespoons unsalted butter

Preheat oven to 375 degrees.

Core, slice and layer the apples in a buttered pie plate or baking dish.  Toss them with the juice of one lemon.

Combine the flour, sugar, salt and cinnamon.  Cut the butter into small pieces and add to the bowl.  Using your hands, rub ingredients together until the butter is incorporated and the streusel is of even color.

Place streusel on top of the apples and bake for about 45 minutes – and up to an hour or so.  The juices should be bubbling a bit at the edges and the top should be crisp, golden and fragrant.

Serve with whipped cream, ice cream, or just drizzled cream as Ruth suggests.

new banana pancakes

Delicious.  Banana.  Chocolate.  Fluffy.  Yeah, ok, I made a new kind of pancake AGAIN.  What’s wrong with me?  I’m not sure but I seem to be obsessed with pancakes, brownies and chocolate chip cookies and my dog.  Oh well, there are worse things.  We all love these.  Andy and Sylvie of course as they are somewhat easy to please, although both would protest and exclaim that these truly are the best banana pancakes to date.  Greg though – big fan which is a bit more exciting.  And Rob and I tend to eat the leftovers every morning after our own breakfast.  Instead of buttermilk, this recipe calls for milk and white vinegar which is nice because I always have these ingredients in the house.  I used my new griddle to make these and I love the ease and non burn and easy flip factor.  My first griddle which is exciting too!  Enjoy another breakfast from me!

banana pancakes (slightly adapted from Little B Cooks):

1 cup milk
2 tablespoons white vinegar (not white wine!)
1 teaspoon vanilla
1 egg
2 tablespoons melted butter
1 cup white whole wheat flour (or all-purpose, or half wheat, half white)
2 tablespoons sugar
1 teaspoons baking soda
1 teaspoons baking powder
1 teaspoon salt
2 small mashed bananas

optional

chocolate chips
blueberries
maple syrup (the original recipe says to heat and add a dash of nutmeg! I’d add a dash of sea salt too)

Add the vinegar to the milk and let sit for 5 minutes.  Heat your griddle (if you are using).

Mix together the dry ingredients.

Mix together the milk/vinegar, vanilla, egg, butter and bananas.

Gently fold into dry ingredients.  Add more milk if seems too thick.

Stir in chocolate chips if desired 0r sliced bananas, or blueberries.  Heat syrup with nutmeg and salt.  We tend to eat these plain but when splurging add the syrup.

Yum.


coconut pecan torte

So this was really good.  Addictive, interesting (and I mean that in a good way!) and unlike anything I have made before (I guess that is synonymous with interesting…)  Rob and I kept taking turns coming back to nibble at it all weekend long.  He mumbling “this is good!”  And me mumbling “I don’t even like coconut I must stop!”  That’s pretty much all I remember to be honest as it was about a month ago.  I don’t remember if guests liked it and I know the kids wouldn’t even try it.  Silly of them.

I think I will likely get to each and every dessert from Alice Medrich’s Sinfully Easy Delicious Desserts and likely write about each one (which I probably could get sued for).  But if I can recommend one new book for you, this would be it.  She is so creative, exact, and super informative.  I read the baker’s notes on every one of her books and I always learn something new.  That’s my plug (and I don’t get anything if you buy it btw!)

coconut pecan torte (Sinfully Easy Delicious Desserts by Alice Medrich):

1 2/3 pecan halves ((6 oz)
1 1/2 cups unsweetened shredded dried coconut (4.5 oz)
3/4 cup plus 2 tablespoons sugar (6.125 ounces)
8 large egg whites
1 teaspoon vanilla extract
1/4 teaspoon cream of tartar
1/2 teaspoon salt

Pre heat oven to 325 and place rack in the lower third of the oven.  Grease the bottom and sides of a 9 inch springform pan.

Place the pecans on a foil lined baking sheet and bake for 7-10 m – until fragrant and start to look toasted.  Place the nuts on a plate to let cool.

Turn oven temp up to 350.  Pulse the coconut and pecans in a food processor with just 1/4 cup of the sugar.  Pulse until it is the consistency of crumbs.

With the whisk attachment of the mixer, beat the egg whites, vanilla, salt and cream of tarter  – on medium high speed until the whites hold a soft shape.  Gradually add the rest of the sugar and continue to whip until the egg whites are glossy and stiff, but not dry.

Pour half of the coconut mixture into the whites and fold in with a large spatula – then add the rest of the coconut mixture and fold until just incorporated.

Pour into prepped pan and spread evenly.  Bake for about 25-30 m until the torte is puffed and golden and the edges are starting to shrink from the sides of the pan.

Set to cool.  To unfold, run a knife around the pan – remove cake and transfer to a platter.

This keeps really well under a cake dome for 3-4 days.

Serve with lightly fresh whipped cream.

Enjoy –


chocolate chip sour cream coffee cake

Oh jeez.  This is not the kind of thing that I can have lying around.  Big chocolate chips, moist cake, cinnamon and sugar laced throughout – can’t blame me.  Luckily I was baking for a charity so I quickly sent most of it away.  Also gave some to Leslie at Andy’s school since she is always on the receiving end of my absence calls.  She gave me a play by play via email…I WILL GLADLY BE YOUR TASTE-TESTER!  Hang on – let me try it . . . OMG!!!  FABULOUS!!!!!  Her enthusiasm and quick feed back will be rewarded 🙂

Anyway, this is super easy to make and really good almost any time of day.

This recipe is from SmittenKitchen which I love.  Because Deb Perelman writes this recipe up so eloquently and because I’m way backed up with posts to write I’m just going to give you the link to her recipe.

sour cream chocolate chip coffee cake

The only change I made was to exchange 1 teaspoon of kosher salt for her 3/4 teaspoon of table salt.

You know I love that kosher salt!


grapefruit cake

More citrus tasting that grapefruit so please don’t shy away.

DELICIOUS!  Moist, flavorful, sweet and yummy.   So good.  Soo good.  Really.  Equally loved by me, Andy, Sylvie, Charlotte, and Danika.  Rave reviews from all and oh, Will and Jason too!  Melissa found them wrestling over what they thought was the last piece and became very popular when she pulled another bite out of her bag.  This cake has three little parts – but each part is easy so don’t get scared off.  And you do have to squeeze some grapefruits (or do you say grapefruit) but I imagine that isn’t a surprise!  It is such a great cake to serve now – as the sun is starting to shine, the snow is melting, the temp is rising (kind of)…and this bright little cake kind of says all of that.  It does.

I found this from the blog Unwritten Recipes and her photos are BEAUTIFUL.

cake
1 cup sugar
2 teaspoons finely grated grapefruit zest
2 grapefruits
2 sticks unsalted butter, softened to room temp
2 eggs, room temp
2 teaspoons grapfruit juice
1 1/3 allpurpose flour
1/4 teaspoon baking soda
1/2 teaspoon kosher salt
1/2 cup buttermilk well shaken

syrup

1/3 cup sugar
1/3 cup freshly squeezed grapefruit juice

glaze

1 tablespoon freshly squeezed grapefruit joice
1/2 cup confectioners’ sugar
pinch of salt

Prepare pans – grease then line the bottom of a 9×5 pan (other sizes will work, just adjust baking time) with parchment and grease again.

Preheat oven to 325 degrees.

Zest the grapefruit (rem to wash and dry first) and just take the outside part of the skin.  The inner white layer is bitter.  Rub the zest into the sugar with your fingers to incorporate the flavor.

With paddle attachment, beat butter and the zested sugar on medium high for 3-5 minutes.  Add the eggs, one at a time.  Scrape down the bowl, mix in the vanilla and scrape again.

Combine whisk the dry ingredients.

With mixer running on lowest speed, add the 1/3rd of the flour mixture, follow it with half of the buttermilk.  And repeat, ending with the flour.  Do not over mix.  Remove from mixer and fold 2 or 3 times to make sure all butter is incorporated.

Pour into prepped pan.  Bake until toothpick comes out clean and the cake is nice and golden.

Let sit 10 minutes.  While it sits, make the syrup.  Bring grapefruit and sugar to a boil (mix to incorporate first) – boil for one minute.  Be careful as it is hot!

Poke many holes in the cake with a toothpick.  Brush the syrup all over the cake and continue as it gets absorbed.  Yum.

Let cool completely.  Invert and remove from pan.

Make the glaze by mixing the confectioners’ sugar and juice – and the tad of kosher salt.  Spread over the syrup soaked cake.  Delish.


vanilla layer cake…easy easy and yes, a little lopsided

So good.  So so good and full of warm vanilla flavor.  This was perfect in the middle of January and the freezing cold.  Coming home to a piece of pretty cake, light and airy and bright.  Made me think of Spring (until I put all the white snowflakes on it!)  Anyway, I love, love, love vanilla.  I really do.  I’m aware that some people think bland or boring, but really, it isn’t those things.  So try again.  Not much else to say to be honest.   Oh, this is a quickie.  Just plop most ingredients into into a food processor and you are all set.

The icing recipe is at the bottom of the recipe.  You can frost, or simply sprinkle on some confectioners’ sugar.

I do like to double this and make two rounds (freeze one for later!)

very vanilla cake (from Alice Medrich’s Sinfully Easy Delicious Desserts):

3/4 cup plus 2 tablespoons (6.125 ounces) sugar
1 cup (4.5 ounces) flour
1/2 teaspoon kosher salt (or 1/4 teaspoon table salt)
1 1/4 teaspoon baking powder
1/3 cup heavy cream
3 tablespoons (1.5 ounces) unsalted butter, melted and hot
3 large eggs (room temp)
2 teaspoons vanilla extract

Preheat oven to 350 degrees.  Grease an 8 x 2 inch round cake pan and line the bottom with parchment.  Grease that too.

Add the sugar, flour, salt and baking powder to the food processor and pulse to mix.

Add the cream and melted butter and pulse quickly – just 8-10 times until the ingredients blend together.  Add the eggs and vanilla and pulst 5-6 more times until incorporated.

Scrape down the sides of the food processor – and pulse again so that the ingredients are all blended and smooth (but no more after that).

Pour batter into prepped pans and bake 30-35-40 minutes until a toothpick comes out just clean.  Remember all ovens are different and many are not accurate, so bake until your cake is done.  Not what the recipe says.

Let cool.

frosing

1/2 cup heavy cream
1 cup sugar
1/4 teaspoon kosher salt (less if using table salt)
2 teaspoons pure vanilla extract
8 tablespoons (4 ounces) unsalted butter, slightly softened, cut into chunks

Mix together the cream, sugar, and salt in a small saucepan and mix a bit to incorporate the sugar.  Cover the pan – and set on medium heat – heat until mixture is bubbling all over.  Uncover and and adjust the heat so that the mixture boils actively (but not crazy).  Cook, without stirring for a minute.  Then pour mixture into a stainless steel bowl and let cool – until barely luke warm – about 45m.

Place the cooled mixture into another (bigger) bowl filled with lots of ice and a some water.  Add the vanilla to the icing.  Then, pour all ingredients into electric mixer bowl and with beater attachment on med high, add the butter slowly and in chunks.

Beat until smooth and fluffy.

If it is not thick or stiff enough – place in fridge for 10-15 min and beat again.

Alternately, if the icing is too stiff or cold, place the bowl in a larger bowl of hot water – until the frosting starts to meld around the bottom…then beat or stir briskly to reach desired consistency.