whole wheat (partially) banana bread

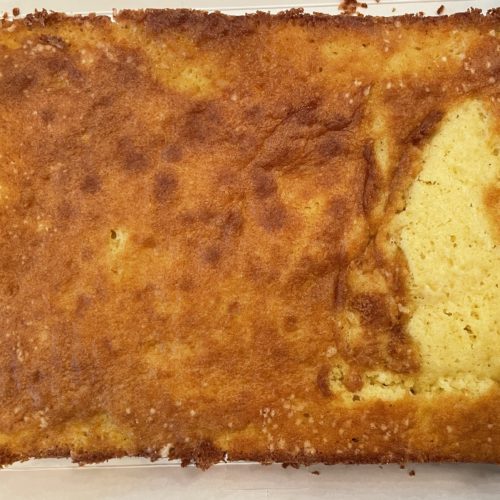
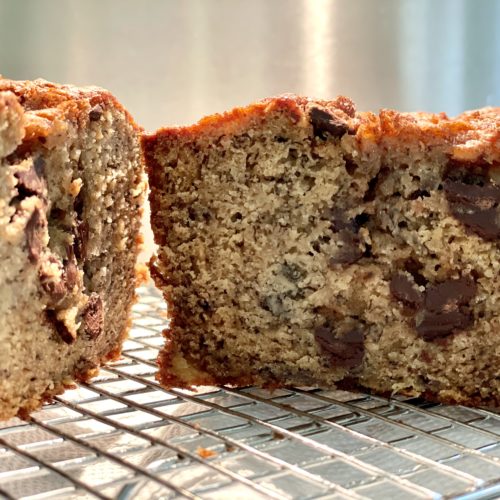
This banana bread was good.  It is good!  Great even.  On par with my normal banana bread which you can find here.  I might like this a bit more because it is a bit less sweet and I do love the addition of white whole wheat flour.  It gives the bread a heartier taste and I like the darker color which is irrelevant I know.  

I found this in my new  King Arthur Baking Company’s All-purpose Baker’s Companion book (that is a mouthful).  The book was updated in March of this year and I’m excited to try out a lot of recipes.  This was my first as I had extra bananas and felt like a change.  

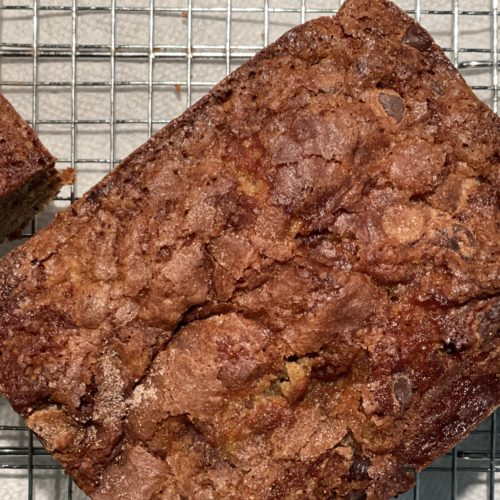
As mentioned the recipe includes white whole wheat flour and also a little cinnamon sugar coating on top which is particularly yummy.  I added chocolate chips to some of my loaves (I doubled the recipe) and that was obviously very good (if you like chocolate).  

Not much more to say – well, the recipe calls for a 9×5 loaf pan and I always find that my loaf cakes come out better if I don’t fill the entire pan with batter.  I might use a bunch of small loaf pans or a large and small – but basically I find my cake cooks  more evenly when not stuffed into the pan.  Then I don’t have to overbake the cake in order to make the middle less raw.  You can also use a muffin tin and make a muffin or two with the extra batter.  Or just bake as the recipe is stated and I’m sure it will be fine.  

Enjoy – 

Ingredients

  • 2 cups (454 g) mashed banana (about 4-5 medium bananas).  Weigh everything if you have a kitchen scale.  And if you don’t – buy one!
  • 1/2 cup veggie oil (99 g)
  • 1 cup (213 g) brown sugar 
  • 2 large eggs
  • 1 teaspoon vanilla extract
  • 1 cup (120g) all purpose flour
  • 1 cup (113 g) white whole wheat flour
  • 1 teaspoon baking soda
  • 1/2 teaspoon baking powder
  • 3/4 teaspoon kosher salt (diamond crystal is best in my opinion)
  • 1 teaspoon cinnamon
  • 1/2 c (57g) chopped walnuts, toasted if desired (optional)
  • choc chips if desired
TOPPING
  • 1 tablespoon (13g) sugar
  • 1/2 teaspoon cinnamon 

Directions

Preheat the oven to 350 degrees.  If using glass or stoneware, reduce the oven temp to 325.  Lightly grease the loaf pan and line the bottom with parchment.

In a large bowl, stir together the mashed banana, oil, brown sugar, eggs, and vanilla

Mix together the flours, baking soda, baking powder, salt, cinnamon, and chopped walnuts and chocolate chips (if using) 

Combine the two and gently mix and fold until it is smooth.

Pour into prepared pan(s).

Combine the cinnamon and sugar for the topping and sprinkle all over the batter.

Bake until a toothpick inserted into the center comes out just clean – with a few moist crumbs but no wet batter.

If the bread appears to be browning too quickly, tent the cake with aluminum foil.

Also, if using stoneware or glass pan, increase the baking time 15 m or so.

As you know – I don’t really believe in baking times.  The recipe in the book calls for 60 to 75 minutes.  As mentioned in the intro – I don’t like to stuff my loaf pans and bake for this long.  I find it better to put a little less batter into the loaf pan – and then bake the rest in a mini loaf pan or a muffin or two.

In that case I would check the bread after 30 minutes and just see what’s going on.  If it all is jiggly and wet – you know you have at least 10 m and likely more.  Keep resetting the timer until it is done.

Let cool for 15 m and then run a knife around the edges, and turn it out of the pan onto a rack to cool completely.

Enjoy –

buttermilk cake

I was making Easter treats for the shelter and I realized there was a lot, a lot of chocolate.  And surprisingly there are many many people who don’t love chocolate.  Well, I’m not so surprised anymore.  I had buttermilk in the fridge and wanted to make something for the vanilla lovers. 

I’ve made a few cakes lately that just don’t hit the spot.  One I made from a blog that I had to toss into the garbage.  So I went searching through my books and remembered that I could always count on Flo Bracker.  Her book Baking for all Occasions is one I used to reach for and hadn’t in a while.  I’m really glad I revisited.

This buttermilk cake is simple, light, airy, tasty and well, just that.  All of that.  And it is great served as is – or with a little powdered sugar.  I decided I needed to counteract the chocolate even more by adding berries and whipped cream.  Well.  That did it!  

The top of my cake was scraped a bit because it rubbed up onto my cooking rack but whatever.  Cake is cake and I’ve never been one to make the prettiest of sweets. 

Flo urges you to bring everything to room temp – so try to remember that!  Pull everything out now, and wait 25 m – then begin.  Enjoy this 

Ingredients

  • 1 3/4 cups (7 ounces/200 g) cake flour
  • 1/2 teaspoon baking powder
  • 1/2 teaspoon baking soda
  • 1/2 teaspoon salt (kosher salt or use 1/4 teaspoon)
  • 2/3 cup (5 1/2 fl ounces/165 ml) well-shaken buttermilk (room temp if you can)
  • 1 teaspoon pure vanilla extract
  • 5 1/2 ounces (1 1/3 stick/155 grams) unsalted butter, at room temp
  • 1 1/3 cups (91/2 ounces/260 grams) sugar
  • 3 large eggs lightly beaten
I doubled this recipe btw – and used a bigger pan as I was baking for a crowd.

Directions

If you have a kitchen scale, then use the weighted measurements.  Your cake will have a better chance at being its best self – hah.  If you don’t know how to use the “tare” button then check it out here.  It is a 24 second video that will make your life so easy.  And get a scale – well worth it.

Preheat oven to 350 degrees.  Remember to pull out ingredients to room temp. 

Prep your 8 inch square pan.  You can do this a variety of ways.  I like to spray a little oil in my pan then squish parchement paper in there.  You can also grease and then flour the pan.  You can also line just the bottom of the pan with parchment.  

Whisk together in a small bowl the flour, baking powder, baking soda, and salt.  Measure out the buttermilk and add the vanilla to that.

In the bowl of a stand mixer (or beaters on electric hand held) beat the butter on medium speed until it is lighter in color, clings to the sides of the bowl, and has a statin appearance. This should take a minute or two.  Slowly add the sugar in a steady stream.  Continue to beat on medium speed until light and fluffy.  Another 3-4 minutes or so.  Scrape down the bowl now and then.

With the mixer on medium speed, add the eggs slowly.  About 2 tablespoons at a time, beating after each addition.  Bump the speed up to medium high if your eggs are not incorporated into the batter.  Again, scrape the bowl down here and there.

On the lowest speed, add about 1/3 of the flour mixture followed by half of the buttermilk.  Stop to scrape down the bowl, and don’t overmix here.  Repeat with another 1/3 of the flour and the rest of the buttermilk. Lastly add the last bit of flour.  Again, just mix a little.  Then remove from mixer and use a spatula to gently fold to just combing all ingredients.  

Pour the batter into the prepared pan and Flo says to spread the batter from the center outward, creating a slightly raised ridge around the outside rim.  (Since heat is conducted faster near the metal rim, mounding the batter around the edges ensures the cake will bake more evenly and will be more level.)

Bake the cake just until it is golden brown on top, springs back when lightly touched in the center, a toothpick comes out just clean and the sides are just beginning to come away from the pan.  

She places the time at 45 m – but if I’m remember right mine took less time.  So as usual check earlier and then often at the end of baking.  I’d set my timer for 35 m and just have a look see and plan from there.

Eat as is, or with confectioners’ sugar and/or with berries, whipped cream.  Whatever you like.  

Enjoy-


mango avocodo corn salsa

I wrote this at the end of the summer – but posting now because summer is around the corner.  I think we are all in the mood for warmth and sunshine, summer salads and grilled meats, and easy gatherings.

Summer is just about over and it got cool here really fast!  But I this week (here) it’s supposed to get up to 78 degrees so you have a moment to squeeze this in with end of summer tomatoes, ripe avocado and sweet summer corn.  I served this on simple oven broiled cod and it was so good.  Silly good.  I ate it the next day on top of arugula and leftover fish.  I know most people don’t like leftover fish – especially cold, but for some reason I can do it.  A little Maldon Sea salt, fresh lime juice and olive oil and I was content.  This would be great in a taco or with tortilla chips – or even added to a store bought salsa to spruce it up.  Enjoy.  

Like anything you make – adapt to your liking.  You can change all the amounts below – I prefer more mango than avocado – but you may prefer it the other way.  Most recipes like this have added chopped red onion which is delicious – but it just doesn’t agree with me sadly.  But go for it if you can!

Oh, and please remember to look at notes on cilantro to learn how to properly clean.  

Ingredients

  • 1 cup frozen or 2-3 ears of cooked fresh corn 
  • 2 -3 mangos, peeled and diced 
  • 2 avocados, diced
  • 1/4 cup cleaned, chopped cilantro
  • 1 cup chopped tomatoes – if using bigger tomatoes squish out the seeds 
  • 1 tablespoon rice vinegar
  • 2 teaspoons olive oil
  • 1 lime – juiced
  • sea salt
  • red onion (optional)

Directions

  • Defrost corn and cook as instructed.  With frozen corn though, I prefer to pour it into boiling water and cook for 2-5 m or so (sometimes undercooked corn – esp previously frozen is a bit better in these types of salads – adding more of a bite and texture rather than a mushy kernel). But you can do what you prefer and to your taste.  Remove corn from stove and quickly drain and run continuous cold water on the corn to immediately stop the cooking.  
  • If using fresh corn, place corn in a pot that has about an inch of boiling water on the bottom.  Add the ears and simmer, covered for about 6-7 minutes.  Again, I prefer this a tad undercooked as well.  Remove ears (tongs are easiest) and place under running cold water to stop the cooking.  Once cool, cut kernels off of cob with a serrated knife.  
  • Wash, peel and dice mango
  • Wash, peel, pit and dice avocado
  • Wash cilantro – remember to look that up!   Chop.
  • Chop tomatoes and onions if you are using.
  • Add olive oil, rice vinegar, lime and salt.  Taste and re season as you like –  I happen to love lime so I will always add a bit extra!
  • Soon I will post on the basics of chopping the above – but in the meantime just google if you need some immediate instruction.

simply delicious ground meat/(optional)egg stir fry

This recipe is soooo easy.  Simple.  And you can change it up so easily picking a different protein each time.  Veggies too.  Egg or no egg.  

Everyone loves this.  Mark loved it, Greg and Sarah asked for the recipe the last time they ate it.  Beth said “thumbs up all around.  Will add to the rotation!”  Sylvie was home this week and asked if I could make a lot so she would have enough for leftovers the following day.  I too am a big fan of this dish.  Oh and Rob and Andy too!  (He makes it frequently at school.)

The recipe calls for coconut aminos which is an alternative to soy sauce for those who can’t tolerate gluten.  I find that I like the coconut aminos more (in this recipe) than soy sauce as it is a littler lest pungent or harsh on the tongue.  It sounds hard to find, but it is right there next to the soy sauces. 

I found this in Juli Bauer’s Paleo Cookbook.  I tweaked it a bit and changed the the order of operations and added egg to mine – as well as all the other veggies.  Have fun with this – play around and enjoy – if you add a lot a lot of veggies you should probably double the sauce.  Additionally – I usually double this recipe for my family – then add a lot of veggies, I then triple the sauce.

Serve with brown rice, light brown rice, white rice or cauliflower rice.  Or something else entirely.  As you can see I plated mine with baby spinach, roasted cauliflower, and string beens and it was good!

Ingredients

  • 2 tablespoons ghee, butter, coconut oil or canola oil.  I like to use butter when Greg isn’t around but really good with ghee and any oil really
  • 1 medium onion – chopped
  • 1-2 cloves garlic minced
  • 1 pound ground meat (beef, turkey, chicken) 
  • kosher salt
  • 1/3 cup coconut aminos (gluten free), or low sodium soy sauce 
  • 1-2 tablespoons honey
  • 1 teaspoon red pepper flakes (plus or minus depending on your taste) 
  • 1 tablespoon minced fresh ginger 
  • 2 eggs (optional) 
  • chopped scallions for garnish (not me as I taste them through the night)
  • a squeeze of lime juice if it needs it
  • pepper
Other veggies to add/try:
  • diced mushrooms
  • string beans cut small
  • shredded carrot or very thinly sliced carrot
  • red peppers
  • frozen peas
  • frozen edamame
  • baby spinach or baby kale
  • broccoli florets (if you use broccoli blanch first) 
Double the sauce if using a lot of veggies!  (I do) Triple the sauce if using more meat and more veg

Directions

  • Sauté the onions in a large pan (12 inch is good for this) using one or two of the fats above.  I like onions to be nice and golden for my dishes because I find I can digest them better and well, I like them better like that.  But you do you as they say.
  • Add the meat and salt it after you put it in the pan.  Let it sit for two minutes and flip the chunk of meat so that it browns on both sides first.  The onions will get even darker underneath.  Then break it up and continue to cook until no more pink remains. 
  • While the meat cooks, make the sauce by combining the aminos, honey, ginger and red pepper and set aside 
  • and then gently beat the eggs in a bowl and set aside
  • Add the garlic to the meat and onion mixture and stir in for a minute
  • Next add mushrooms if you are using – saute for a few minutes.
  • Add the sauce to the pan and cook until the liquid has reduced by one third – about 10 minutes.  
  • Half way through add the other veggies 
  • Cook your eggs in a separate pan and chunk up with a spatula.
  • Add to the pan when it is just about ready.  
  • Carefully mix up the ingredients and taste.  If it tastes too sweet (you overdid it on the honey) I find a squirt of lime juice helps.  I like lime either way as I like the little zing it adds.
  • pepper it if you like and top with cut scallions (if you like)
  • enjoy – 

dairy free chocolate pudding ice cream

I used to kind of scoff at a non-dairy ice cream and I’m sorry about that.  (I don’t think I scoffed out loud though.)  But now that Greg is here, living with us, I’ve taken on the job of making him delicious gluten and dairy free desserts.  He is studying now for a big test so I’m on a mission to find delicious sweets for him – as it is something to look forward to at the end of the day.

Greg had told me about this vegan ice cream cafe called FoMu in Boston that he loved.  He said the ice creams were unreal and that he could safely eat so many of them.  So I bought the FoMu cookbook before the holidays (at the tail end of 2020) and surprised him with some chocolate pudding ice cream.

He was delighted!  And I was too.  Simple, cold, chocolatey, and smooth.  I’ve made it two more times since then as well as the vanilla which I can write about another time. 

I will say that this is best eaten a 4-6 hours after you run it through your ice cream machine.  It is soft and oh just so delicious.  Once frozen overnight it hardens (more than your ice cream) and it has to sit out a bit before you eat it.  And each day it recovers less from the thaw.  But this shouldn’t be a problem because you can eat it all right up ASAP.  Now you have an excuse to.  Also – you can freeze it it smaller portions to avoid re-thawing thawed ice cream.  You can purchase pint/quart containers easily online. 

Ingredients

  • 2.5 ounces or 70 grams premium dutch processed cocoa 
  • 2.5 cups or 600 ml coconut milk
  • 1/4 cup or 50 grams unrefined organic cane sugar (you can sub granulated sugar)
  • 1/2 cup or 120 ml agave 
  • pinch of sea salt I prefer Maldon 
  • 2 tablespoons or 30 ml espresso powder (optional) ( I used 1 of the two) 

Directions

  • In a heavy duty mixer or with an immersion blender, combing the coconut milk, cane sugar, agave and espresso (if you are using) 
  • Sift the cocoa powder into the mixture and mix again to combine well.  Add the salt and taste the ice cream base for flavor – add a tad more salt if it needs it.  Don’t skip this.  But don’t add table salt if that is all you have.
  • Run your ice cream in your machine – and store in freezer in freezer safe containers.  (Again, I buy the ice cream pint containers online).
  • Let freeze for a few hours before serving.  And let come up to room temp for a bout 10-15 minutes if it has hardened overnight.

sugar cookies (and more variations!)

OK, these are terrific.  Seriously good cookies.  Goooood.  The cookies are pictured above in the box and ready to go, in a bigger box with other treats that I will blog about, and on the counter with some valentine treats.  I dropped a box of assorted cookies to my friend Jodi and all she wrote back was “the sprinkle cookies”.   She isn’t that verbose in text but this was the simplest compliment and it made me smile.  I had to add “good, right?” just to get some more feedback and praise.  So I urge you to try these!  The beauty of this recipe is that you can roll them in sprinkles, chocolate sprinkles, mini chips, toffee bits, really anything!  Have some fun.  II’m making more tomorrow so I’ll add some photos then.   

This recipe comes from my newest favorite cookie book called 100 Cookies The Baking Book For Every Kitchen by Sarah Kieffer.  And wow – I’ve made several of her recipes and I’m overwhelmed with the desire to bake the entire book.  This section in her book is called “sheet-pan banging” cookies and it points to her method of making the cookies rippled and flat.  My latest batch were the best looking but of course no photos.  She instructs the baker to make large balls of dough and I know that would be great but so far I’ve only done medium.  Tomorrow I’ll do large.  You can also make them small cute and rippled (a bit).

Although this method can take longer it is fun and worth it.  The bigger the cookie the less you can fit on one pan so be mindful of that.  Sarah has snickerdoodles and molasses and all kind of sheet pan banging recipes to try.  I like this sugar cookie one because of all the variations.  I doubled the recipe and kept some dough in the fridge.  You can then make more as you wish – but make sure the dough comes to room temp a bit so that the goodies will stick to it and the dough will spread.

Oh, and get out your kitchen scale as there are weighted measurements too which I love.  

Enjoy-


Ingredients

  • 2 Cups (284 grams) all- purpose flour
  • 1 teaspoon baking soda
  • 3/4 teaspoon kosher salt (diamond crystal is best)
  • 1/2 teaspoon cream of tartar
  • 1 cup (2 sticks or 227 grams) unsalted butter, room temp
  • 1 3/4 cups (350 grams) granulated sugar (divided) 
  • 1 large egg
  • 1 tablespoon pure vanilla extract 

Directions

Adjust the oven rack to the middle of the oven and set at 350 degrees.

  • Line the sheet pan(s) with parchment paper or tin foil (dull side up)
  • In a small bowl, whisk together the dry ingredients – flour, baking soda, salt and cream of tartar.
  • With the paddle attachment of stand mixer or with beaters, beat the softened butter on medium speed until creamy, about a minute or 2.
  • Add 11/2 cups (300 g) of the sugar (don’t add it all as I did my first time through)
  • Beat on medium speed until light and fluffy about 3-4 minutes.
  • Add the egg and vanilla and mix on low to combine.
  • Add the dry ingredients and beat on low until just combined.  Remove from mixer and finish mixing by hand so that you don’t overmix 
  • If you want to add sprinkles or chips or other treat into the cookies you can do that now.  Just don’t overdo it.  
  • Next roll the dough into 3 oz (85 g) balls.  Again, you can do these smaller if you choose.
  • Roll each ball into the remaining 1/4 cup of sugar and the addition of your sprinkles, chips, flakes, etc.
  • At this size (3 oz) place 4 balls on the cookie sheet.  And bake one pan at a time.  Again, I made smaller balls and was able to fit 9 on my pan.  But tomorrow I’ll do the real thing.
  • Bake for 8 minutes.  Then lift one side of the sheet pan up about 4 inches and gently let it drop down against the oven rack so that the edges of the cookies set and the center falls back down.  After the cookies puff up again in 2 minutes, repeat lifting and topping the pan.  Repeat every 2 minutes to create ridges and ripples around the edge of the cookie.  Some of my cookies weren’t really spreading so I took them out and kind of banged them on the counter – just a bit.  
  • Bake for 13-15 minutes in total, until the cookies have spread out and the edges are golden brown, but the centers are much lighter and not fully cooked. 
  • Remove from oven and place on a rack to cool for a bit – or, if you are lazy like me just on the counter.  
  • If the cookies are too dark or cooking too much remove from the pan after 10 minutes (and onto a wire rack) to continue to cool.  Or just leave on pan too cool.
  • Enjoy these babies!

Vietnamese baked fish

Bursting with flavor this fish dish is my new favorite.   I love love love it.  It is bold and intense with garlic, ginger, fish sauce and mint.  All of these ingredients meld together in and on top of the fish in a little foil packet that you cook for only about 16 minutes.  Seriously easy once you have the ingredients in the house.  Do not add any salt to the dish as the fish sauce does the trick.  And again – please don’t be afraid of fish sauce.  But also, maybe don’t smell it from the bottle.  Here is some fish sauce brand info.  I just learned a lot from the article myself.

I made this recipe with flounder (it fell apart but tasted great!), halibut, cod and haddock.  All so so good.  Of course the thicker the fish the longer it takes to cook so use 16 minutes only as a guide.

This is delicious with rice although I happen to just like it as it is – I added more tomatoes and carrots because I’m a little veggie crazy.  The last time I made this dish I used fresh peas instead of carrots and it was a hit.

This recipe, like the Thai Fish Curry is from my Mediterranean Way cookbook.  One day I’ll venture out of the Asian and into one of the Mediterranean dishes.  Maybe.  

This recipe calls for 6 pieces of fish but feel free to double or cut in half (as I do).  

Trying to think if anything else…but I think that is it!  Enjoy –

Serves: 6

Prep time: 15 minutes

Cook time: 16-20 minutes

Medium

Ingredients

  • 4 ripe tomatoes, diced (and more if you like)
  • 4 tablespoons fish sauce
  • 2 tablespoons lemon juice
  • 2 teaspoons sesame oil (I use a tad less as I find the flavor very strong – but do as you wish
  • 4 teaspoons freshly grated ginger
  • 2 cloves garlic, minced (I use a little less but if you are a garlic fan go for it all
  • 2 tablespoons chopped mint
  • 1 teaspoon sugar
  • 1/2 teaspoon ground pepper or more to taste (I like more) 
  • 4 6-ounce firm white fish fillets (haddock, snapper, cod) 
  • 2 julienned carrots (I used grated carrots)
  • another time I used fresh peas 

Directions

Preheat oven to 440 degrees. 

In a medium bowl, mix together the tomatoes, fish sauce, lemon juice, sesame oil, ginger, garlic mint, sugar and pepper.

Take a decent sized piece of tin foil and make a little boat for the fish.  Set the open foil packets on a baking pan.  You want plenty of extra foil as you need be able to seal the foil at the end.  This may take a few tries.  Next time I’ll take a photo of mine.

Put a fish fillet into each packet of foil.  Top with the julienned or shredded carrots.  Follow with the tomatoes and marinade portioning it equally among the fish. 

Cook for 16 minutes.  Take a peek inside but be carful as the steam inside the packets is hot.  Super hot.

If the fish is thick and looks too opaque, cook a few more minutes. If not, slide the fish and all it’s cooking liquid onto a plate and enjoy. 

I do hope you like it as much as I do!

ground turkey taco meat

Andy made this turkey taco meat last week (above – the two pics on the right) and several times last fall.  It’s versatile and easy and oh so good.  I made it last week for me and Rob – and it was good!  I had it in iceberg lettuce and a salad the next day. 

 The taco meat also tastes great on top of rice, in a taco salad bowl, as a topping on baked potato, as well as for tacos.  Any which way you can add guacamole, salsa, chopped cucumbers, chopped pineapple, red peppers, sour cream or greek yogurt…and more!  

He and I often add veggies to the dish – we might cook them separately and double the spices and liquid – mushrooms are great in there – or a bunch of frozen peas at the end.  Andy is partial to carrots as you can see.

This recipe calls for 2 pounds of meat but Andy usually doubles it while at school so he has a ton of leftovers.  When everyone was home I made 5 pounds.  It lasted 2.5 days!  Oh, and you can sub ground chicken or beef.  

Enjoy – 

Serves: a lot

Prep time: 10 m

Cook time: when it's done! But about 20 m

Easy

Spices

  • 4 tablespoons chili powder
  • 2 tablespoon ground cumin
  • 4 teaspoons paprika
  • 4 teaspoons kosher salt
  • 1/2 teaspoon garlic powder
  • 1/2 teaspoon onion powder
  • 1/2 teaspoon cayenne pepper (more or less depending on your taste)

Ingredients

  • 2 pounds ground turkey meat
  • 1 1/2 cups water
  • 2 tablespoons apple cider vinegar
  • 1 tablespoon brown sugar
  • serve with chopped cucumbers, guacamole, salsa, greek yogurt (or sour cream) and chopped pineapple for some excitement.  

Directions

Mix all the spices together and set aside.

  • Cook the meat in a large skillet – use a little oil (2 teaspoons) if you are using a stainless pan. No oil necessary if you are using a non stick pan.
  • Cook turkey in a large skillet over medium heat – stirring to break up clumps. When the turkey is cooked (no more pink spots), stir in the spice mix and water. Reduce the heat and simmer stirring here and there until most of the liquid has been absorbed – maybe 10 minutes.
  • Stir in cider vinegar and brown sugar – simmer to let the flavors merge –
    If using beef then you may want to strain the beef of fat before you add the spices.
  • serve with guacamole 

triple chocolate banana bread

Wowee.  This is delicious.  Rich in flavor and color and texture – you can’t  miss this one. I mean it.  Best chocolate banana bread ever.  As mentioned in the post from Liv for Cake (below) you can certainly skip the chips and ganache for a less chocolatey experience.  And/or add walnuts to cut some of the richness and sweetness.  But we loved as is.  These days when I bake the sweet often sits on our counter and eventually looks sad and dry (after several days of being ignored).  This dessert never had a chance to sit and kids argued over who got the last piece.  Yum.  I plan to make again this week.

I used half the ganache in the recipe fyi – but saved the rest and will use tomorrow when I make this again.

Here is the recipe...chocolate banana bread.

I followed almost exactly – but used natural Valrhona cocoa powder.  Oh, I also doubled the recipe but baked one cake in a larger loaf pan than in the recipe.   I find I don’t have to bake as long and I have more control with the overall moistness of the cake.  Muffin/cupcake shape would be great as well.  You can follow my lead or follow the recipe.  Also, remember to read my baking tips (esp measuring flour!) before you bake.

orange cookies

These are Lidia Bastianich’s yummy little gems.  Simple little citrus cookies with a sweet and delightful orange glaze.  These are so pretty and perfect with coffee or tea, or crumbled up over vanilla ice cream – or simply on a cookie platter.  These are from my new favorite cookie book: One Sweet Cookie: Celebrated Chefs Share Favorite Recipes.  I just love this book.  I really do.  Each recipe collected by Tracey Zabar has a blurb about the origin of the cookie and/or how much it is loved.  It such a gift that the author was able to gather these recipes from some very famous chefs to share with us.

FYI, the dough need a little time to set up in the fridge.

orange cookies (from Lidia Bastianich via One Sweet Cookie by Tracey Zabar):

3 cups all purpose flour
2 teaspoons baking powder
1/2 teaspoon kosher salt (use 1/4 if using table salt)
6 ounces (1 and a half sticks) unsalted butter, softened
1/2 cup plus one tablespoon sugar
3 large eggs (room temp is best)
1 teaspoon vanilla extract
2 tablespoons fresh orange juice
2 tablespoons fresh lemon juice
1 tablespoon grated orange zest

glaze
2 and 1/2 cups confectioners’ sugar
1/4 cup orange juice (as needed)

Whisk together the flour, baking powder and salt in a medium bowl.

With paddle attachment (or handheld beater) cream the butter and sugar on medium speed until light and fluffier – about 2 minutes.  Add the eggs, one at a time beating well after each addition.

Add the vanilla, orange juice, lemon juice and orange zest.  Beat to combine.

Add the flour to the mix and on the lowest speed possible, mix until just incorporated.

Remove from mixer and fold to incorporate all of the dry ingredients.

Roll the dough into logs as shown here.

Place in fridge or freezer until firm enough to cut with out losing their shape.

Preheat oven to 350 degrees.  Line sheet pans with parchment paper.  Cut the logs into 1/2 inch round and place on sheet pans.  Bake for about 15 minutes or so – until the cookies are golden.  Cool completely.

For the glaze, whisk together the oj and confectioners’s sugar – add a dash of sea salt if you feel like it.

Once cooled, dip each cookie in the glaze (upside-down) then shake off excess and place sticky side up on parchment to set and dry.  If glaze is too thick or thin, adjust with more juice or less.

Save some batter for another day – and save for longer in the freezer.

Enjoy –