coconut tart with chocolate smear (non dairy, flourless and also butter-less))

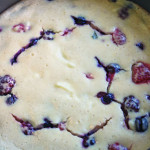
Rob loved this.  Loved it.  A lot.  He ate slice after slice as it sat on our counter throughout the weekend.  He thought it tasted very rich and creamy despite the lack of butter or cream.  Ali and family too thought delicious – like a Mounds bar.  I’m not a coconut fan, so honestly very hard for me to judge but even to me, it tasted pretty good.  The yummy recipe comes from Mark Bittman’s new cookbook, Food That Matters and wow – what a terrific book!  Thank you mom.  This was very easy to make – a good one to throw together with your kids (or on your own) and serve to guests as well.

The recipe makes one small 9 inch tart.  Feel free to double the recipe and make two if you are baking for a crowd.  Enjoy-

Mark Bittman suggests topping the whole tart with fresh raspberries or cut up strawberries if you want to change it up.

coconut tart with chocolate smear (very slightly adapted from Mark Bittman’s Food That Matters):

2 cups shredded, unsweetened coconut (I used sweetened – all I had in the house)
1/2 cup sugar (if using sweetened coconut add only 1/4 cup sugar)
2 eggs – separated
1 teaspoon vanilla extract
1/2 teaspoon kosher salt
6 ounces bittersweet chocolate, roughly chopped
1 tablespoon sugar
1 cup coconut milk (light is OK too)

Preheat the oven to 350 degrees. In a medium sized bowl, mix, together the coconut, sugar, egg whites, vanilla and salt.  Press the mixture into the bottom and up the sides of a 9 inch tart pan.

Bake until the coconut shell is firm and nicely toasted (nice golden color) about 13-20 minutes – keeping in mind that you will not bake it again.

Meanwhile, in a medium saucepan, combine the chocolate, egg yolks, coconut milk and sugar and place over low heat.  Whisk and cook almost constantly until the chocolate is completely melted and steaming.  Be careful – do not let the mixture boil and separate.

When the tart shell comes out of the oven, spread the chocolate mixture into it.  Let the tart sit and cool – and become firm before cutting and serving.  The tart will keep covered and refrigerated for a day or two (although we kept ours on the counter and it held up pretty well).  Enjoy-

crack pie

How can you not make a pie called Crack Pie.  Having never tried crack itself it seemed like an exciting pie to eat.  I pulled and saved this recipe from the September issue of Bon Appetit – featuring The Milk Bar’s desserts.  I knew our friend Jason would be a terrific taster since he does not really eat chocolate (so sad).  Well, he loved it.  Of course he did – with all its oat-mealiness and brown sugar and butter.  We all loved it.  Especially me!  I’m slowly realizing that I truly like all desserts, not just chocolate or lemon or ice cream.  Exciting.  My mom was here visiting and she suggested that I cut a piece out for the photo insisting that it will be a much better picture.  It was her sneaky way of making sure she got a good taste of it too!  Yummy she said 🙂  The taste is hard to describe  – but it is rich and tasty and somewhat butterscotch-y with a crunchy oatmeal crust.  I managed to make this with my injured hand (well, really with out it) so anyone can do this!  The crust is press in – no rolling, so don’t be scared.  Serve with freshly whipped cream or vanilla ice cream.  Enjoy-

Oh, make this the day before you plan to serve.  It chills overnight and is great served cold.

crack pie (from Bon Appetit Magazine featuring the Milk Bar’s desserts):

oat cookie crust-
9 tablespoons unsalted butter (1 stick plus one tablespoon), room temp
5 1/2 tablespoons light brown sugar, packed
2 tablespoons sugar
1 large egg
3/4’s cup plus 2 tablespoons old-fashioned oats
1/2 cup all purpose flour
1/8 teaspoon baking powder
1/8 teaspoon baking soda
1/3 teaspoon kosher salt

filling
3/4 cup sugar
1/2 cup light brown sugar, packed
1 tablespoon nonfat dry milk powder
1/4 teaspoon kosher salt
1/2 cup (1 stick) unsalted butter, melted and slightly cooled
6 1/2 tablespoons heavy whipping cream
4 large egg yolks
1 teaspoon pure vanilla extract

Oat cookie crust – Preheat oven to 350 degrees.  Line a sheet-pan with parchment or foil.  Beat 6 (just 6) tablespoons of the butter with 4 (just 4) tablespoons brown sugar and 2 tablespoons of the sugar with the paddle attachment of your mixer – or with hand held beaters.

Beat until light and fluffy and scrape bowl here and there.  This should take about 4-5 minutes.

Add the egg, and beat until pale and fluffy.  Add the oats, flour, baking powder, baking soda and salt and beat until well blended.  Transfer mixture to cookie sheet and press dough with hands to make a nice thin layer- about 1/2 inch thick or so.  Bake until nicely golden – about 17-20 minutes.  Transfer to a rack and let cool completely.

Transfer cooled oat cookie crust to a food processor (you can also do this all by hand – but my hand is hurt) and add 3 tablespoons butter and 1 1/2 tablespoons of the brown sugar.  Pulse until dough comes together.

Press into a 9 inch pie plate and make sure you push the crust up the sides of the pan.  Place the dish on a rimmed baking sheet and preheat oven to 350 degrees.  Place oven rack in center of oven.

For the filling – Whisk together the sugar, brown sugar, milk powder and salt in a medium bowl.  Add the melted butter and mix until incorporated.  Add the cream, then the egg yolks and vanilla and whisk until well blended.

Pour the filling into the pie crust and place in oven with sheet-pan.  Bake for about 30 minutes – and then reduce the heat to 325 degrees and bake another 20-24 minutes – until the pie only jiggles slightly when jiggled.  It should look set around the edges and may have a few dark spots.

Place on cooling rack for 2 hours.  Then place in fridge uncovered and overnight.  Serve chilled with powdered sugar, and ice cream.  Good crack.  Enjoy –

apricot raspberry tart (with easy press in crust)

The apricots and raspberries together in this sweet make for a truly sensational bite.  This is my favorite of the three fruit desserts that I baked for friends recently. Jen’s too if I’m remembering right.  I meant to take notes, but just couldn’t manage to stuff myself and write about it at the same time.  Alcohol doesn’t help either, so hopefully it is as good as I’m remembering.  The fruit sits upon a delicious nutty crust and is topped with a crisp streusel topping.  What more can you want?  The crust is a press in btw – no rolling here, so don’t be scared.  I was worried that the tart would be a soggy mess (since you do not pre-bake the shell), but it was sweet, tart, and so very flavorful.  My mouth is watering in memory now as I write.  I must say that this rivals any chocolate dessert for me (and that is saying a lot).  Oh and try to find good apricots and berries – remember that the best fruit desserts must start with tasty fruit (so sample it and if it is bad, remember that it will be worse in your dessert)!  Deborah Madison’s book is filled with a myriad of fruit desserts.  Each more mouth watering than the next.  Enjoy this-

You will need a 9 inch tart pan and a food processor.

Best to serve the day you make it although leftovers are good in the AM.

apricot raspberry tart (from Seasonal Fruit Desserts by Deborah Madison):

tart dough and topping

1/2 cup almonds (with our w/out skin)
1/3 cup brown sugar
1/4 teaspoon kosher salt
1 cup all purpose flour
1/3 cup whole wheat pastry flour (or just use (more)vall purpose if you don’t have)
8 tablespoons (1 stick) cold unsalted butter, cut into 10 pieces
1 tablespoon water
1 teaspoon vanilla extract
1 egg yolk

fruit filling

4 cups ripe apricots, quartered (if overripe just cut in half), pitted
1 cup raspberries
2 tablespoons all purpose flour
1/4 cup sugar
pinch kosher salt

Preheat oven to 375 degrees.  To make the tart dough and topping, place the almonds and sugar in a food processor with half the salt and pulse until the mixture is fine and smooth.  Measure out 1/2 cup of this mixture (for the topping) and set it aside for later.

Add the flour and remaining salt to to the remainder in the food processor and combine.  Add the chunks of butter and pulse until broken up into coarse crumbs.

Mix the water, vanilla and egg yolks with a fork and then with the food processor running, add this liquid and pulse until the dough looks moist and has started to come together.

Remove 1/2 cup of this dough and add it to the reserved 1/2 cup of the almond sugar mixture.  And again, set aside for topping.

Press the remaining dough (from the food processor) into a 9 inch tart pan and using your fingers press the dough into the pan. Use your fingers to press the dough up the sides of the tart pan and to flatten the base.  If the butter warms up and you are having trouble – refrigerate it and then continue to press in and form a nice even crust.

Toss the apricots, raspberries, flour, sugar and salt together and pour into the tart shell.

Rub the reserved 1/2 cup almond tart dough and 1/2 cup almond-sugar mixture together and make coarse crumbs.  Sprinkle over the fruit.

Place the assembled tart on a sheet-pan and place in the center of the oven – bake until the top is nicely golden and the fruit has released its juices – about 45 minutes or so.

Remove and let cool.

I had a hard time removing the bottom circle of the tart – so i just left it on.  Of course remove the tart ring before serving.

Delicious!  Enjoy-

blackberry sour cream pie

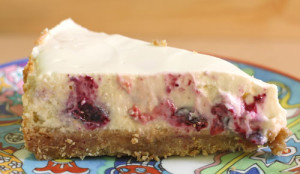
What a truly pretty pretty pie!  Major hit. And just in time for summer entertaining (or just for you or your family).  Sylvie LOVED it – especially the graham cracker crust.  Lauren ate only the crust (oye).  But Andy – my chocolate loving son – was starving and asked for a bite which was surprising since he’s never been a pie (and custard) guy and he said, “mmmm….so good!”  Very exciting for me (although he didn’t choose it for dessert that night.)  Anyway – success, even with Rob who is not much of a pie guy either.  Alisa, Mike, Ali, Jonathan, and me – well, we all really loved this.  I keep repeating myself but not much more to say.  The creamy tart sour cream filling paired with the sweetened cooked blackberries and the awesome graham crust – well – you can imagine.  This pie is easy since it is really almost like a cheese cake baked in a pie plate. No dough to roll out and the custard easily bakes in the oven with out any trouble.  It is impressive looking with beautiful purple hues and lovely in its varied texture.  Perfect for company some time soon.  Enjoy this-

This is not difficult but there are a few different steps.  Just organize yourself and plan – and you will see that it will come together quite easily.

blackberry sour cream pie (slightly adapted from Pie Pie Pie by John Phillip Carroll):

graham cracker crust-

1 1/2 cups graham cracker crumbs
2 tablespoons sugar
2-3 pinches kosher salt
1/2 cup (one stick) melted unsalted butter

sour cream custard layer

1 1/2 cups sour cream
1/2 cup minus 2 tablespoons sugar
3 eggs
1 1/2 teaspoons vanilla extract
3/4 teaspoon kosher salt

blackberry topping-

1/2 cup minus 2 tablespoons sugar
1/2 cup water
2 cups fresh or frozen blackberries (do not thaw frozen blackberries)
1 tablespoon cornstarch
1 tablespoon water

Preheat oven to 325 degrees.

Make the graham cracker crust.  Place the crumbs, sugar and salt in a small bowl and add the melted butter and mix to combine.  Transfer crumb mixture to a 9 inch pie pan (FYI, I think mine was 8 inches which was OK, although I wasn’t able to use all of the custard filling) and press firmly into the pan – making sure to keep it even and smooth. Press the crumbs up the sides of the pan – to the top.

Bake 8-10 minutes – until golden and firm.  Set aside to cool completely.  You can make this earlier in the day, or the day before you plan to bake the pie.)

Preheat the oven again to 325 degrees.  In a medium bowl, whisk together the sour cream, sugar, eggs, vanilla extract and salt. Pour the mixture into the cooled pie shell and carefully place in the lower third or middle of the oven.  (If you have too much custard, don’t overfill pie.  You can place the extra in a ramekin – with some berries and bake in a water bath if you’d like an extra treat.  Or just toss the extra if you have.)

Bake for about 34-39 minutes – until the filling doesn’t have a liquidy jiggle when you shake it a bit.  The custard should look set but wet.  Remove from the oven and cool to room temp.  You can also place in the refrigerator at the is point for several hours (if you choose) before adding the berry topping.

Berries next.  In a medium saucepan, over medium high heat, boil the sugar and water, stirring a bit to help the sugar dissolve.  Reduce the heat to low and and add the berries.  Cook gently for about 5 minutes until they soften and some of the juice is released.

In a small cup – mix together the cornstarch and water.  Whisk well.  Add to the berry mixture on stove – let boil gently for about a minute – until the topping is slightly thickened.  Place in a shallow bowl (to speed up the cooling process) – and let sit and cool, stirring occasionally and very gently.

Once cool, spoon the berry sauce and berries over the cooled custard spreading it all over the pie. Refrigerate for at least 2 hours, or overnight and slice and serve.

Enjoy!

chocolate pudding pie

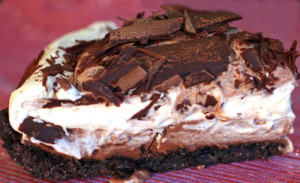
It was Alisa’s birthday – she is what we like to call our “young friend who is a student who lives with us and helps out now and then” – long title, but she is no longer an au pair and she is not just a student, she is truly part of our family.  So…anyway…it was her 25th birthday and I really wanted to make her something special.  Well…success!  This pie is extremely good.  I’m not even a custard girl (although I think I’m becoming one!) and oh…the cookie crumb crust, the whipped cream and pudding – all together, delicious.  I mean it.  Alisa was very happy and exclaimed “this is perfect for me!” and  “I love it!”  She said she had to hide it in the refrigerator when her friends came to celebrate and I believe it.  If you grind the cookie wafers and make the pudding the day before it is a breeze to assemble the following day.  All the small steps are fairly simple, but I guess added together take a little time and effort.  But please, make this, bake this…and enjoy!

chocolate pudding pie (barely adapted from Williams-Sonoma Pie and Tart Cookbook):

cookie crumb crust (this is an extra half recipe because I enjoy a hearty crust…but decrease if you don’t) –
1 3/4 cups plus 2 tablespoons chocolate wafer cookie crumbs (I used Nabisco Famous Chocolate Wafers – in the cookie aisle – but next time maybe make home-made wafer cookies)
7.5 tablespoons unsalted butter, melted
4.5 tablespoons sugar
1/2 teaspoon kosher salt

pudding filling
2 1/2 cups whole milk
5 oz. semisweet chocolate, chopped into small pieces
4 large egg yolks
3/4 cup sugar
3 tablespoons cornstarch
1/2 teaspoon salt
2 teaspoons vanilla extract

whipped cream topping
1 cup heavy cream
1 tablespoon sugar
1 teaspoon vanilla extract

chocolate curls for the top or shavings

For the cookie crumb crust:
Preheat the oven to 350 degrees.

Grind the cookies to fine crumbs in your Cuisinart.  Mix the cookie crumbs with the melted butter, sugar and salt and stir to combine until all the crumbs are moist.  Press firmly and evenly into a 9 inch pie plate – making sure that the crumbs come up the side of the pan.

Bake in preheated oven for about 8-10 minutes.  Remove and let cool.

For the pudding:
In a sauce pan over low heat, warm the milk and chocolate together whisking until the chocolate has melted.  Don’t worry the mixture will look a little grainy.  Do not boil.

In a separate medium sized bowl, whisk together the egg yolks and sugar until pale yellow.  I did this by hand, just whip vigorously for a minute or two.  Add the cornstarch, salt and vanilla extract and beat again.

Slowly add the warm milk mixture to the eggs…mixing well after each small addition…and then finally mixing all of it together.  Return mixture to the saucepan and cook over medium heat until it thickens and begins to bubble slowly and look like pudding.  This should take about 5-8 minutes.  Remove it from the heat and stir a bit more – another minute or so.

Pour the pudding into the baked and cooled pie shell and cover with plastic wrap – so that the plastic actually touches the top of the pudding.  (This will prevent skin forming on the pudding.)  And refrigerate for 2-3 hours.

In the meantime, make the chocolate curls or shavings.  I failed a bit here – and ended up with shavings – and my only excuse was that I was rushing.  But to make the curls, just warm a hunk of semisweet chocolate (wrapped in plastic wrap) in your hands.  With a vegetable peeler, gently “peel” your chocolate pulling the peeler up and towards you to make the curls.  If the chocolate is too cold (like mine) you’ll get shavings (which is not the end of the world).  So practice and see.  I will too!  You can store these in the refrigerator until ready to assemble pie.

OK, lastly,once the pie is set and cool, make the whipped cream by placing the cream, sugar and vanilla in the bowl of a stand mixer with whisk attachment or with hand held beaters and whip until nice soft peaks form.  Do not over whip!  Look to freshly whipped cream post for more help if you need it.

Spread the cream on top of the cooled pie and place curls or shavings on top of the cream.

Refrigerate the pie but try to pull out for 20 minutes before you serve for maximum flavor and enjoyment.  (Takes the chill off.)

Enjoy- really.  This is good!

berry cheesecake with sour cream topping

My dear friend Dani read my first five posts and said – “love it, but what about my cheesecake and my peppermint ice cream?”  Cheesecake first.  Dani  was very close to having gestational diabetes with her first pregnancy.  Doctors orders… no sugar – none!  It was wicked hard (yes I’m originally from Boston) for her so I really wanted to do good by her when she could eat sweets again.  When I asked what she needed as as she was going into labor, she replied, “the cheesecake please!”  That was that.  I proudly arrived – cheesecake in hand – and I think I was her very favorite person at that moment (well, except for maybe her newborn baby).  This is not a light and fluffy cheesecake, it is dense and rich and packed with berries.  My friend Elese said “OMG that cheesecake is crazy good – it is really outstanding and I’m not just saying that.” My favorite part is the buttery graham cracker crust – so much so that I changed the recipe to make 1 1/2 times the original amount of crust.  This cheesecake is so easy to make and tastes even better the following day.  Perfect for a make-ahead dessert.  (A side note: Dani read this and apparently I made – at her request – Oreo cheesecake.  Think she was really craving sugar.  I don’t remember that which is somewhat scary, but she loved it with Oreos and wanted me to tell all of you that, although I really prefer berries!)

mixed berry cheesecake with sour cream topping (adapted from my mothers recipe)
1 7/8 cup graham cracker crumbs
1/4 cup plus 2 tablespoons sugar
7.5 tablespoons melted butter (almost one stick)
3/4 teaspoon salt
1 pound (2 – 8 oz packs cream cheese – not whipped!)
1/2 cup sugar
2 eggs
1 teaspoon vanilla, 1/2 teaspoon cinnamon (or more to taste),  3/4 teaspoon salt
mixed berries (about 2 cups – I use 1 cup blueberries and 1/2 cup each blackberries and raspberries – but do what you love – more or less – one type of berry or even no berries.)

topping:
1 1/2 cups sour cream, 2 tablespoons sugar, 1 teaspoon vanilla, and 1/4 teaspoon salt

Pre-heat oven to 375 degrees.

Mix crumbs, sugar, melted butter and salt.  Squish mixture  into an 8 or 9 inch spring-form pan and bake for 8-10 minutes.  Let cool for 10 minutes.

In mixer, mix cream cheese and sugar – when blended, add eggs one at a time and mix well.  Remember to scrape down the sides of the bowl and mix again.  Add the vanilla, cinnamon and salt.  Remove from mixer and by hand, fold in the berries being careful not to break them into pieces.

Pour mixture into pre-baked crust and continue to bake at 375 for about 30 minutes.  (Sometimes the butter from the crust leaks out of my pan, not sure why, and onto the oven floor so I often line the shelf below with tin foil to catch the drips and make clean up easier.)

As usual, remember to set your timer for 25 minutes and then check every 5-3 minutes thereafter so that you do not over cook.  Put cake on wire rack and let cool for about 15- 30 minutes.

Raise the oven temp to 400 degrees and make the topping.  Mix the sour cream, sugar, vanilla and salt and spread on top of the baked cheesecake.  This tastes delicious and also covers any cracks in the cheesecake.  Pop in the oven for 5 minutes to set.  Remove and once cool, cover with plastic wrap and let set in the refrigerator.  The following day, or several hours later, run a knife around the edges of the pan, unlock the spring and un-mold the cake.  If you have a hard time releasing the crust from the pan you can cut in slices first and then remove.  Enjoy the love and smiles  from your family and friends…