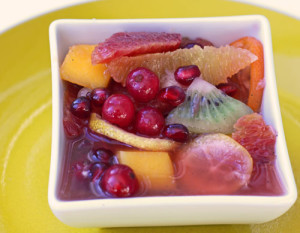
 Oh, I LOVED this. Make this! I served it to a few friends on Saturday and it was a huge success. Very special – especially for a fruit salad (although I do love fruit). The marinating syrup is delightfully refreshing – with fresh vanilla, ginger and citrus flavors. It also presents beautifully. This calls for some fruits you may have to search for – but are well worth it – but of course you can skip or substitute for what you cannot find. Make this the day before you plan to serve as it needs to chill overnight. Ali (my neighbor) was looking forward to a taste…but
 unfortunately (for her) I gobbled it ALL up finishing it Sunday midday! Mmmm…
(I’m placing this in the medium effort category only because of the time it takes to cut the fruit. The actual recipe is very easy. Please taste your purchased fruit before you use it. Your fruit salad is only as good as your fruits so try to start with the very best. Seeding vanilla beans and pomegranates are at bottom of the post.)
jeweled winter fruit salad (slightly adapted from the December 2009 issue of the Food Network Magazine):
1/2 cup sugar
2 cups water
1 1-inch piece of fresh ginger, peeled and sliced thin
1 vanilla bean, split and scraped (see bottom of post if you are unfamiliar with vanilla beans)
1 lemon
7 – 8 blood, cara cara or naval oranges (I used 5 blood, 2 cara cara, and one naval – if all large oranges use seven, if small oranges use eight – the blood and cara cara are red hued and look beautiful – taste good too!)
2 mangos, peeled and diced
5 kiwis, peeled and diced into large chunks
8 kumquats sliced very thin – seeds removed
1 – 1 1/2 cup pomegranate seeds (About 1-2 pomegranates. See bottom of post if you are unfamiliar with removing pomegranate seeds. Try to use them because they add crunch, flavor and beautiful color. They need to be ripe and good so ask for help in your grocery if you are unfamiliar.)
1/2 cup red currants (or more to taste I love these sour bites) if you can find them
2 firm bananas
Combine the sugar, sliced ginger, vanilla seeds and vanilla pod in a saucepan. With a wide veggie peeler, remove wide strips of lemon and orange zest (from one of the oranges) and add to the saucepan. Later you will have to pull these items out – so if you want to wrap up in cheesecloth feel free. I just fished around the fruit.
Bring all to a boil over medium-high heat. Once boiling, reduce and simmer for about 5 minutes. Refrigerate until cold. (To speed up the process place in an ice water bath in the fridge.)
Peel remaining oranges by cutting off the tops and bottom and then using your knife to peel following the natural curve of the orange so that the segment is revealed. Over a medium bowl, use your knife to cut along both sides of each membrane to free the segments, letting them fall into the bowl. Squeeze all remaining juice from the orange. Repeat with all remaining oranges.
Add the cut mangoes, kiwis, kumquats, pomegranate seeds and red currants and gently toss. Pour the chilled syrup over the fruit. Then add the bananas and again, very gently toss.
Let chill overnight. Before serving, remove the citrus zest, ginger and vanilla pod. Serve in small bowls and enjoy-
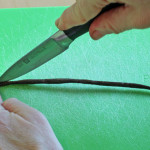 vanilla bean– To seed the vanilla bean, place the long bean on a cutting board. With your paring knife, slice the bean lengthwise – from
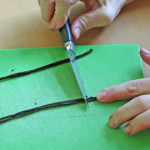 top to bottom all the way down and through. Open it up and you will see soft brown inside. With the back of your knife, scrape the seed gently (while holding the end of the pod) collecting all the goodness from inside. These are the seeds and they should be on your knife. The pod contains more flavor and seeds and is often added to marinating liquids or ice creams – and pulled out later. You can purchase at the grocery or get a bunch from penzeys.com – store them in an airtight container or they dry out.
 pomegranate– To remove seeds from pomegranate, place it on a cutting board and cut into quarters. Over two bowls, one for white pith/skin and one for seeds, gently break apart each quarter
 bending it slightly. More and more pomegranate seeds will be revealed. You might get splashed a little bit if you pop a seed which is likely and normal. (Do not wear your favorite white t-shirt. Or any favorite shirt. A dark pj top should do the trick. Or naked is good!) Peel away the thin membrane and gently pull the seeds from the shell. You eat the whole little red thing. Seed included. Delicious.

 My vertigo sadly seems to be sticking… so again, I decided to make simple, easy and a somewhat healthy dessert. Although as a busy mom of three I suppose I’m often bakin’ easy regardless of my motion sickness. Anyway this sweet treat is sooo very much better than you would think. The sweet cheese and the macerated strawberries are delightful on your tongue. Really. The kids loved the fruit – the cheese they were hesitant, but surprised when they realized it was good (I didn’t tell them it was cheese at first). Alisa looked at it with glee – so excited to eat it – as she loves mascarpone. She said it was divine. Loved every spoonful and when I told her she could finish it (all) she looked so very happy…and she did (finish it :)) Anyway – it is elegant and lovely to serve for company. Although I’ve made something similar before, I was reminded of sweet mascarpone from the book The Mediterrasian Way. I do love this book – for savory as well as sweets and love the advice the authors give on balancing your lifestyle. Sweets included (in moderation!)


 100 percent happiness – we all LOVED this orange flavored cake. Really a new favorite in our house! As I nibbled and watched my family enjoying… sighing, smiling, making mmm noises, and Sylvie licking the crumbs off her plate…well, life seemed very good and simple that moment. When I saw that this cake featured olive oil, I was curious but also slightly worried that it wouldn’t be “blog-worthy” or that the olive oil would overwhelm the flavor. But no worries, the oil added an amazing dimention – it was so tasty and so incredibly moist. My family and neighbors Ali and Jonathan had no idea that there was olive oil in the cake (although I tasted it – and enjoyed it!) The orange syrup finished the cake with even more orange flavor. Not much more to say, save that it is nice there is no butter in this recipe, it is fairly easy to make and you will most likely have most of the ingredients on hand. This is perfect for everyday and company too. I mean it. Try it.
 This cake is sooo very good, ridiculously easy to make, and has no butter! It is Greg’s absolute favorite but we all love it. I was talking to my old and dear friend Michelle yesterday about the blog. She said she’s been baking so much, loving it, and what to make next? I told her that the
 I love these bananas. I’m not even a fan of a raw banana – but oh…a sprinkling of sugar, a blow torch – and voila – magic banana. These are great in addition to most any dessert. Really and truly. I absolutely love them in an ice cream sundae. My favorite. The crisp topping is like a creme brulee – but underneath, a banana. Yum! These are a great snack when you’re craving something sweet – especially for the kids (well, me too). The hard sugary shell entices them (us) and while we are at it – eat a whole healthy potassium filled banana! (OK, yes, with some added sugar.) Actually these might be good cut into hot oatmeal for breakfast – just thought
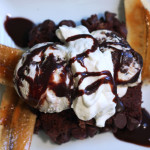 of that now. Hmmm…tomorrow. These are relatively easy to make if you have a blow torch – but sadly most people don’t? Blowtorches are easy to find
 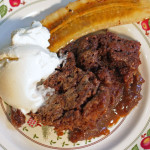 at your local hardware store – you don’t need anything fancy – but if you want a fancy one – especially styled for pastry, then by all means purchase. And don’t be scared – I know it sounds intimidating. The blow torch comes in very handy for caramelizing fruits, meringues and creme brulee. Unfortunately, unlike creme brulee – broiling these in the oven is really not quite as good. The banana “cooks” a bit and gets very mushy – but I guess it’s worth a shot if there is no other option. (OH, just got a note from Robert a friend and neighbor who says he cooks bananas in a nonstick pan over high heat with balsamic vinegar and some sugar. Yes, a pan friend banana may be the alternative way to go if you’re not daring enough for the blowtorch!)
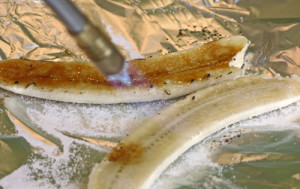 Slice each banana lengthwise. Place on foil or a foil-lined roasting dish or sheet pan. For each banana, sprinkle about a teaspoon of sugar (you can use more or less depending on the size of the banana and your personal taste) onto the cut side of the banana – and go to blowtorch town. Take your time…hold the blowtorch about 3-5 inches away and slowly move the flame around the banana. Keep the blowtorch moving all over and over and over again until the sugar caramelizes and turns a lovely shade of nutty brown. Delish.
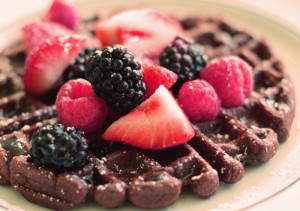 Sometimes the recipe that comes in the instruction manual is actually pretty good! In this case, very good. You may know (from a
 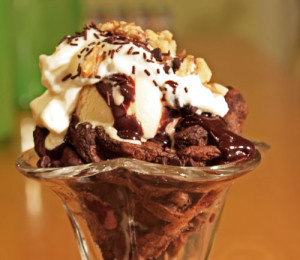 14 – 6 inch waffles. I wrapped each individually in plastic wrap and then into a freezer bag. (I just read about

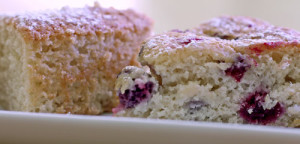 I loved the write-up of this recipe in Cake Keeper Cakes – in that you usually have the ingredients for it on hand. This is a great simple plain cake. One that my son Greg loves. He said “mom, this is amazing – it is just perfect for me!” Every day this week there was a piece in his lunch – and he was a very happy person. Laura Chattman’s recipe calls for the cake plain which is delicious, but I happen to have some mixed frozen berries and I added them to half the batter (I doubled the recipe and made two cakes). The result was equally as great. Greg’s friend Jamie was over and exclaimed that he loved berries and cake and “oh, Lisi, this is really really good.” My daughter Sylvie loved the berries in it too. I like this cake because there is no butter, and the low fat yogurt and eggs somehow make this feel like a healthy treat despite the sugar and white flour. (So I didn’t scold my au pair Alisa for eating it for breakfast.) Enjoy!
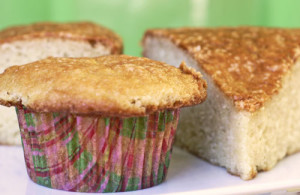
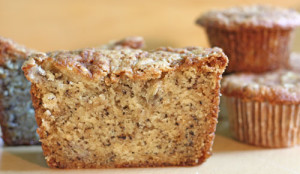 This recipe was given to me by my sis-in-law Sandy and it is a keeper! I make it for bake sales, morning coffees, afternoon snacks and dessert. I make it with or with out chocolate chips or nuts and in various sizes and shapes. My kids seem to love them in a muffin shape and that helps with quantity control – otherwise they just might eat the loaf. Zach and Lauren were over and that trick didn’t work, as Zach who’s 13 tried to convince me that I should cut into the loaf and that he should get thirds. I gave in!
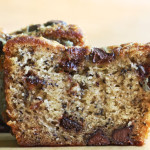 Pre-heat oven to 325 degrees. Butter or spray your loaf pans and line bottom with parchment. (As you are cutting, cut some extras for the next time you bake.) If using muffin pans, line with cupcake liners.
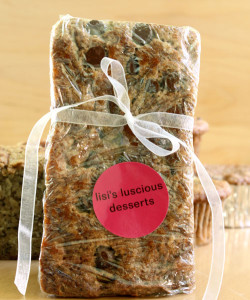

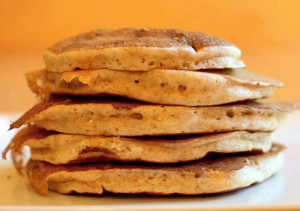 I think because my mom often sent me to school with a kiss and a cold pop-tart (sorry mom), I am now one of those moms who really insists that we all eat something healthy in the mornings and that we all sit together to eat it! It can be a challenge to make it happen since all three kids have school at different times, but we usually can manage 5-7 minutes together. The harder problem is Andy — who unlike his brother Greg and sister Sylvie, really dislikes cereal. Not only that, he refuses most breakfast items unless they happen to have chocolate or chocolate chips in them. That being said, I’m always on the look out for healthy pancakes. Of course I mess that up a bit with some added chocolate chips but I hope that the benefits of merely eating, and eating together will somehow win the fight over the chocolate in the AM. So I decided to try Ellie Krieger’s Whole Wheat pancakes for a change. They were a hit! Especially with the chocolate. Oh, and Andy just read this and said, “I’m eating whole wheat pancakes?!” – guess they are good. Ellie serves these with an delicious looking strawberry sauce, but Andy eats them plain (well with chips) and no need for syrup.
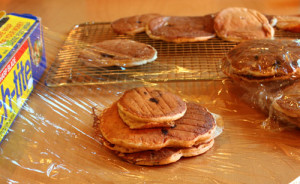 I like to double the recipe and make many extra. Once cool, I wrap the pancakes in groups of 3-4 pancakes and place in a plastic bag or airtight container and freeze. (I just read about