(moist) bran muffins with fruit and nuts

So these muffins were a nice surprise…pretty good!  They are healthier than others – packed with bran, whole grains, fruits and nuts.  Not too sweet, these are truly meant for breakfast.  I did the math and there is about 1 teaspoon of butter in each muffin – making these a decent choice for an afternoon snack for you or your kids – or really for everyone.  I warned tasters that these are healthy and “wheaty” and they all liked them – Sylvie, Greg, Andy, Zach and Lauren!  I liked them too 🙂  The addition of chunky bananas, soft raisins and toasted walnuts add a lot of flavor, texture and moistness to these little brown muffins.  An oh, they are best warm out of the oven.  Next time, I might try the same base – but substitute apples for bananas – and add a little cinnamon too.  With the raisins and nuts – really – any fruit will do.  This made about 24 muffins.  As usual, you can cool, wrap and freeze some – to re-heat each AM for a long lasting breakfast treat.  Enjoy-

bran muffins with fruit and nuts (slightly adapted from Ina Garten’s Barefoot Contessa At Home):

2 cups wheat bran (mine was coarse but any will do)
2 cups buttermilk, shaken
1/4 pound or 1 stick butter, room temp
1/2 cup light brown sugar – lightly packed
4 extra large eggs – at room temp
3/4 cup unsulfured molasses
2 teaspoons grated orange zest
1 teaspoon vanilla extract
3 cups white whole wheat flour
1 1/2 teaspoons baking powder
1/2 teaspoon baking soda
1 teaspoon kosher salt
2 cups raisins
2 cups diced banana – cut medium dice (2 bananas)
1 cup chopped walnuts, toasted (if time)

Preheat oven to 350 degrees.  Toast walnuts for 5-9 minutes – until fragrent and lightly toasted.  Set aside to cool.  Wash then zest your orange.  Set aside.

In a medium bowl, whisk together the flour, baking powder, baking soda and salt.  Set aside.

Line muffin pans with liners.

Combine the bran and buttermilk and set aside.  In the bowl of your mixer, beat the butter and sugar with the paddle on high speed for about 5 minutes – until light and fluffy.  Scrape and mix again.

On low speed, add the eggs, one at a time.  Scrape and mix again.  Add the molasses, orange zest and vanilla.  (The mixure may look curlded at this point but that is OK.)

Add the buttermilk/bran mixture and combine on low speed.  Then add the dry flour mixture to the batter and mix on low until justcombined.  Do not overmix.

Remove from teh mixer and fold in teh raisins, bananas and cooled walnuts.

Fill the muffin cups full and bake for about 24-29 minutes – until a toothpick comes out clean.

When you can handle the muffins – pull them from the pan.  I recently read that it is better to let muffins cool outside of the pan so that they don’t get condensation and moisture build up from the heat.

Enjoy!

(healthy) buttermilk pancakes

We all really like these pancakes.  Andy especially loves these fresh off the griddle.  I omitted the butter and replaced the white flour with King Arthur’s white whole wheat flour.  It is less dense than whole wheat and the pancakes look whiter which seems to have big appeal.  Mixed with buttermilk, eggs, and chips – these are very yummy and healthier than the norm (OK, I know the chocolate isn’t health-food, but you can add blueberries, rasberries or bananas instead.)  I slip in a little flax-seed and I’m extra happy.  As you may know, I have whole wheat pancakes in the blog – but these are what I tend to make most (for Andy).  Experiment, pick your poison and enjoy-

Look to the bottom of the whole wheat pancake recipe for photos and directions on how to freeze the pancakes and reheat for early school mornings…

buttermilk pancakes (adapted from smittenkitchen.com – which was originally adapted from Martha Stewart’s Original Classics Cookbook):

2 cups white whole wheat flour
2 tablespoons ground flax-seed
2  teaspoons baking powder
1 teaspoon baking soda
1/2 teaspoon kosher salt
3 tablespoons sugar
2 large eggs, slightly beaten – room temp
1 teaspoon vanilla
3 cups buttermilk
chocolate chips (to taste)
or, blueberries, raspberries or banana
(if you want to add butter you can add a bout 3-4 tablespoons, melted)

In a medium large bowl, whisk together the flour, flax-seed, baking powder, baking soda, salt and sugar.  Set aside.

Measure the buttermilk in a large liquid measuring cup – and add the eggs and vanilla to the buttermilk.  Mix a bit.

Pour the buttermilk mixture into the dry ingredients – and mix until just incorporated.  Stir in melted butter if desired.   Stir in chocolate chips, blueberries, rasberries or banana slices.

Lightly grease pans and heat over medium heat.  Pour batter onto hot pan.  I use a little less than a 1/4 cup per pancake.  Turn when the pancakes have bubbles on top and are slightly dry around the edges.  These can be tricky to flip – they are delicate but you’ll get the hang of it.  Cook other side until lightly browned.

I find I have to lower the heat as I cook the pancakes – eventually cooking on low – otherwise my pancakes burn.

You can keep the finished pancakes in the oven at 180 degrees.  Alternately, let pancakes cool – and wrap by 3’s in plastic wrap and freeze for healthy pancakes on the fly.  Enjoy!

(beautiful) blue cornmeal pancakes

The kids, Alisa, myself – we all adored these pancakes.  The blue cornmeal brings a slightly nutty taste and terrific texture to the pancake that was not only different but truly tasty.  And the blue hue was a hit with the kids (well, and the adults too!)  I will make these for brunch next time I’m hosting…and keep them warm in the oven for service.  If you purchased blue cornmeal for the blue corn biscotti (and you should…it is so very very good) – then you will have a lot of cornmeal left over.  And although you can make biscotti over and over again, it is nice to have something else to do with it.  So enjoy these, mix it up for yourself or your family and oh…yes drizzle with warm maple syrup.  Delicious.  Enjoy-

Best if you let this batter rest for 30 minutes before you cook – keep in mind if planning ahead.

blue cornmeal pancakes (from Bradly Ogdens: Breakfast, Lunch, and Dinner):

This is enough for a small crowd  6 dozen tiny 2 inch pancakes or 3 dozen medium.  Halve the recipe if you want less.  These do freeze.

2 cups blue cornmeal
2 teaspoon sugar
1/2 teaspoon kosher salt
1/2 teaspoon baking soda
2 1/2 cups buttermilk
2 eggs
4 tablespoons unsalted butter, melted

Whisk together the dry ingredients.  Mix together the wet ingredients.  Pour the wet into the dry and mix until just comes together and then let batter sit for 30 minutes.

Grease (slightly) and heat griddle or pan on medium heat.  Let pan heat up.  Pour batter by skant 1/4 cup portions – or less or more depending on your taste.  The pancake will bubble and the edges will brown – then flip and cook on other side for a minute.

Serve warm with syrup.  Enjoy!

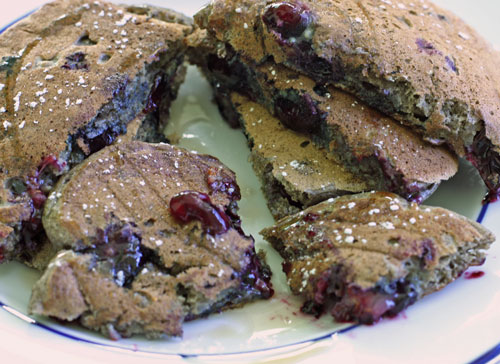
blueberry buckwheat pancakes

So again, trying to make some healthier pancakes and these were a success!  The blueberries burst with flavor and add a sweetness to this healthy batter.  Add maple syrup if you want to sweeten these up – or make a fruit compote instead.  Yum.  The were a hit with Alisa, Rob and me – the kids, well, they don’t love blueberry pancakes.  I studded a few with chocolate chips for Andy and well, yes, of course very good!  Enjoy these – easy to make, pretty to look at, and a pleasure to eat!

blueberry buckwheat pancakes (from Williams-Sonoma’s Eat Well):

1 1/4 cups all purpose flour
3/4 cup buckwheat flour
1 1/2 teaspoon baking powder
1 1/2 teaspoon baking soda
1/4 teaspoon salt
2 large eggs
2 1/2 cups buttermilk
2 tablespoons canola oil
1 1/4 cup fresh blueberries
warm maples syrup (optional)

Whisk together the flours, baking powder, soda and salt.  In a small bowl, whisk together the eggs, buttermilk and oil until well blended.

Stir the egg mixture into the flour mixture until just blended, and then gently fold in the blueberries.

Coat your pan with a little bit of oil and wipe out excess.  Heat pan over medium heat and spoon batter into the pan in 1/4 – 1/3 cup portions.

Cook until pancakes are browned on  the bottom and bubbles from on the surface – for a bout 2 minutes…then flip and and cook another 1-2 minutes.

Enjoy-

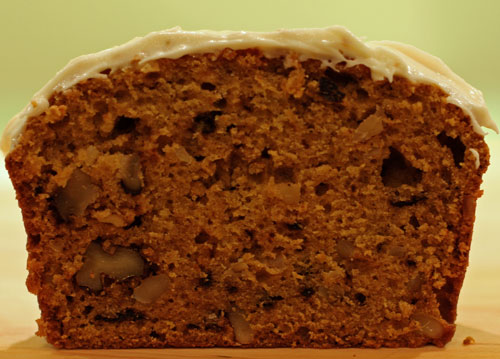
pumpkin walnut bread

OK, so again, easy and delicious.  2 bowls, no mixer and lots of yummy spices.  Not too sweet pumpkin bread with lots of healthy walnuts make this an easy staple for a breakfast treat, brunch or an afternoon snack.  And save for the icing, it is dairy free (and it is still quite good without).  I made this with my continued vertigo so you know it is simple.  I felt like purging the excess from my (somewhat excessive) pantry and I knew I would not want pumpkin in the spring and summer.  I scoured my new Sur La Table cookbook which is chock full of baking tips – really good ones – and found this.  I took out a little sugar since I wanted it to be more bread(y) than sweet and it was a great success.  Everyone really enjoyed – Mike thought too many nuts – so go easy on them if you prefer less.  These would also be great as muffins.  (Just adapt and watch baking time.)  Smart to make a double batch and pop one in the freezer since this freezes very well.  Enjoy-

pumpkin walnut bread (adapted from Sur La Table’s The Art and Soul of Baking):

2 cups all purpose flour
3/4 teaspoon baking soda
1/2 teaspoon ground cinnamon
1/4 teaspoon allspice
1/4 teaspoon ground clove
1/4 teaspoon nutmeg
1/4 teaspoon ginger
1/2 (almost) teaspoon kosher salt
2 large eggs, room temp
1/3 cup water
1 1/2 cups sugar (minus 3 tablespoons – if you want sweet bread, keep the tablespoons)
1 cup canned pumpkin puree
1/2 cup canola oil
1 1/2 teaspoon vanilla extract
1 cup toasted chopped walnuts (or less if desired)
sprinkling of sugar for top (optional)

cream cheese frosting (you will have a leftover – hold for another occasion)

6 oz cream cheese, room temp
1 1/2 oz butter room temp
1 1/2 cups confectioners’ sugar
1 teaspoon vanilla extract

Preheat oven to 350 degrees.  Toast your walnuts and set aside.

Lightly coat at 9×5 loaf pan with butter or spray – and line the bottom with parchment.

In a large bowl, whisk together the flour, baking soda, cinnamon, allspice, cloves, nutmeg, ginger and salt.  Set aside.  In a medium bowl, whisk together the eggs and water, then add the sugar and mix well.  Next add the pumpkin puree, oil and vanilla extract and mix well.

Add the wet mixture to the dry ingredients and mix until just blended.  Add the walnuts and mix in.  Pour batter into prepared pan and level the top with a small palate knife or back of a spoon.  Optional – sprinkle one tablespoon of sugar to the top of the loaf for a crispy slightly sugary top – especially good if you do not plan to ice the bread.

Bake for about 54-64 minutes – until the bread is firm to touch and toothpick comes out clean.  Let cool for 15 minutes- then turn out onto pan to cool completely before you frost (if you plan too.

icing

Place the cream cheese, softened butter in mixer and blend until smooth (with paddle – or hand mixer).  Beat well –

Whisk the confectioners’ sugar then add to the mixture and blend on low for a minute.  add the vanilla and on medium speed beat for about a minute, scrape down sides and beat again.

Spread desired amount onto pumpkin loaf and enjoy!  (The icing does need refrigeration – so pull out of frige a half hour before you plan to serve for best flavor.)

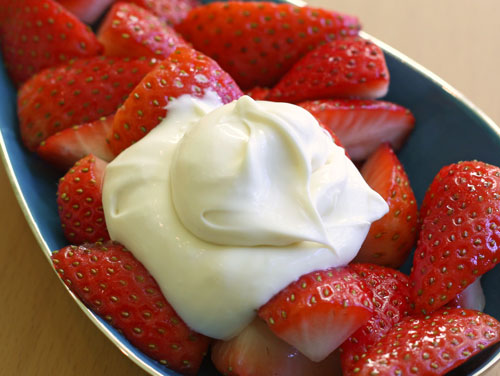
strawberries with sweet mascarpone cheese

My vertigo sadly seems to be sticking… so again, I decided to make simple, easy and a somewhat healthy dessert.  Although as a busy mom of three I suppose I’m often bakin’ easy regardless of my motion sickness.  Anyway this sweet treat is sooo very much better than you would think.  The sweet cheese and the macerated strawberries are delightful on your tongue.  Really.  The kids loved the fruit  – the cheese they were hesitant, but surprised when they realized it was good (I didn’t tell them it was cheese at first).  Alisa looked at it with glee – so excited to eat it – as she loves mascarpone.  She said it was divine.  Loved every spoonful and when I told her she could finish it (all) she looked so very happy…and she did (finish it :))  Anyway – it is elegant and lovely to serve for company.  Although I’ve made something similar before, I was reminded of sweet mascarpone from the book The Mediterrasian Way.  I do love this book – for savory as well as sweets and love the advice the authors give on balancing your lifestyle.  Sweets included (in moderation!)

Enjoy-

macerated strawberries with sweet mascarpone cheese (from The Mediterrasian Way by Ric Watson and Trudy Thelander)

serves 4

28 tasty strawberries, hulled and quartered
1 teaspoon superfine sugar or granulated is fine too
dash of fruit liqueur like cointreau
1 cup mascarpone cheese
2 tablespoons confectioners’ sugar
dash vanilla

Toss the quartered strawberries with the teaspoon of sugar and Cointreau.  Cover and allow to macerate in the refrigerator for at least an hour.

Mix together the mascarpone cheese, sugar, and dash of vanilla in a small bowl until well combined.

Serve together and enjoy –

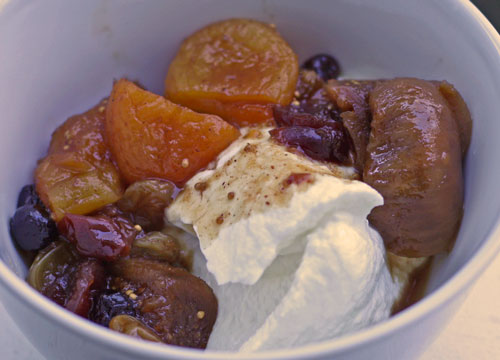
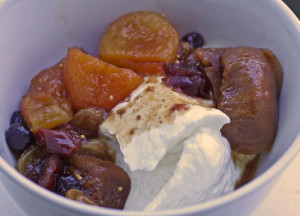
(seriously delicious) dried fruit compote with greek yogurt

The subject line in my friend Suzanne’s email read OMG!!! after she tasted this dessert.  “Such a treat,” she said.  “I savored every bite and didn’t want it to end.  One of my overall favorites!”  It really is delicious.  Do not skip this even if you think it isn’t for you.  It’s like that dress that you wouldn’t have tried on, but your friend makes you…and it happens to look great on you.  The fruit and yogurt deliver powerful flavors and texture.  It satisfies your sweet tooth yet makes you feel good at the same time.  Sylvie said it was unexpectedly good (which is great coming from an 8 year old.)  As usual (which seems to be my M.O. of late) it is easy to make.  I happen to be out of commission for a bit with a long bout of vertigo (that still persists) but in the midst (of the more severe week) I thought that baking might calm and restore my senses and equilibrium – so this is one of the many easy things I made when I was spinning.  I also decided that some healthier desserts would be necessary since I was feeling so ill.  Anyway, on I go – try this.  Surprise someone.  Lovely for a casual dinner with friends.  And definitely serve it with the Greek yogurt – it cuts the sweetness of the dried fruits.  On top of ice cream too (for a sweeter sweet.)  Enjoy-

dried fruit compote with greek yogurt (adapted slightly from The Mediterrasaian Way by Ric Watson and Trudy Thelander):

1 cup orange juice (freshly squeezed if you have the time)
1/2 cup water
2 teaspoons brown sugar
1/2 teaspoon cinnamon
1/4 teaspoon ground clove
pinch of kosher salt
1 cup dried apricots
1/2 cup dried figs (some sliced in half)
1/2 cup raisins (mix in gold if you can, or try dried blueberries or cranberries)
Greek yogurt or vanilla ice cream
almond slivers (optional)

In a small saucepan, mix together the orange juice, water, brown sugar, cinnamon, clove, and salt and bring to a boil.  Reduce heat to low-simmer, and add the apricots, figs, and raisins.  Cover the pot and simmer for about 20 – 25 minutes until liquid get syrupy and reduces a bit.

Serve the compote in bowls with a spoon ful of yogurt or ice cream.  Sprinkle with nuts if you choose.  Enjoy-

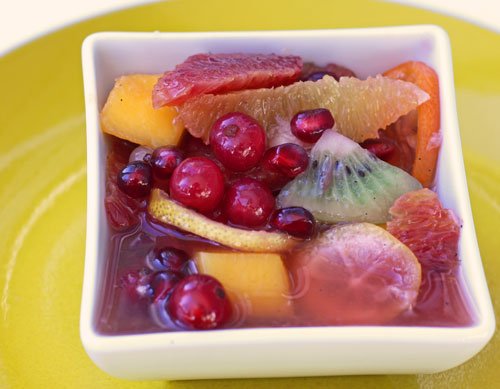
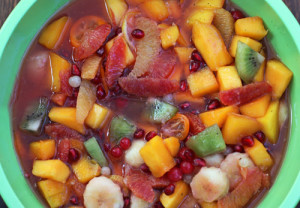
jeweled winter fruit soup (delicious!)

Oh, I LOVED this.  Make this!  I served it to a few friends on Saturday and it was a huge success.  Very special – especially for a fruit salad (although I do love fruit).  The marinating syrup is delightfully refreshing – with fresh vanilla, ginger and citrus flavors.  It also presents beautifully.  This calls for some fruits you may have to search for – but are well worth it – but of course you can skip or substitute for what you cannot find.  Make this the day before you plan to serve as it needs to chill overnight.  Ali (my neighbor) was looking forward to a taste…but unfortunately (for her) I gobbled it ALL up finishing it Sunday midday!  Mmmm…

(I’m placing this in the medium effort category only because of the time it takes to cut the fruit.  The actual recipe is very easy.  Please taste your purchased fruit before you use it.  Your fruit salad is only as good as your fruits so try to start with the very best.  Seeding vanilla beans and pomegranates are at bottom of the post.)

jeweled winter fruit salad (slightly adapted from the December 2009 issue of the Food Network Magazine):

1/2 cup sugar
2 cups water
1 1-inch piece of fresh ginger, peeled and sliced thin
1 vanilla bean, split and scraped (see bottom of post if you are unfamiliar with vanilla beans)
1 lemon
7 – 8 blood, cara cara or naval oranges (I used 5 blood, 2 cara cara, and one naval – if all large oranges use seven, if small oranges use eight – the blood and cara cara are red hued and look beautiful – taste good too!)
2 mangos, peeled and diced
5 kiwis, peeled and diced into large chunks
8 kumquats sliced very thin – seeds removed
1 – 1 1/2 cup pomegranate seeds (About 1-2 pomegranates. See bottom of post if you are unfamiliar with removing pomegranate seeds.  Try to use them because they add crunch, flavor and beautiful color.  They need to be ripe and good so ask for help in your grocery if you are unfamiliar.)
1/2 cup red currants (or more to taste I love these sour bites) if you can find them
2 firm bananas

Combine the sugar, sliced ginger, vanilla seeds and vanilla pod in a saucepan.  With a wide veggie peeler, remove wide strips of lemon and orange zest (from one of the oranges) and add to the saucepan.  Later you will have to pull these items out – so if you want to wrap up in cheesecloth feel free.  I just fished around the fruit.

Bring all to a boil over medium-high heat.  Once boiling, reduce and simmer for about 5 minutes.  Refrigerate until cold.  (To speed up the process place in an ice water bath in the fridge.)

Peel remaining oranges by cutting off the tops and bottom and then using your knife to peel following the natural curve of the orange so that the segment is revealed.  Over a medium bowl, use your knife to cut along both sides of each membrane to free the segments, letting them fall into the bowl.  Squeeze all remaining juice from the orange.  Repeat with all remaining oranges.

Add the cut mangoes, kiwis, kumquats, pomegranate seeds and red currants and gently toss.  Pour the chilled syrup over the fruit.  Then add the bananas and again, very gently toss.

Let chill overnight.  Before serving, remove the citrus zest, ginger and vanilla pod.  Serve in small bowls and enjoy-

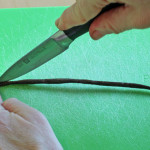
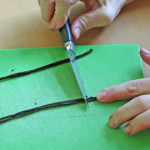
vanilla bean– To seed the vanilla bean, place the long bean on a cutting board.  With your paring knife, slice the bean lengthwise – from top to bottom all the way down and through.  Open it up and you will see soft brown inside.  With the back of your knife, scrape the seed gently (while holding the end of the pod) collecting all the goodness from inside.  These are the seeds and they should be on your knife.  The pod contains more flavor and seeds and is often added to marinating liquids or ice creams – and pulled out later.  You can purchase at the grocery or get a bunch from penzeys.com – store  them in an airtight container or they dry out.

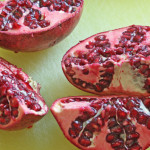
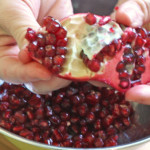
pomegranate– To remove seeds from pomegranate, place it on a cutting board and cut into quarters.  Over two bowls, one for white pith/skin and one for seeds, gently break apart each quarterbending it slightly.  More and more pomegranate seeds will be revealed.  You might get splashed a little bit if you pop a seed which is likely and normal.  (Do not wear your favorite white t-shirt.  Or any favorite shirt.  A dark pj top should do the trick.  Or naked is good!)  Peel away the thin membrane and gently pull the seeds from the shell.  You eat the whole little red thing.  Seed included.  Delicious.

(very moist) orange cake

100 percent happiness – we all LOVED this orange flavored cake.  Really a new favorite in our house!  As I nibbled and watched my family enjoying… sighing, smiling, making mmm noises, and Sylvie licking the crumbs off her plate…well, life seemed very good and simple that moment.  When I saw that this cake featured olive oil, I was curious but also slightly worried that it wouldn’t be “blog-worthy” or that the olive oil would overwhelm the flavor.  But no worries, the oil added an amazing dimention –  it was so tasty and so incredibly moist.  My family and neighbors Ali and Jonathan had no idea that there was olive oil in the cake (although I tasted it – and enjoyed it!)  The orange syrup finished the cake with even more orange flavor.  Not much more to say, save that it is nice there is no butter in this recipe, it is fairly easy to make and you will most likely have most of the ingredients on hand.  This is perfect for everyday and company too.  I mean it.  Try it.
(very moist) orange cake (slightly adapted from The Modern Baker by Nick Malgieri):
4 navel oranges
3 large eggs (room temp)
2 1/2 cups sugar
1 1/2 cups olive oil (I used extra virgin, but you can also use pure olive oil – use an olive oil that you like, that is high in quality)
1 1/2 cups milk (pull to room temp if you can)
2 1/2 cups all purpose flour (look to baking tips and measuring flour so that you don’t add too much)
1/2 teaspoon baking powder
1/2 teaspoon baking soda
1 teaspoon kosher salt

syrup
1/4 cup freshly squeezed orange juice
6 tablespoons sugar

Rub 2, 9 inch cake pans with a little bit of canola oil.  Line bottom of pans with parchment rounds.  (These might be nice in a muffin shape too.  Just adjust baking time.)

Preheat oven to 350 degrees.  Place rack in middle of oven.

Wash the oranges.  Grate the zest from the oranges – being careful to grate only the orange part of the orange – do not grate the pith (the white bitter part).  You can segment the oranges with a grapefruit knife and eat for a snack :))

Juice enough of the oranges to reserve 1/4 cup for the syrup.  Set aside zest and juice (separately).

In a medium sized bowl, whisk together the eggs and orange zest.  Whisk in 1 cup of the sugar and whisk for about a minute.  I did this by hand – vigorously. Then once lighter, whisk in oil and milk.

In a small bowl, stir together the remaining 1 1/2 cups sugar, flour, baking powder, baking soda, and salt.

Whisk the dry mixture into the egg mixture in three additions — whisking until smooth.  But don’t over mix.

Divide and pour batter into prepared pans.  Bake the cakes until they are a golden, and firm when you press in the center.  It should take from 50-55 minutes.

Cool the cake for 5 minutes, then run a knife around the edges (if needed), invert, and un-mold.  Then turn right side up again.  Repeat with other cake.

Make the syrup while the cake is cooling.  Bring the 1/4 cup juice and sugar to a boil.  And simmer for a minute or so.

Once cake is inverted poke little holes all over the cakes with a toothpick.  Then brush the warm syrup all over the cakes and repeat until you have used it all.

Let cool.  Delicious.  Once cool, you can wrap and freeze the cake as well.

Enjoy-

yummy yellow cake

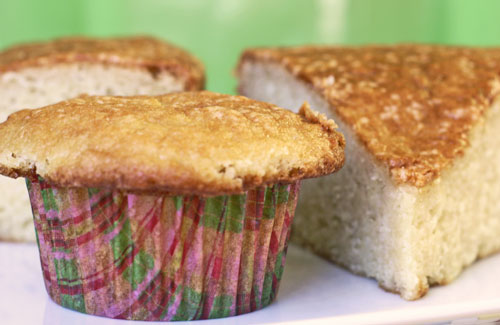
This cake is sooo very good, ridiculously easy to make, and has no butter!  It is Greg’s absolute favorite but we all love it.  I was talking to my old and dear friend Michelle yesterday about the blog.  She said she’s been baking so much, loving it, and what to make next?  I told her that the yogurt cake is delicious.  A good sweet for her and her three little girls – oh and her husband too who happens to like vanilla if I’m remembering right.  I mentioned that I fear people are scared of the name – or that “yogurt cake” it turns them off.  Michelle said, “it’s true, the name is killing me and I can’t get past it.”  She said, re-post it and call it something like “yummy yellow cake.”  So here it is again with Michelle’s new title.  I’m normally not this insistent – but really, try it.  You can dress it up with some confectioners’ sugar – or make a winter sauce of figs, wine and prunes (my childhood friend Jenny’s mom Fern did that – and wrote and raved to me about it).  You can eat it plain and I’m telling you…good cake.  Just two bowls and a spoon is all you need (no mixer or beater) – and I bet you have the ingredients on hand right now.  I decided to make it in a cupcake form as well – just to see what happened.  Of course, delicious with a crispy top that both Sylvie and I especially love.  Greg – he likes his cake soft and with out the added crunch but luckily for him, I made both (I’m also more than happy to eat his top!)  So here it is again.  Enjoy-

yummy yellow cake (adapted from Cake Keeper Cakes by Laura Chattman):

2 cups flour
1 1/4 cups sugar
1 teaspoon baking powder
1 teaspoon baking soda
1/2 (scant) teaspoon kosher salt
1 cup plain low-fat yogurt (or whole-milk)
1/3 cup canola oil
2 large eggs (room temp)
2 1/2 teaspoon vanilla
mixed raspberries, blueberries or blackberries – frozen (do not thaw) or fresh – amount to your liking (fruit totally optional)
confectioners’ sugar

Preheat the oven to 350 degrees and butter or grease the bottom and sides of a 9 inch round cake pan.  Place a parchment round in the buttered pan, and then lightly flour – knocking out any excess.  If making cupcake shape, line with paper and you might want to grease the top of the muffin pan so that the tops don’t get stuck.

Whisk the flour, sugar, baking powder, baking soda and salt in a medium bowl.  In another bowl, mix the yogurt, oil, eggs and vanilla extract.

Pour the wet mixture into the dry and mix until flour is just incorporated.  If using berries, add now.  Pour into prepped pan and bake for about 40-45 (for plain), about 50  minutes (for berries), and about 20 minutes for the cupcakes (if adding fruit check it might take a little more time).  As usual though, check often and before to avoid over baking this cake.

Let the cake sit for 5-10 minutes, then run a knife around the edges and invert onto a rack and let cool.  Dust with the confectioners’ sugar (if you’d like) and enjoy!