simply delicious ground meat/(optional)egg stir fry

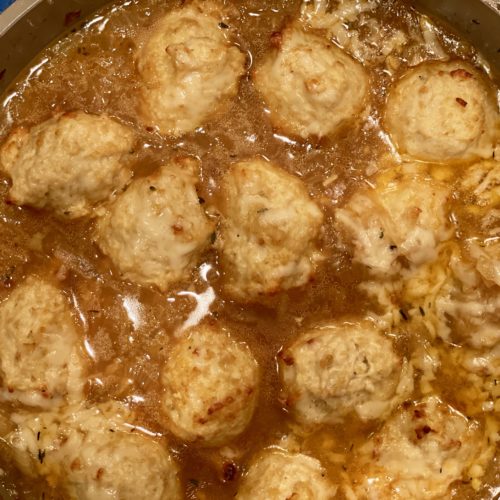
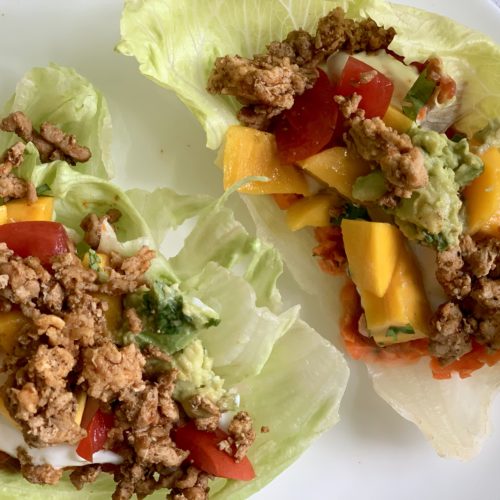
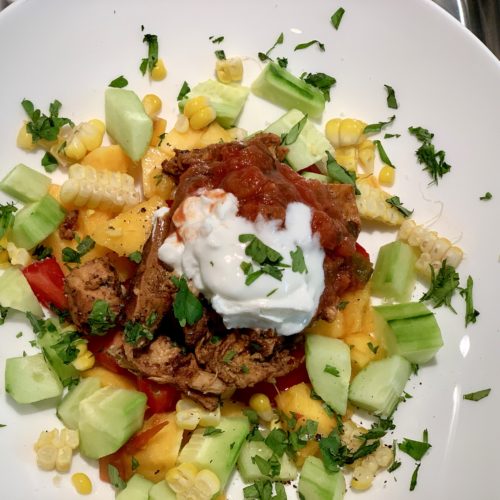
This recipe is soooo easy.  Simple.  And you can change it up so easily picking a different protein each time.  Veggies too.  Egg or no egg.  

Everyone loves this.  Mark loved it, Greg and Sarah asked for the recipe the last time they ate it.  Beth said “thumbs up all around.  Will add to the rotation!”  Sylvie was home this week and asked if I could make a lot so she would have enough for leftovers the following day.  I too am a big fan of this dish.  Oh and Rob and Andy too!  (He makes it frequently at school.)

The recipe calls for coconut aminos which is an alternative to soy sauce for those who can’t tolerate gluten.  I find that I like the coconut aminos more (in this recipe) than soy sauce as it is a littler lest pungent or harsh on the tongue.  It sounds hard to find, but it is right there next to the soy sauces. 

I found this in Juli Bauer’s Paleo Cookbook.  I tweaked it a bit and changed the the order of operations and added egg to mine – as well as all the other veggies.  Have fun with this – play around and enjoy – if you add a lot a lot of veggies you should probably double the sauce.  Additionally – I usually double this recipe for my family – then add a lot of veggies, I then triple the sauce.

Serve with brown rice, light brown rice, white rice or cauliflower rice.  Or something else entirely.  As you can see I plated mine with baby spinach, roasted cauliflower, and string beens and it was good!

Ingredients

  • 2 tablespoons ghee, butter, coconut oil or canola oil.  I like to use butter when Greg isn’t around but really good with ghee and any oil really
  • 1 medium onion – chopped
  • 1-2 cloves garlic minced
  • 1 pound ground meat (beef, turkey, chicken) 
  • kosher salt
  • 1/3 cup coconut aminos (gluten free), or low sodium soy sauce 
  • 1-2 tablespoons honey
  • 1 teaspoon red pepper flakes (plus or minus depending on your taste) 
  • 1 tablespoon minced fresh ginger 
  • 2 eggs (optional) 
  • chopped scallions for garnish (not me as I taste them through the night)
  • a squeeze of lime juice if it needs it
  • pepper
Other veggies to add/try:
  • diced mushrooms
  • string beans cut small
  • shredded carrot or very thinly sliced carrot
  • red peppers
  • frozen peas
  • frozen edamame
  • baby spinach or baby kale
  • broccoli florets (if you use broccoli blanch first) 
Double the sauce if using a lot of veggies!  (I do) Triple the sauce if using more meat and more veg

Directions

  • Sauté the onions in a large pan (12 inch is good for this) using one or two of the fats above.  I like onions to be nice and golden for my dishes because I find I can digest them better and well, I like them better like that.  But you do you as they say.
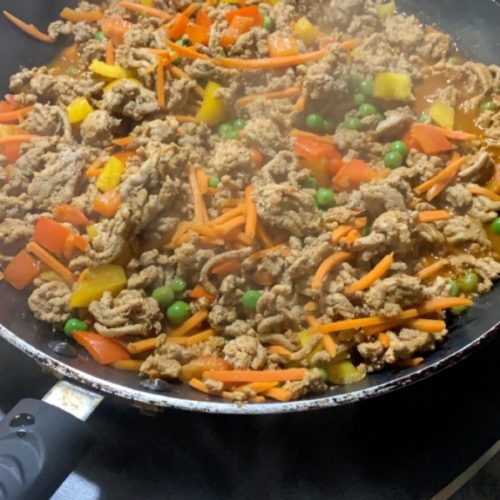
  • Add the meat and salt it after you put it in the pan.  Let it sit for two minutes and flip the chunk of meat so that it browns on both sides first.  The onions will get even darker underneath.  Then break it up and continue to cook until no more pink remains. 
  • While the meat cooks, make the sauce by combining the aminos, honey, ginger and red pepper and set aside 
  • and then gently beat the eggs in a bowl and set aside
  • Add the garlic to the meat and onion mixture and stir in for a minute
  • Next add mushrooms if you are using – saute for a few minutes.
  • Add the sauce to the pan and cook until the liquid has reduced by one third – about 10 minutes.  
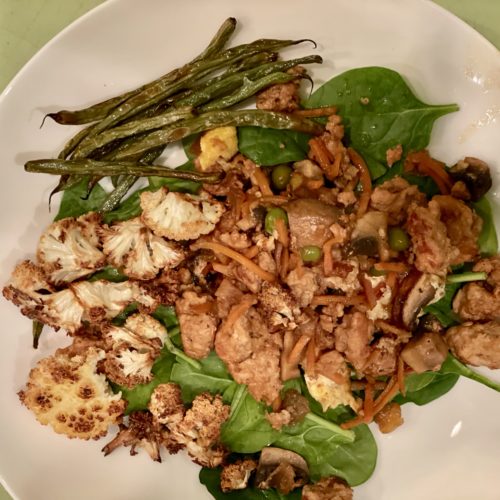
  • Half way through add the other veggies 
  • Cook your eggs in a separate pan and chunk up with a spatula.
  • Add to the pan when it is just about ready.  
  • Carefully mix up the ingredients and taste.  If it tastes too sweet (you overdid it on the honey) I find a squirt of lime juice helps.  I like lime either way as I like the little zing it adds.
  • pepper it if you like and top with cut scallions (if you like)
  • enjoy – 

french onion soup meatballs

I love French onion soup so when I saw this recipe I knew I had to try it.  So glad I did.  The caramelized onions, rich beef broth and little tasty meatballs are the makings of this perfect dish.  “Delicious” said Rob today at lunch as he ate his leftovers.  “Mmm mmm so good!” I said exuberantly to Rob and Sylvie to which they indulged me with kind smiles. 

The first time I made the meatballs with a mixture of ground turkey and chicken and used a beef/chicken/turkey stock.  I used less butter than the recipe called for but left most everything else as is.  The second time I used just chicken meat in the meatballs and beef stock.  This time I cut the cheese in half (inside the meatballs) and also put less on top figuring you can add more cheese if you like on your own.  They were equally delicious.  Really.  Well obviously the more cheese the better (if you like cheese).

Both times I did not have gruyere cheese and substituted parmesan.  But really gruyere would be great.  I just flaked on it.

In terms of stock – and this is for all recipes, purchase the richest stock/broth/bone broth you can find and afford.  Or make homemade.  The freezer section has some great options these days and yes, I know pricey but this will really make a difference.   Bonafide provisions makes good broth and I see it often in stores.  Brodo also has great stock.  If your stock tastes bland – or you only have boxed broth then I have a small trick.   More than gourmet is a product that I really love.  They sell little packets of glace stock (that’s what they call it).  The glace is chicken, veal, or beef stock and reduced so much that it lands in this little packet in the palm of your hand.  You can actually make a broth from this little packet by and adding water.  But I use it to enrich my broths and stocks – I don’t use the whole packet I use just a bit and mix it in and taste, and readjust.  A teaspoon might help, or 2 teaspoons.  In this case I added a little bit of the beef  and although my broth was tasty, this put it over the edge into scrumptious.  

The kids put it over noodles and Rob and I had with a cauliflower/veggie rice.  At lunch he heated up leftover butternut squash and ate it all together and just loved it.  I just ate mine as is – and slurped the remaining liquid right out of the bowl and into my mouth.  That is when I declared my happiness.  

I found this recipe at delish.com – if interested check out the comments at the bottom of their recipe for changes, additions and thoughts.  I’m always interested in how others change a recipe to improve it or just make it their own.  They also have a 1 minute video that shows how to make this all come together so check that out too.  

You can make the meatballs in advance and make the sauce closer to dinner to break up the time.  I listen to an audio book while I cook so it is very enjoyable.  I recommend it.  

I DOUBLED THE RECIPE BELOW

Ingredients

  • MEATBALLS
  • 1 pound ground chicken (or beef or turkey) not the leanest versions or these will be dry  
  • 1/2 cup gruyere cheese (or less depending on your diet and level of deliciousness that you want)
  • 1/4 cup breadcrumbs (I used whole wheat panko but anything will work)
  • 2 teaspoons chopped parsley (I didn’t add, didn’t have don’t love)
  • 1 egg
  • 1-2 cloves of garlic, minced
  • 2 teaspoons kosher salt (if table salt, use a bit less but get some diamond crystal in the house please)
  • ground pepper
        SAUCE:
  • 2 tablespoons butter (recipe calls for 4 and that would be delicious but 2 was enough for us) 
  • 2 large onions, thinly sliced 
  • 1-2 cloves garlic
  • 2 cups beef broth (read the 4th paragraph above for more info if you skipped it)
  • 2 teaspoons fresh thyme – which would be great.  I didn’t have so added some dried.
  • 1/2 cup shredded gruyere
 

Directions

  • Preheat the oven to 425, line a baking sheet with parchment, or foil (grease the foil with olive oil so meatballs don’t stick)
  • Assemble meatballs, In a large bowl combing all of the ingredients and mix gently to combine.  Don’t overmix
  • Form the mixture into meatballs.  You can decide on the size – the bigger they are the longer they cook.  Mine were prob about 1 1/2 tablespoons but next time I’ll make smaller
  • Place on baking sheet and bake until golden and cooked through – if medium sized this should take about 25 m – but check before and continue to check the meatball temp and cook until 165 reads on a meat thermometer
  • If they haven’t browned much feel free to pop under the broiler for a minute – I find them more appealing with color (and there is less color with less cheese)
  • Make the sauce – in a large skillet melt the butter and add the onions and cook until VERY soft and golden.  This is KEY.  The recipe states 25 minutes but I prob kept those onions slow cooking for 40m and when I read the comments on the original recipe,  people caramelized them even longer.  I start on medium heat but eventually to low and stir them often.  You don’t want to burn the onions.
  • Add garlic and cook until fragrant 30 secs or so (don’t burn the garlic it’s very bitter) 
  • Add broth and thyme and season with a little salt and pepper
  • Bring to a boil then reduce heat and let simmer and bubble until slightly thickened 10-15 m.  Taste the reduction now and reseason for salt and pepper.  Add the glace (mentioned in f4th paragraph above) if you have it and want to.  
  • Add the cooked meatballs to the skillet and sprinkle with gruyere and cover and cook until meatballs are warmed through and cheese is melty – this can take 5-10 minutes depending on how hot your meatballs are.
  • Sprinkle with thyme and serve. Yum. 

general thoughts for the young/Inexperienced cook

IN GENERAL

Please try to read all of this section.  It will just take about 4 minutes and you might learn something.  You never know. 

There is a separate section with baking tips.

Decide what you will make for the week over the weekend or when you have extra time and start a grocery list – look at ingredients, make a list, then go to the store for whatever is missing from the pantry or fridge.

Always preview a recipe – sometimes you will need to marinate overnight. It’s good to know that the day before!

Before you cook, read the recipe through first and a second time so you have a basic understanding of what has to happen.

Try to get all ingredients prepped before you start (esp as a beginner). Dice, chop, mince, etc.

Ignore cooking times. Well – ballpark is good – but otherwise, check your dishes by using your own senses (smell, taste, touch) to decide when they are done. Use a meat thermometer for safety with poultry.

You can always google questions like “what is a good substitution for xxx?” It’s all at your fingertips.

I often double the sauce or spices in a recipe because it often needs more sauce (esp. Asian) and I like things with extra flavor. I also tend to add more kosher salt. And I finish my recipes with Maldon Salt which is delicious. (You can find this in “my favorite things”.  

Experiment. Recipes are only a guideline. Feel free to substitute ingredients that you prefer. And always taste your dishes before serving. Then you can adjust your salt/pepper, or add a splash of lemon juice if too sweet.
And remember, If you don’t like your food too spicy you can always ADD spice but you cannot take it away!

This is a good one that I learned in cooking school.  Anchor your cutting board to the counter with a wet paper towel under it to keep it from moving around – this will steady the board and it will be safer and easier for you to chop.

Prevent bacteria growth by cooling hot food in a shallow dish in the fridge – or break into smaller bowls.

You can substitute ground turkey, chicken and beef for each other. Do not buy the “leanest” chicken or turkey – or “plain white meat” as it needs a bit more fat to be tasty.

OVEN

Learning how your oven works will take time. Although if it is very basic it shouldn’t take too much time. I’ve had ovens that run hot and cold also differing in temp between the front and the back. This can result in uneven browning so I usually rotate my sheet pans half way through cooking.

Remember to let the oven preheat fully before you cook. This is very important. Don’t rush.

Most recipes will say “bake”  and you can certainly follow that. Bake is when the bottom heating element in the oven heats up.

Convection – newer ovens have a convection button that you can add to bake or roast. Convection means there is a fan inside the oven blowing the air all around – this can make the food cook faster and more evenly. If you are using two racks at the same time, it might be good to put convection on.  Lower the oven temp if switching to convection by 15 degrees or so.  And check on your food earlier than stated in the recipe.

Roast – This is like bake, but it adds heat from the heating element on the top of the oven along with the bottom element. So you have heat coming in both directions. Your food will likely cook faster and brown both the bottom and the top.

Convection Roast – both the top and bottom heating elements are on as well as the fan that blows the hot air. I often cookie sheet pans of vegetables this way as we like them crispy.

Broil – is when only the top heating element is on and it is very hot. This is how you quickly brown your meats, or crisp up that chicken skin – or produce that yummy crackly sugar on a creme brûlée.

SAUTE

When sautéing, it is important to first heat the pan, then heat the oil, then add the ingredients.
Never overcrowd your pan/skillet with food. The heat will not distribute evenly.  And instead of sautéing the food it will almost boil in their own juices which isn’t terrible but way less appealing.  
When you sauté – make sure the oil is hot before adding all of your ingredients. Throw a small piece of something in the oil and make sure it sizzles before adding the rest.

SEASONINGS

Seasonings are up to you – if you know you like hot spice, add a little extra of it. If you know you don’t like oregano (me), then omit it. I often add a bit more kosher salt in the recipe. Usually a lot more – and then I finish with Maldon Sea salt which is delicious.

RICE

If you are using a rice cooker, the brown rice takes almost an hour to cook and it can stay in the rice cooker for a while. It will automatically stay on “warm” until you unplug it. White rice cooks a bit faster. Rice cookers make life easier because once you set it up, you are done with it until you eat.  

OILS

Sauté with regular olive oil or canola oil or another high spoke point oil. Use the extra virgin olive oil for finishing a dish – like drizzling it on salad or meat – or naan – or for roasting veggies.

EGGS

Usually it is large eggs in a recipe unless otherwise noted

BUTTERMILK

If your recipe calls for buttermilk, you can use regular milk with lemon juice – google that.

STEAK/Poultry

Let raw steaks come to room temperature before seasoning and grilling. Allow cooked or grilled meat to rest at room temperature for 10 minutes before serving.

SALT

(I’ve quoted from others…) Embrace salt. Don’t be afraid to use salt; it pulls the flavors out of your dishes. Cook with kosher salt and season with sea salt. Season! your! food!

Salt is the key to making food’s flavor jump around on your tongue. Most recipes will mention when you should add salt (and probably pepper as well), but it’s a good rule of thumb to add at least a pinch or two when you start cooking and again at the very end. Your palate will be the ultimate guide here, so taste often.

GREEK YOGURT

Use plain Greek yogurt as a healthy substitute for mayo, sour cream, heavy cream and more. 

a note on cilantro

Cilantro is one of my favorite herbs - but it is one of the dirtiest

Grit can ruin dish – so to clean it:

  • Fill a bowl with cool water, take the leaves off the stems (don’t be too particular, stems can be in there too) and place into the bowl of water.  
  • Use your hands to stir around.  Remove the cilantro by picking it up out of the water.  You will see dirt and grit at the bottom of your bowl.  Repeat this until the water is clean. 
  • Do not pour into a strainer because the dirt will rinse right on top of the clean leaves.  As you can see, there is a lot of grit and dirt at the bottom.
  • Dry the cilantro in a clean dish towel or paper towels.  Then chop as you desire!

general shopping list for the young adult

fullsizeoutput_5cd5

Protein – chicken, beef, fish, shrimp (frozen uncooked shrimp are good to have on hand)

Fresh oranges, lemons and limes 

 An assortment of fresh veggies, and don’t forget garlic and onion (store away from potatoes).

Frozen vegetables – corn, rice, peas and frozen edamame

Fresh ginger (this is usually near potatoes in the supermarket)

Apple cider vinegar, red white vinegar, white wine vinegar, balsamic vinegar and my fave if you like, fig vinegar.

Extra virgin olive oil, olive oil (for cooking), avocado oil if you like, canola oil, sesame oil

Potatoes (store in a cool spot away from onions and garlic)

Fresh herbs (depends on your recipes for the week) I love basil and cilantro

Butter – unsalted (because you can always add salt yourself), Ghee if dairy free

Eggs (organic) if possible. Usually large 

Milk. Sour cream or greek yogurt (esp for tacos)

Cheese – Manchego is really good in sandwiches or solo. Parmesan cheese.  Mozzarella 

Agave syrup (usually near the sugars and honey), Maple syrup, Honey

Brown sugars, sugar, confectionery sugar (if you plan to bake at all)

Flour – all purpose or GF

Breadcrumbs (whole wheat, seasoned and plain, white and panko – and assortment is great)

Spices – you can purchase as you need when a recipe calls for it – but good ones to have are: chile powder, cumin, cayenne, paprika, onion powder, garlic powder, Italian seasonings – basil, oregano, mustard powder, curry powder, coriander, thyme, rosemary, red pepper flakes

Ketchup, mustard, mayo

Capers and olives and pickles 

Chiles in Adobo sauce.  A few cans.  Once you open one, put the rest in a small glass container in the fridge.  

Tomato sauce, marinara sauce, crushed tomatoes, passata, fire roasted chipped tomatoes (in cans), tomato paste

Beef, chicken broth.  If you can find frozen stock or bone broth that is even better.

Cornstarch, baking powder, baking soda 

Diamond Crystal kosher salt, fresh pepper, Maldon sea salt (so good)

Pasta – whole wheat and white, Rice – brown, light brown 

Apricot jam is great to cook with – especially a teriyaki chicken

Red and white wine – inexpensive but not too cheap – as you are enhancing your food.

Asian cooking:

Coconut milk

Thai red and green curry paste

Miso paste

Soy sauce, coconut aminos if GF

Hoisen sauce, oyster sauce

Rice vinegar – unseasoned

Mirin

Fish sauce! a must

If you are reading this and can think of other additions then please lmk –


Gianni Calogiuri Fig Vincotto Vinegar

Not certain what I would do without this vinegar.   It is great right out of the bottle – haha – no – I don’t actually do that, although truthfully I do lick my fingers sometimes.  If on a desert island I might just have to bring it – with one of the salads above and some ice cream :). 


As you can see above it is wonderful on my salmon salad and my steak salad.  I basically make a variation of this salad almost every day for lunch.  Today it was leftover chicken.  I add herbs too and usually a diced apple.  If I don’t have a leftover protein I’ll add a fried or boiled egg and add a few pistachios.  Mmmm.  Oh, and cheese is especially good on that steak salad.  I’m sure most of you know all of this and I’m just rambling. 

So, I drizzle this all over, add a tad of good quality extra virgin olive oil, Maldon sea salt and pepper and well….scrumptious.  I’ve been using this vinegar for many years now and I do not tire of it.

It is also great drizzled on roasted brussel sprouts.  Greg likes it mixed with honey and then drizzled on the sprouts.  I used to buy this at a local specialty store but now I can get it online.  Just google it and there are several choices – not just Amazon!

blueberry pancakes (one bowl, healthy)

Andy learned how to cook last year- how to make dinner for himself – and breakfast – and well he is pretty good!  Being home however, brings out the little boy in him – pleading (well truly just asking now that he is 21) for me to make him waffles.  At the start of the pandemic with all the kids home I was eager and excited to cook for them.  As time passed, the morning waffles became a bit tiring especially because Andy knows how to make them – and dinners are a handful because of Greg’s dietary needs and Andy eating a ton and everyone wanting leftovers!  Recently though he asked me to please make him blueberry pancakes (he has moved on from chocolate chip).  I have many old recipes in the blog – but I’m always searching for the next best recipe.  Be it brownies, chocolate chip cookies or pancakes – it is a never ending endeavor.  I succeeded I think – I found this recipe from the blog Amy’s Healthy Baking (I fiddled with it a bit) and I have to report that they might be the best to date.  Oh and don’t skip the vinegar.  I know it seems weird but I promise you cannot taste it.  And please don’t compare these to buttery, white flour, decadent pancakes.

For measuring flour it is best to use a small digital scale.  Jamie from My Baking Addiction gives a really thorough tutorial on how to measure flour with a measuring cup – and how that this specific measurement can make or break your cookies (in this case pancakes!) 

Sylvie said “delicious, truly good mom” and Sarah (Greg’s girlfriend) said “I’m really full but I wan’t more – these are REALLY good!”  And Andy said “They are fire”.  So there you have it.  Bake and enjoy – 

Oh, I usually double the recipe – esp if I have a crowd.

20 small pancakes

Prep time: 5 minutes

Easy

ingredients

  • 1 tablespoon unsalted butter, melted 
  • 1 large egg
  • 1.5 teaspoons vanilla extract
  • 1 teaspoon maple syrup
  • 1/4 teaspoon salt
  • 1/4 cup (60 g) plain nonfat greek yogurt 
  • 2 tablespoons milk (I used 1 percent)
  • 1/4 cup water
  • 1 cup plus 2 tablespoons (135 grams) white whole wheat flour (or half whole wheat and half white) 
  • 1 teaspoon baking soda
  • 1/2 teaspoon baking powder
  • 1 cup fresh blueberries

Directions

Melt the butter.  And in a medium bowl, whisk together the butter, egg, vanilla, maple syrup, and salt.

Stir in the Greek yogurt and mix until there are no lumps.  Stir in the vinegar and then the milk and water. 

Pour the flour evenly over the patter and sprinkle the baking soda and baking powder on top.  Stir until just incorporated and fold in the blueberries.

I use my griddle to cook these – and they work fine with or without butter.  You can also use a non stick pan.  You really can make any size you want so have some fun!

If you look at Amy’s Healthy Blog blueberry pancake post  she gives a lot of advice regarding substitutions for special diets.  So check that out too.

ground turkey taco meat

Andy made this turkey taco meat last week (above – the two pics on the right) and several times last fall.  It’s versatile and easy and oh so good.  I made it last week for me and Rob – and it was good!  I had it in iceberg lettuce and a salad the next day. 

 The taco meat also tastes great on top of rice, in a taco salad bowl, as a topping on baked potato, as well as for tacos.  Any which way you can add guacamole, salsa, chopped cucumbers, chopped pineapple, red peppers, sour cream or greek yogurt…and more!  

He and I often add veggies to the dish – we might cook them separately and double the spices and liquid – mushrooms are great in there – or a bunch of frozen peas at the end.  Andy is partial to carrots as you can see.

This recipe calls for 2 pounds of meat but Andy usually doubles it while at school so he has a ton of leftovers.  When everyone was home I made 5 pounds.  It lasted 2.5 days!  Oh, and you can sub ground chicken or beef.  

Enjoy – 

Serves: a lot

Prep time: 10 m

Cook time: when it's done! But about 20 m

Easy

Spices

  • 4 tablespoons chili powder
  • 2 tablespoon ground cumin
  • 4 teaspoons paprika
  • 4 teaspoons kosher salt
  • 1/2 teaspoon garlic powder
  • 1/2 teaspoon onion powder
  • 1/2 teaspoon cayenne pepper (more or less depending on your taste)

Ingredients

  • 2 pounds ground turkey meat
  • 1 1/2 cups water
  • 2 tablespoons apple cider vinegar
  • 1 tablespoon brown sugar
  • serve with chopped cucumbers, guacamole, salsa, greek yogurt (or sour cream) and chopped pineapple for some excitement.  

Directions

Mix all the spices together and set aside.

  • Cook the meat in a large skillet – use a little oil (2 teaspoons) if you are using a stainless pan. No oil necessary if you are using a non stick pan.
  • Cook turkey in a large skillet over medium heat – stirring to break up clumps. When the turkey is cooked (no more pink spots), stir in the spice mix and water. Reduce the heat and simmer stirring here and there until most of the liquid has been absorbed – maybe 10 minutes.
  • Stir in cider vinegar and brown sugar – simmer to let the flavors merge –
    If using beef then you may want to strain the beef of fat before you add the spices.
  • serve with guacamole