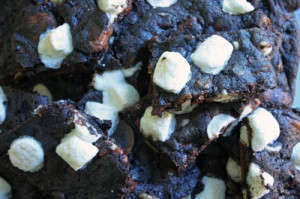
 This stuff is heaven. I really truly mean it. Moist, very chocolaty cookies, filled with various chips, nuts and marshmallows all creating a mouthwatering texture and taste that seriously rivals most cookies I’ve eaten. The free form shape adds to my delight (for reasons I can’t explain). I made these for the last school fair and they were a serious hit. I always double the recipe (the recipe below is doubled) and freeze a bunch for my son Greg who is normally not a crazy chocolate lover. He takes these from the freezer and pops them in the microwave and eats them warm and gooey. He groans with pleasure and raves and raves and thanks me for making them. Gotta love that at 13. I like them with vanilla ice cream (what else is new). This recipe is adapted from The Baker’s Field Guide to Chocolate Chip Cookies by Dede Wilson. She calls them Heavenly Hash Break-up Bars, but Greg (my son) quickly named them Cookie Bark but no matter what you call them they are good. Seriously good. So bake them soon and enjoy!! *Reader – order the black cocoa now – so you will be ready to bake. And if you live locally, come to my pantry!
rocky road cookie bark (or heavenly hash break-up bars – adapted from The Baker’s Field Guide to Chocolate Chip Cookies by Dede Wilson):
2 cups all purpose flour
4 tablespoons black cocoa
1 teaspoon baking soda
1/2 teaspoon kosher salt
1 cup (2 sticks) softened butter (unsalted)
1 cup sugar
1/2 cup packed light brown sugar
1 1/2 teaspoons vanilla extract
2 large eggs
2 cups semisweet choc chips, 3/4 cup white choc chips, 3/4 cup milk chocolate chips
1 1/4 cup toasted pecan halves
1 3/4 cup mini marshmallows
Preheat oven to 350 degrees. Line 2 cookie sheets with parchment paper.
Toast nuts in 350 degree oven or toaster oven for 5-9 minutes. Be careful not to burn! Set aside to cool. Pull butter out to soften and egg out to room temperature.
Whisk together the flour, black cocoa, baking soda and salt. In another bowl, place all the various chips and nuts.
In the mixer, beat butter for a few minutes, add the sugar and continue to beat for a few minutes until lighter and fluffy. Add the brown sugar and continue to mix for another minute or two. Scrape down the bowl, add the eggs, one at a time until each is incorporated – then the vanilla. Scrape the bowl again and mix a little bit more.
On the lowest speed, add the flour in 2 batches – mixing until almost incorporated. Pull bowl from mixer and add all of the chips and the nuts and continue to mix (by hand – and I actually physically use my hand here) until all is just incorporated.
Divide the dough and place half on each cookie sheet. Flatten the dough with your hands by pushing down with wet(ish) hands and get it basically as thin as the chocolate chips. (You will use the marshmallows in the next step if your worried I forgot).
Bake for about 17-20 minutes – continually checking to see if they look done (the glossy sheen should be gone and they should feel dry on the top). Place the sheet pans on the counter and place the marshmallows on top of the cooked batter – placing them evenly around – and squish each one in to the bark. Be careful as the sheet pan is hot!
Bake for another 4-5 minutes until the marshmallows kind of melt or brown a tiny bit (although not necessary).
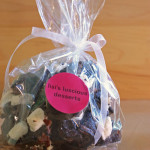
Let cool and cut with a knife free form, or break-up with your hands. I found that I u nderbaked this last batch and they were really really good, although a little bit harder to handle. Getting them off of the parchment was a little tricky, so I picked the whole piece of parchment (with cookie attached) and flipped it over a piece of tin foil and just peeled back the parchment. That did the trick. You can cut before or after. These are great gifts as well. I was baking for Gilda’s Club and decided to package them up in a little bag – nice for the holidays or just a little treat for a friend or family.

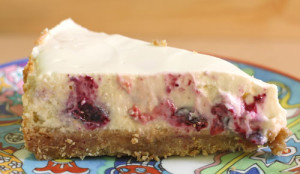 My dear friend Dani read my first five posts and said – “love it, but what about my cheesecake and my peppermint ice cream?” Cheesecake first. Dani was very close to having gestational diabetes with her first pregnancy. Doctors orders… no sugar – none! It was wicked hard (yes I’m originally from Boston) for her so I really wanted to do good by her when she could eat sweets again. When I asked what she needed as as she was going into labor, she replied, “the
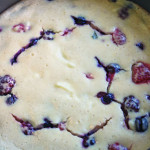

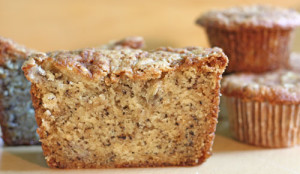 This recipe was given to me by my sis-in-law Sandy and it is a keeper! I make it for bake sales, morning coffees, afternoon snacks and dessert. I make it with or with out chocolate chips or nuts and in various sizes and shapes. My kids seem to love them in a muffin shape and that helps with quantity control – otherwise they just might eat the loaf. Zach and Lauren were over and that trick didn’t work, as Zach who’s 13 tried to convince me that I should cut into the loaf and that he should get thirds. I gave in!
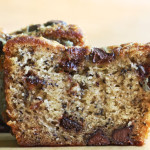 Pre-heat oven to 325 degrees. Butter or spray your loaf pans and line bottom with parchment. (As you are cutting, cut some extras for the next time you bake.) If using muffin pans, line with cupcake liners.

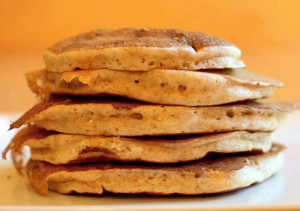 I think because my mom often sent me to school with a kiss and a cold pop-tart (sorry mom), I am now one of those moms who really insists that we all eat something healthy in the mornings and that we all sit together to eat it! It can be a challenge to make it happen since all three kids have school at different times, but we usually can manage 5-7 minutes together. The harder problem is Andy — who unlike his brother Greg and sister Sylvie, really dislikes cereal. Not only that, he refuses most breakfast items unless they happen to have chocolate or chocolate chips in them. That being said, I’m always on the look out for healthy pancakes. Of course I mess that up a bit with some added chocolate chips but I hope that the benefits of merely eating, and eating together will somehow win the fight over the chocolate in the AM. So I decided to try Ellie Krieger’s Whole Wheat pancakes for a change. They were a hit! Especially with the chocolate. Oh, and Andy just read this and said, “I’m eating whole wheat pancakes?!” – guess they are good. Ellie serves these with an delicious looking strawberry sauce, but Andy eats them plain (well with chips) and no need for syrup.
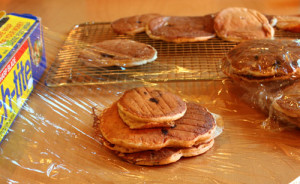 I like to double the recipe and make many extra. Once cool, I wrap the pancakes in groups of 3-4 pancakes and place in a plastic bag or airtight container and freeze. (I just read about


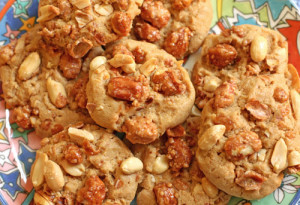 The recipes in Alice Medrich’s cookbook Pure Dessert are so innovative and fresh. I read through the book dog-earring many pages vowing to bake from it. I finally made the time even though I knew that these cookies would be a tough sell for my family. No peanut lovers here (except for me) and my brother-in-law Patrick turns his nose with disgust whenever I make anything with peanut butter (he’s French and says the French just don’t get peanut butter). But I forged ahead because I knew I’d like them and I just needed to try. Well…yum! If you like peanuts and peanut butter – then this is a cookie for you. My friends Ali and Jonathan generally get to try and enjoy most of my sweets (they are neighbors so they get it all) but claim to not be critical enough. But I’ll take Ali’s concise comment – “loved them.” My daughter Sylvie surprised me by telling me that they were yummy – that the nuts reminded her of the chou-chou nuts that they sell on the beach in France. Oh, and by the way, these cookies are truly beautiful to look at.
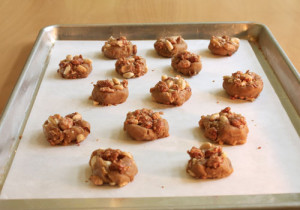 h for each cookie and roll in a ball and then into the nuts. Press in the pieces that fall off. I like to cram as many as I can into the cookies. Place on cookie sheet and bake for anywhere from 14-19 minutes. Baking time will vary and depends on the size of the cookie, where they are placed in the oven, and how you measured your ingredients that day. The humidity and weather can also affect baking time. So please check the cookies often so as not to over bake. They should look very lightly browned on the top. Let cool and enjoy! Turn into a peanut cookie ice cream sandwich with vanilla ice cream. A little messy but delicious.

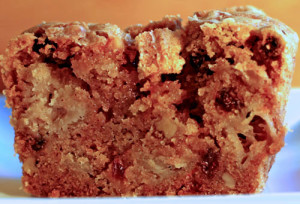
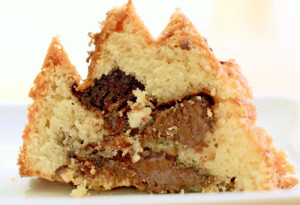 Daniel, my nephew, loves Nutella. His eyes light up when he sees that jar. So when I saw a write-up for a new cookbook that featured Nutella-Swirl Pound Cake, I knew I had to make it for him! I decided to double the recipe so I could keep one and also give one to Gilda’s club – a charity that I often bake for. My family really enjoyed the cake. For me – a warm toasted slice was heaven. I should have swirled the batter a bit more – I think the result would have been even better. Sadly Daniel didn’t even get to try the cake – but for his next visit I’ll be ready — Nutella jar in hand!
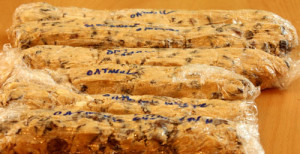
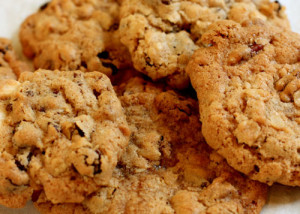 I cannot believe that my first post is for oatmeal raisin cookies! I have to blame it on our friend Jason – who is coming to dinner on Saturday night. Unlike Rob and I, Melissa (his wife), and all of our (6) collective kids, Jason is just not happy with a chocolate cookie, cake or dessert. Crazy, but true. Since I’m pressed for time and already have chocolate chip cookie dough in the freezer I figure an oatmeal raisin cookie will do the trick. This recipe was given to me by my friend Jill who said it is The Best oatmeal cookie she’s ever eaten. And Jill knows her cookies. The recipe calls for plenty of butter so I knew it would be good. But as I was finishing with the batter, I just couldn’t help myself…I had to add some chocolate chips to the dough.
 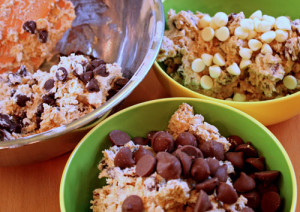 I reserved some plain Jason dough for Saturday night, but experimented with the rest – dividing it into three bowls and adding semi-sweet, milk chocolate, and white chocolate chips to each. The result was great. Saturday night came and went. Jason actually loved the white chip cookies. And my chocolate-loving son Andy said that the plain oatmeal raisin were one of his favorites! Success. Thank you Jill.