cranberry pecan pumpkin upsidown cake

OH, I’ve been working hard to get this one in by Thanksgiving.  I do hope I made it in time for you to get the ingredients (not many!) and change your menu a bit.  (Btw, no mixer involved and this cake keeps nicely overnight.)  Salted nutty candied pecans combined with sour bursts of cranberries, fragrant cinnamon and the autumnal taste of pumpkin, this is scrumptious.  And so pretty.  I finally got it right on my third attempt.  Now it will be easy for you!  The first time I made it, it was delicious – but the topping overwhelmed the cake.  When I inverted the pan, it oozed all over the platter.  I knew something was wrong.  Company was coming so I started to fret especially since I was psyched to share this w/my fruity male friends (in the sense that they like fruit desserts).  I was wondering what I would quickly whip up for them when Sylvie announced that she fixed it.  She simply spooned up the extra the topping surrounding the cake and exclaimed that not only was it all set, but we now had a yummy caramel/cranberry/pecan sauce for ice cream.  I also under baked that cake – but my guests loved it.  Loved it.  Especially Marco and Jason.  Although a success, I fiddled with the topping on my second attempt (sauce was nice but not necessary) and this time it was too sugary.  Today I finally made it correctly — and added a little sea salt to the caramel topping and oh, the day was complete.  It is complete!  I urge you to try this and impress your company.  Enjoy –

If you have a large can of pumpkin puree – save the rest in another container.  I had leftover, so I made pumpkin waffles that I will post asap.

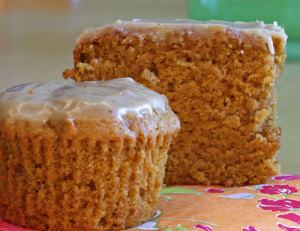
cranberry/pumpkin upside-down cake (slightly adapted from Emily Luchetti’s A Passion for Desserts):

1 stick (8 tablespoons) unsalted butter
1/2 cup firmly packed dark brown sugar
1/4 teaspoon sea salt or Maldon salt is so good in this
2 cups cranberries
3/4 cup coarsely chopped pecans, toasted first
2 large eggs
1 cup pumpkin puree
1/4 cup vegetable oil (just under 1/4 cup actually)
1 1/2 cups all purpose flour
1 cup sugar
1 1/2 teaspoons baking powder
1 teaspoon cinnamon
1/2 teaspoon kosher salt (use less if not kosher)

Preheat oven to 350 degrees.  Toast pecans as instructed in baking tips.  (I usually toast a lot of nuts at one time – then place them in an airtight container for the next time I need toasted nuts.)

Line a 9 inch square pan with parchment (just on the bottom)

Gently melt the butter then add the brown sugar.  Stir to combine.  Pour the mixture into the prepared pan.  The butter may ooze out a little, that is OK.  Sprinkle on the sea salt.

Mix together the cranberries and toasted nuts.  Place them evenly on top of the brown sugar/butter mixture.

In a large bowl, whisk together the eggs, pumpkin puree and oil.  In another bowl, whisk together the flour, sugar, baking powder, cinnamon, and salt.

Gently fold the flour mixture into the pumpkin mixture.  Then scoop out and place batter on top of the pecans and cranberries.  Carefully spread the batter evenly trying not to mix in the (soon to be) topping.

Place in the oven for 40-45 minutes – or until a toothpick comes out clean.

Let cake sit on wire rack for 10-12 minutes.  Run a knife around the edges.  Place a large plate or platter on top of the cake.  Invert the cake and plate together and remove the pan (it might be hot!)  Carefully peel off the parchment paper.

Serve warm or at room temperature with some freshly whipped cream or vanilla ice cream.

pumpkin loaf with whole grains and olive oil

This was really good.  Better than the photo – since the color looks off (sorry!)  Moist, pumpkiny and full of goodness.  I do love a healthy sweet snack and my kids did too!  All of them.  Andy loved this fresh baked and gooey out of the oven.  Greg, Sylvie and Rob all said good – esp good considering the whole grains and lack of butter.  I too enjoyed, toasted and crispy – I do like texture.  And yes, of course I added the chocolate chips – I did, as usual – but it is obviously up to you.  My family seems to need this.  I found this in the October issue of  Fine Cooking Magazine.  As soon as I see Ellie Krieger’s photo I’m immediately interested.  I actually met her at the airport last year, behind her in the check in line and told her how much I enjoy her recipes, books and articles.  She is smart, healthy and creative – I do envy that!  So enjoy her – from me – and treat yourself and your family to this terrific fall sweet.

pumpkin loaf with whole grains and olive oil (from the Oct/Nov issue of Fine Cooking — Ellie Krieger):

3 1/4 oz (3/4 cup) whole wheat flour
3 oz (2/3 cup unbleached all purpose flour)
1 teaspoon ground cinnamon
1 teaspoon baking soda
1/2 teaspoon baking powder
1/2 teaspoon ground nutmeg
1/2 teaspoon kosher salt
2 large eggs
1 cup canned pumpkin puree
1/2 cup packed light brown sugar
1/3 cup olive oil
1/3 cup honey
chocolate chips (optional)
2 tablespoons pumpkin seeds (optional)

Preheat oven to 350 degrees.  Spray a 9×5 inch loaf pan with cooking spray.

In a medium bowl, whisk together the flours, cinnamon, baking soda, baking powder, nutmeg, and salt.  Set aside.

In a large bowl, whisk together the eggs, pumpkin puree, brown sugar, olive oil and honey.  Mix until well combined.

Pour the dry ingredients into the wet and gently fold until evenly incorporated.  Add the chips (if using — or sprinkle on top).

Pour batter into prepped pan and tap the pan on the counter to settle the batter.

If using pumpkin seeds – sprinkle on top and lightly press in.

Bake until the top is browned and a toothpick comes out just clean  40-45 m.  If the top of the loaf is browning too much – cover the top with foil.

Let cool in pan for 15 minutes then turn out gently.  Let cool.  Enjoy!

Valentine Peeps

So I know, I did Valentine chocolates last year, but last year I didn’t have Valentine Peeps!!  And this year I do, and my family is happy.  As I’ve said before, Peeps and chocolate are ridiculously good.  Seriously one of my favorite confections.  Marshmallows are similar, but there is something special about the sugary texture of the Peep combined  with the snappy chocolate shell that makes music.  Rob loves them with bittersweet chocolate – it cuts the sweetness a bit while the rest of us like them sweet and yummy dipped in milk chocolate.  Actually Andy can go both ways.  I dressed them up with sprinkles and jimmies but they are just as good plain.  If you are up for tempering chocolate, find some Peeps and start the party.  These are perfect to tell those you love that you love them…or like them.  Be sure to treat yourself to one too.  Enjoy –

valentine Peeps:

Go the the Halloween Peeps post to learn how to temper chocolate.  And also be sure to check out the bottom of the Valentine chocolates from last year that shows what happens if you don’t temper it.

Enjoy and happy Valentines day!

gingerbread and white chocolate chunk blondies

Soft moist gingerbread with sweet chunks of white chocolate throughout make these a little different and extra special.  Please don’t discount these based on the white chocolate because I love them!  I really love them.  Sylvie is right on board with me. Rob’s brother Eric  said “delicious!”  and Kathy and Thomas agreed.  They speak to us.  If you use high quality white chocolate (a must) I promise that even you white chocolate haters will enjoy.  Rob is one of those haters – and guess what, he likes them a lot!  (OK, he did pull out some of the white chunks, but kept some in too.)  Linda and Patrick were super reluctant to try but after much prompting they did, and they thought waay better than expected.  Of course they mentioned that dark chocolate would be fabulous next time.  But I really enjoy the sweet creamy white chocolate combined with the warm winter spices.  Next time I might add cranberries to pucker the flavor a bit.  Perfect for holiday celebrations as they are very easy to make and a great addition to a festive holiday cookie platter.  Oh, and they freeze well too.  Enjoy-

This recipe makes two 8×8 pans.

gingerbread and white chocolate chunk blondies (originally from Martha Stewart Living, December 2007 – but found on one of my favorite blogs, Technicolor Kitchen)

2 3/4 plus 1 tablespoon flour (395 grams)
1 1/4 teaspoon baking soda
1 1/4 teaspoon kosher salt
1 1/4 teaspoon ground cinnamon
1 teaspoon ground ginger
1/4 teaspoon ground cloves
2 1/2 sticks unsalted butter, room temp
1 1/4 packed light-brown sugar (218 grams)
1/2 cup plus 2 tablespoons sugar (124 grams)
2 large eggs
1 large egg yolk
1 1/4 teaspoons vanilla extract
1/3 cup unsulfured molasses
9 ounces good quality white chocolate chopped (I like both big and small pieces throughout).  Or white choc chips.

Preheat oven to 350 degrees.  Line two 8×8 square pans with foil so that it hangs over the edges.  Look toward the bottom of  baking tips for a visual.  Lightly butter the foil.

Whisk together the flour, baking soda, salt, cinnamon, ginger, and cloves.  Set aside.

Beat the butter and brown and white sugars with the paddle attachment of you mixer.  Beat on medium high speed until paler and fluffy – about 5 minutes.  Scrape the bowl down every now and then.

Add the eggs, and yolk, one at a time – beat well after each addition and again, scrape down bowl.  Beat in the vanilla and molasses .  On the lowest speed, add the dry ingredients and mix until just combined.  Do not over-mix.  Fold or mix in the white chocolate chunks.

Spread the batter evenly between the two pans.  Bake until a toothpick comes out just clean and the edges are golden.  About 32-37 minutes.

Let cool and then pull out from pans with the foil overhang.  Cut into squares when completely cool.  Serve.  Delicious.

They last for about a week in an airtight container and they freeze well too.

Enjoy-

pumpkin whoopie pies

Moist little pumpkin cakes sandwiched with a cream filling…truly yummy and so perfect for Thanksgiving or really anytime this fall.  My friend Ali wanted to try and taste these before her guests did, and thought a dry run was a good idea.  She does this with her whole Thanksgiving meal (save for the turkey!)  I told her to go for it, but she then clarified the request stating that perhaps I should make them and she and the girls could help.  I was game and so we did!  The girls loved pulling this easy batter together, smelling and touching all the spices as they were incorporated.  They spooned the batter onto the sheet pans and piped some too, taking delight in the process.  Their favorite part was filling them with frosting and of course, eating them.  The pumpkin flavor is perfect and if you don’t over-bake these, they are so very moist – in fact Sylvie preferred them plain.  Andy loves these as Ali and I do, and Rob too thought really tasty although he would prefer something gooey and chocolatey for dessert and thought this would be great with tea (if he drank it, but doesn’t).  Jodi took a taste for Lauren who adored them saying “awesome and ginger and cinnamon rock!” We first tried these with a more traditional marshmallow filling and found it to be too sweet and clashed a bit with the pumpkin.  Instead we opted for a sweet cream cheese filling that hit the spot hard.  Enjoy –

*Oh, because of the cream cheese filling these have to be refrigerated if storing overnight.  They are good cold, but best if you pull out 30 minutes before you plan to serve again.

pumpkin whoopie pies (adapted from Cook What You Love by Robert and Melinda Blanchard):

cakes

3 cups all purpose flour
1 teaspoon kosher salt
1 teaspoon baking powder
1 teaspoon baking soda
1 1/2 teaspoons ground cinnamon
1 teaspoon ground cloves
1/2 teaspoon ground ginger
1 cup (2 sticks) unsalted butter, room temp
2 cups light brown sugar, packed
1 (15 oz) can unsweetened pumpkin puree
2 large eggs
1 teaspoon pure vanilla extract

filling

6 tablespoons (3/4 stick) unsalted butter, room temp
6 ounces cream cheese (not whipped), at room temp
1 teaspoon pure vanilla extract
2 3/4 cup confectioners sugar
2 pinches kosher salt

Preheat the oven to 350 degrees.  Line 2-3 sheet-pans with parchment paper.

In a medium bowl, whisk together the flour, salt, baking powder, baking soda, cinnamon, clove and ginger.  Set aside.

With the paddle attachment of your mixer (or hand held beaters) beat the butter and brown sugar until lighter and fluffy – for about 4-5  minutes.  Scrape the bowl down and mix in again.

Add the pumpkin, eggs and vanilla and mix on medium speed until combined.  Scrape and mix again.

On the lowest speed, stir in the flour in 2 batches, mixing until just incorporated.

Place heaping tablespoons (we made some bigger – but keep the same size on each sheet-pan) onto the sheet-pan.  We used a spoon, an ice cream scooper and a piping bag without a tip.  The piped cookies came out the prettiest but the spooned ones were just fine and obviously taste the same.

Baking time is tough here.  The book calls for 10-12 minutes – but my cakes took much longer.  I also had the oven packed with 3 sheet-pans – so that might have been why.  I think you should check your cakes after 10 minutes but then keep setting your timer for 5-3 – 2 minutes after that – and pull when the tops spring back when you touch them or when a toothpick comes out just clean.  My middle pan took about 20 minutes to cook but my top pan about 14 – so again, just check and check often.  You don’t want to over-bake.

While cooling, make the filling.  Place the butter, cream cheese and vanilla in the bowl of your mixer (or with hand held beaters) and beat with paddle until smooth and creamy – for about a minute.  Scrape and mix again.

Add the confectioners’ sugar and pinches of salt and mix until smooth – about 1 minute.  Scrape and mix again.  If the mixture is too soft you can refrigerate for 20 minutes (especially if cookies are too warm).  Mine was just right.

With an offset spatula or knife spread filling onto the bottom of a cookie-cake and top with the bottom of another to form your whoopie pies.  Enjoy-

pumpkin choc chip cookies

So these are really good!  And so very different from any other pumpkin cookie recipe (or any cookie recipe) that I’ve ever made. Try them for Thanksgiving and I’m sure your guests or hosts will be smiling.  The nice thing about these is that they really are chewy and cookie-like and not so cake-y like most pumpkin cookies.  I dropped some to Stephanie who said, “you brought them to the right house.”  She continued with “big hit – the pumpkin was not overwhelming and the chocolate chips are always a bonus.  Emma (11) gave it a nod, an hmmmm and a good – that’s a lot for her.  And Rob was very happy.”  Beth thought delicious!  And Karen reported “the pumpkin choc chips are a bit more unusual, but I happen to love the flavor of pumpkin and really did like them, but with a disclaimer of strong pumpkin flavors, they are worthy of your fabulous blog!”  So funny that one taster thought very pumpkin-y and another not so much.  You can vary your spices here adding more or less depending on your family.  My family loved them – especially Sylvie well, Andy too!  Enjoy-

Oh, btw, check the ingredient list before you make these as you may not have all the ingredients in your pantry.

chewy pumpkin chocolate chip cookies (barely adapted from sugarplum.com):

1/2 cup unsalted butter
1/3 cup chopped pecans, toasted
2 tablespoons unsalted butter, melted (yes, more butter but separate)
3/4 cup dried milk powder (I used non-fat)
1/2 cup graham cracker crumbs
3 tablespoons sugar plus 3/4 cup sugar – divided
1 1/2 tablespoons cornstarch
3/4 cup pumpkin puree
1 large egg
1 teaspoon vanilla extract
1/2 teaspoon cinnamon
1/4 teaspoon nutmeg
1/8 teaspoon clove
1/8 teaspoon allspice
1/2 teaspoon kosher salt
1/2 teaspoon baking soda
1 cup all purpose flour
3/4  cup chocolate chips

Preheat oven to 350 degrees.  Toast the pecans for 6-7 minutes – then set aside.

Reduce the oven to 250 degrees.

Melt the 1/2 cup butter in a small saucepan over medium heat and cook about 2 minutes – stirring here and there.  The butter will foam then start to turn a nice golden brown.  Once golden, pour into a bowl and let cool.

In a large bowl stir together the 2 tablespoons of melted butter, dried milk powder, graham cracker crumbs, 3 tablespoons of the sugar, and the cornstarch until well mixed.  Place the crumbs on sheet-pan and bake at 250 until the crumbs turn light brown and toasted.  This should take 11-15 minutes.  Set aside to cool.  Once cool, place crumbs back into the bowl and stir with a whisk to break up the crumbs.

Increase the oven temp to 375 degrees.  Line sheet pans with parchment.

Place the pumpkin puree in a small saucepan over medium heat and cook for 3-5 minutes, stirring a lot, until most of the liquid evaporates from the puree.

With the paddle attachment of your mixer, beat together the 3/4 cup sugar, egg and cooled browned butter on low speed at first, then up to medium high speed for a bout 4-5 minutes.  On medium speed, mix in the pumpkin, vanilla, cinnamon, nutmeg, clove, allspice, salt and baking soda – and mix until all combined.

On the lowest speed, add the flour and mix until just incorporated.  And lastly, stir in the the baked crumb mixture (the dried milk, graham crumbs,and cornstarch) followed by the chocolate chips and pecans.

Drop by tablespoons onto sheet-pans and bake for about 8-11 minutes – until lightly golden.  Cool then transfer to rack to cool.

Yum, enjoy-

(grandma’s) mandelbread cookies

My grandma was a great cook and baker – and lived till she was 97!  Before she passed away, she handed me a glad bag filled with index cards – all written in her not so neat scrawl, but with many notes in the margins and “Excellent” written next to this one. These have been on my to-bake list for about 2 years…and today – this first day of high school for Greg – I was feeling jittery and unsettled and decided that baking these would be a perfect thing to do.  (Even though I had MANY many other things I should do.)  I can’t compare with other mandelbreads because I’ve never had any other but these were good!  Addictive.  Alisa really liked these a lot.  She loved the nuts and chips and the feel of the cookie.   Ali and her extended family enjoyed them too!  Mandelbread is shaped like Italian biscotti – but it is lighter, less dense and much softer (well, my grandma’s recipe is) than biscotti.  Cake-ier too.  These are great for those who don’t love things too sweet but love a taste of something homey and simple at the end of the meal.  These cookies are also easier on your teeth than biscotti which is (sadly) nice as we age.  You can keep these plain – or add nuts, chips, coconut or anything else you can think of.  My friend Ellie said her grandma put in candied cherries – another idea!  Enjoy –

Oh, and btw – these are non dairy.

(grandma’s) mandelbread cookies (from my grandma Ruth’s index card):

3 large eggs
1 cup plus 2 tablespoons sugar
1/2 cup canola oil (or vegetable)
3 cups sifted flour
1/2 teaspoon kosher salt
1 teaspoon baking powder
1 teaspoon vanilla extract

optional – 1 cup mix – ins –  (I used 1/2 cup toasted chopped pecans and 1/2 cup mini chocolate chips but plain is also good or with just nuts.  Also coconut might be nice if you are a coconut lover.)

Toast nuts first if you are using.  Chop.

Preheat oven to 350 degrees.  Place rack in middle of oven.  Beat 3 eggs with whisk attachment – or with hand held beaters – for about 5 minutes until thicker and yellow.  Slowly add sugar and continue to beat for another 5 minutes.  In the meantime measure the flour, baking powder and salt and set dry ingredients aside.

I switched to the paddle attachment  at this point – but you can do the rest by hand as well.

Add the oil on lowest speed and then the vanilla extract.

Gently fold in the dry ingredients in 3 additions – being careful not to over-mix.

Add nuts, chips – or whatever mix-ins you prefer.

Place the dough in a big mound on a parchment lined sheet pan – making a long large log (you can also make 2 smaller logs).

Bake for about 35-39  minutes until lightly browned and the top is hard and you can try a toothpick too.  It is a little tough to judge – but try your best.

Let cool on pan for a bit, then slice the log as you do in the blue corn biscotti (there are photos there) and place on sheet pan – laying down each cookie – packing them in – then bake these again – for about 4 – 5 minutes on each side @375 degrees.  (My grandma wrote “broil until brown” but I decided to just bake again for a bit – nervous to broil as she also wrote “watch it!!).  Pick what you prefer.  The more you bake the harder the cookie will be.  I wanted these soft so I only baked for a little bit.

Let cool and enjoy with coffee or yes, in vanilla ice cream too!

pumpkin walnut bread

OK, so again, easy and delicious.  2 bowls, no mixer and lots of yummy spices.  Not too sweet pumpkin bread with lots of healthy walnuts make this an easy staple for a breakfast treat, brunch or an afternoon snack.  And save for the icing, it is dairy free (and it is still quite good without).  I made this with my continued vertigo so you know it is simple.  I felt like purging the excess from my (somewhat excessive) pantry and I knew I would not want pumpkin in the spring and summer.  I scoured my new Sur La Table cookbook which is chock full of baking tips – really good ones – and found this.  I took out a little sugar since I wanted it to be more bread(y) than sweet and it was a great success.  Everyone really enjoyed – Mike thought too many nuts – so go easy on them if you prefer less.  These would also be great as muffins.  (Just adapt and watch baking time.)  Smart to make a double batch and pop one in the freezer since this freezes very well.  Enjoy-

pumpkin walnut bread (adapted from Sur La Table’s The Art and Soul of Baking):

2 cups all purpose flour
3/4 teaspoon baking soda
1/2 teaspoon ground cinnamon
1/4 teaspoon allspice
1/4 teaspoon ground clove
1/4 teaspoon nutmeg
1/4 teaspoon ginger
1/2 (almost) teaspoon kosher salt
2 large eggs, room temp
1/3 cup water
1 1/2 cups sugar (minus 3 tablespoons – if you want sweet bread, keep the tablespoons)
1 cup canned pumpkin puree
1/2 cup canola oil
1 1/2 teaspoon vanilla extract
1 cup toasted chopped walnuts (or less if desired)
sprinkling of sugar for top (optional)

cream cheese frosting (you will have a leftover – hold for another occasion)

6 oz cream cheese, room temp
1 1/2 oz butter room temp
1 1/2 cups confectioners’ sugar
1 teaspoon vanilla extract

Preheat oven to 350 degrees.  Toast your walnuts and set aside.

Lightly coat at 9×5 loaf pan with butter or spray – and line the bottom with parchment.

In a large bowl, whisk together the flour, baking soda, cinnamon, allspice, cloves, nutmeg, ginger and salt.  Set aside.  In a medium bowl, whisk together the eggs and water, then add the sugar and mix well.  Next add the pumpkin puree, oil and vanilla extract and mix well.

Add the wet mixture to the dry ingredients and mix until just blended.  Add the walnuts and mix in.  Pour batter into prepared pan and level the top with a small palate knife or back of a spoon.  Optional – sprinkle one tablespoon of sugar to the top of the loaf for a crispy slightly sugary top – especially good if you do not plan to ice the bread.

Bake for about 54-64 minutes – until the bread is firm to touch and toothpick comes out clean.  Let cool for 15 minutes- then turn out onto pan to cool completely before you frost (if you plan too.

icing

Place the cream cheese, softened butter in mixer and blend until smooth (with paddle – or hand mixer).  Beat well –

Whisk the confectioners’ sugar then add to the mixture and blend on low for a minute.  add the vanilla and on medium speed beat for about a minute, scrape down sides and beat again.

Spread desired amount onto pumpkin loaf and enjoy!  (The icing does need refrigeration – so pull out of frige a half hour before you plan to serve for best flavor.)

valentine chocolates (kid style)

I love dipped stuff.  Soon I’ll make more grown up chocolates – and dipped dried fruits and nuts, but oh, there is nothing like a chocolate covered Oreo, potato chip, pretzel, marshmallow or graham cracker… I love it all.  So do my kids, their friends and my friends and anyone who came over last week.  Conor happily took a bag home and Jodi and Mike loved their goodies.  Temper your chocolates (follow directions in the Halloween Peeps post) and go to town.  Look to the bottom of this post for a photo of untempered chocolate.  The sweet and salty thing is addictive and delicious.  My personal favorite is crunched up pretzels with white chocolate and dried tart cherries.  Wow.  I decided to sprinkle half with Valentine hearts and colors for an idea for Valentines day and left some plain just for munching.  This chocolate (if tempered) will keep in an airtight container for a while (well, the potato chips kind of loose their crunch).  So make ahead and let everyone know that you love them!  Enjoy-

chocolate dipped goodies (kid style):

tempered: white, milk, semisweet and/or bittersweet chocolate (there are some great tempering videos out there – just google it and if you love dipping then invest in a tempering machine.)

things to dip
marshmallows (big and mini)
kettle corn
crunched pretzel pieces, flat pretzels, pretzel rods, pretzels thin
Oreos (whole or crunched)
potato chips (I like Cape Cod)
dried fruits
graham crackers whole or smooshed
cocoa nibs (my new favorite!)
m & m’s
mini chocolate chips

I think you can figure most of this out.  But just in case, prepare a few sheet pans lined with parchment.

Oreos – if you have a mold you can cover them using it.  If not, simply dip them in the tempered chocolate.  Alternately, crunch them up and pour chocolate over them, mixing all together.  Scoop out little spoonfuls onto the parchment, or into cupcake liners.  Top with m&m’s if you choose or chocolate shavings or drizzle.

Graham crackers – individually dip – then add on m&m’s, or cocoa nibs, or really anything.  Alternatively, smash them up and combine  with chocolate and mini marshmallows and plop little spoonful down on parchment or again, in a cupcake liner.

Pretzels – dip the whole pretzel in the chocolate.  Leave as is, or coat chocolate with mini m&m’s or mini chips and let set.  You can also smash up the pretzels into bits, add dried cherries and pour chocolate over (esp good with white chocolate) – and drop by spoonful onto parchment (or into cupcake liners).

Cocoa nibs – I love love these.  I loved them simply mixed with white chocolate and then poured into mini cupcake liners.  Alternatively, add to dipped grahams or marshmallows for added texture and flavor.

Marshmallows – simply dip big ones 3/4’s way down into chocolate.  turn upright to set and top with a treat if you choose (m&m’s, mini chips, cocoa nibs).  As mentioned above, combine mini marshmallows, graham crumbs and chocolate and place by spoonful onto parchment.

Kettle Corn – spread some kettle corn on parchment and drizzle chocolate over it.  Delicious!

Potato chips – dip and place on parchment to set.

chocolate NOT tempered

If you do not temper the chocolate, it will take many hours to set – and even when set it will feel tacky and slimy.  The chocolate will streak and not have a good snap or bite.  The chocolate is not as viscous and is heavier to work with.  If you look carefully at the photo to the left and below, you’ll see streaks and spots on the chocolates.  Hopefully you can also see that the chocolates have a duller appearance than their tempered counterparts and just look pretty unappealing.  No one ate these!

the same Oreo a few days later...

pumpkin cookies or cake with brown butter icing

So if you’ve been reading my blog – you’ll remember that although we all really liked the orange pumpkin cake — it wasn’t overwhelmingly pumpkiny.  I had to try again.  It’s not that I even (personally) love pumpkin flavor so much but feel that the kids should know what pumpkin tastes like.  (Since they were clueless with the last cake!)  Plus I know that many adults really like pumpkin.  I scoured my cookbooks and finally found a good looking pumpkin cookie recipe from Martha Stewart.  These cookies came out great and were a huge hit with family and the many friends who tried them.  I had a feeling that the cookies would have a cake like consistency (which many people loved, although I do not) so I also baked them in a muffin and mini loaf cake shape.  Both cakes and cookies were delicious – pumpkiny and have all the spicy warm fall flavors – ginger, nutmeg and cinnamon which round out the pumpkin so nicely.  The brown butter icing completes them.  Enjoy!

pumpkin cookies or cake with brown butter icing (barely adapted from Martha Stewart’s Cookies):

2 3/4 cup all purpose flour
1 teaspoon baking powder
1 teaspoon baking soda
1 1/4 kosher salt
1 1/2 teaspoon ground cinnamon
1 1/4 teaspoons ground ginger
3/4 teaspoon freshly grated nutmeg
1 1/2 sticks (3/4 cups) butter – room temp
2 1/4 cups packed light brown sugar
2 large eggs
1 1/2 cups canned pumpkin (14 oz)
3/4 cup evaporated milk
2 teaspoons vanilla extract

icing
2 cups confectioners’ sugar
5 tablespoons unsalted butter
1/8 cup plus a few teaspoons evaporated milk
2 teaspoons vanilla extract
pinch kosher salt

Preheat the oven to 375 degrees and line sheet pan with parchment.  Or, prep mini loaf tins with butter and parchment and/or line your cupcake pans.

In a small bowl, whisk together the flour, baking powder, baking soda, salt, cinnamon, ginger, and nutmeg.

Cream the butter and brown sugar on medium high speed in the mixer for about 3 -4 minutes until light and fluffy.  Reduce to medium and add the eggs one at a time until each is incorporated.  Scrape down the bowl and mix again.  Reduce the speed to low and add the pumpkin puree, evaporated milk, and vanilla – mix well.

Add the reserved flour mixture – and mix until just combined.  Now here Martha (Stewart) advises to put the batter in a pastry bag and pipe out the cookies.  I know this can overwhelm 
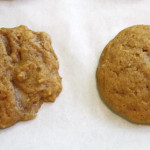
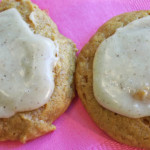
some people.  Soo…now you have your muffin pans or loaf pans!  Problem solved.  Or…drop by spoonfuls onto parchment.  I did a side by side comparison to show you the difference – the right side is the cookie that was piped, the left dropped.  Honestly no biggie here…right?  Plus, once you add the icing it makes even less of a difference. 🙂  If you do decide to pipe the cookies, here are some tips: 1 – do not overfill piping bag.  You will lose control of the batter.  2 – 
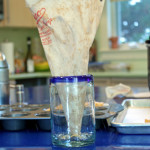
to fill the bag, place it in a large container – a glass or measuring cup or vase – so that you have two hands to fill it.  3 – twist the end of the bag and with light pressure, squeezing from the twist, gently pipe the cookies.  Use a round 1- 1 1/2 inch tip – I just used the coupler but do what makes you happy.

Bake cookies about an inch apart and for about 12-18 minutes.  As usual check often and before – and rotate the pans to ensure even baking.  The muffins took about 30 minutes and the loaf cake took about 40 minutes.  The cake or cookies should have a good spring to the top – or use a toothpick to check the crumb.

Let cool on rack.  Invert the cake (if you made a cake) after it has cooled for about 10 minutes.  In the meantime make the icing.

Place the confectioners’ sugar in a bowl and melt the butter in a saucepan over medium high heat.  Cook the butter swirling it occasionally and keep cooking until you brown the butter.  Now I went very far here – and really took it as brown as I could go because I love the nutty taste of brown butter.  But be careful, you do NOT want to burn the butter.  Cook it as long as deep as you want – or feel comfortable with (at least a golden brown) which should take about 3 minutes.  When browned, immediately add to the confectioners’ sugar and mix – add the evaporated milk, vanilla and the pinch of salt and mix and whisk until smooth.  Add evaporated milk as you see fit – you can make this loose here and just like a glaze – or keep it thick – more like a frosting.  I like it runny and glazy.  Again, do what you like!

Once the cookies/muffins/cakes are cool – frost with the brown butter icing.  If the frosting gets too hard to work with, you can heat it in the microwave for 10 seconds to re-soften – or add more evaporated milk if too dry.

Yum.  Jason was here just now (the guy and friend who inspired my first post on oatmeal cookies) and said – “Oh, I LOVED those cookies.  I just love that pumpkin with all those flavors…my favorite!”  I hope you like them too!