
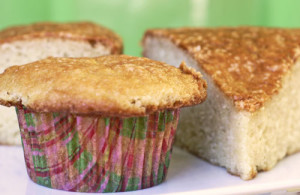
 This banana cake is scrumptious. In the midst dealing with a flat tire, trying to fix the TV volume that was (and still is) stuck on mute, and driving the kids to and from activities…I noticed that I had three very ripe bananas sitting on the counter and decided that I must use them today. I wanted something different than my basic banana bread (that we do love) – was in the mood to try something new – but something just as simple to make since I was pressed for time. Well, I found a good one! I was able to prep the ingredients in between Triple A coming, rushing the car in for service (apparently I had only 10 minutes before the tire deflated again!), picking the car up 25 minutes later (I owe Jack’s Automotive some cake) and continued as I prepped dinner as well (it was a crock pot night which made things easier). By the time dinner ended I had my mise en place and was ready to combine the measured ingredients and pop in the oven. This is an incredibly long winded way of telling you that this is easy to make. More importantly, it is yummy. I made one with streusel on top and with out chocolate. And I made one with the streusel and mini chips swirled a bit throughout. I gave Greg the non-chocolate version in his lunch and as soon as he saw me after school he said, “what was that amazing thing in my lunch?” Josh and Lauren loved the chippy version and Mike, Zach, Andy, Sylvie and Rob loved both. This cake is light, delicate and more cake-y than the banana bread (which makes sense). Anyway, the streusel topping is divine. I love streusel. Rambling now, but this in my little mug of ice cream…can’t wait! Enjoy-
banana streusel cake (with or without chocolate chips) only very slightly adapted from Flo Braker’s Baking For All Occasions:
streusel–
6 tablespoons all purpose flour
6 tablespoons firmly packed light brown sugar
3 tablespoons unsalted butter, cut into little pieces
1/4 teaspoon ground cinnamon
1/4 teaspoon kosher salt
cake–
2 cups cake flour
1 teaspoon baking powder
1/2 teaspoon baking soda
1/2 teaspoon kosher salt
1 cup mashed banana (2 medium or 3 small or 9 oz)
3 tablespoons whole milk
1 teaspoon pure vanilla extract
4 oz (1 stick) unsalted butter, room temp
1 cup sugar
1 large egg, lightly beaten, room temp
mini chocolate chips 2/3’s cup (or more or less to your taste)
streusel – in a medium bowl combine the flour, brown sugar, butter, cinnamon and salt. Rub the mixture with your hands over and over again until the butter smooshes a bit and the dry ingredients start to look like slightly wet sand. Set aside.
Preheat oven to 350 degrees and place oven rack in center. Line the inside of a 9×9 pan with foil or parchment so that it comes up the sides of the pan. Then you can pull whole cake out of oven using foil as an aide. Look to baking tips to see photos of this with a cranberry cake. You can also butter and parchment and flour traditionally – but it is trickier to invert from the pan – yet do-able for sure. (These would be great in muffin shape as well! Just adjust baking time – shorter.)
Whisk together the flour, baking powder, baking soda and salt. Set aside.
Mush the bananas and stir in the milk and vanilla and set aside.
With the paddle attachment of the mixer – beat the butter and sugar for 3-4 minutes on medium speed. Scrape down sides beat again for 30 seconds. Add the egg and beat until incorporated.
Next add the banana mixture (it might look curdled that is ok) – and beat until combined.
On the lowest speed, add the flour in 2’s – and mix until just incorporated. Finish folding by hand for best results. If using mini chips you can fold in (some) now or you can wait and place on streusel or a little bit of both!
Spoon the batter into the pan, smooth and then cover evenly with the streusel. And again, if using the chocolate chips, you can place some on top. I swirled the chip batter with a knife but I actually prefer the crunch streusel on top vs inside the cake, but up to you.
Bake for about 42-50 minutes, but check often and before with a wooden toothpick. Let cool for 10 minutes then remove from pan with the foil as aide – or invert if you buttered and floured the pan (carefully).
Let cool, and cut and enjoy!
This cake freezes well. Wrap with plastic and then foil and freeze up to 2 weeks.


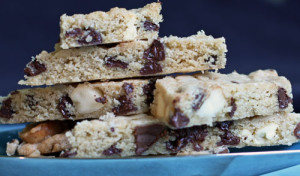
 I happen to really like white chocolate. Sometimes I have to whisper that when there are serious dark chocolate eaters around (but I really like dark chocolate too). I like it all. I know I’m not alone – my friends Wendy and Jessie always search for white chocolate goodies in my pantry. The combination of oatmeal, dried cherries and white chocolate spoke to me when I read this recipe in Amy Scherber and Toy Kim Dupree’s book The Sweeter Side of Amy’s Bread. I added nuts and a sprinkling of sea salt to the recipe to yet again provide another overdose of ingredients. But they are yummy!! Crisp on the edges and soft in the middle…mmm. Good white chocolate is vital. Please don’t skimp here – I think that most people believe they don’t like white chocolate because they’ve never had the good stuff. As usual, feel free to save some of the batter to freeze – roll into a log as directed at the bottom of the
 100 percent happiness – we all LOVED this orange flavored cake. Really a new favorite in our house! As I nibbled and watched my family enjoying… sighing, smiling, making mmm noises, and Sylvie licking the crumbs off her plate…well, life seemed very good and simple that moment. When I saw that this cake featured olive oil, I was curious but also slightly worried that it wouldn’t be “blog-worthy” or that the olive oil would overwhelm the flavor. But no worries, the oil added an amazing dimention – it was so tasty and so incredibly moist. My family and neighbors Ali and Jonathan had no idea that there was olive oil in the cake (although I tasted it – and enjoyed it!) The orange syrup finished the cake with even more orange flavor. Not much more to say, save that it is nice there is no butter in this recipe, it is fairly easy to make and you will most likely have most of the ingredients on hand. This is perfect for everyday and company too. I mean it. Try it.
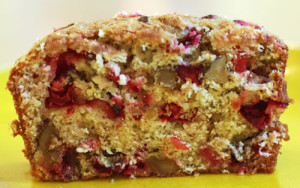 This is one of my favorites from childhood. I loved this tea bread. Mmmm… filled with walnuts, cranberries, orange zest and juice it is packed with flavor and texture. It was on my camp visiting day “request list” for years. That and chicken soup (that day my mom would bring me anything!) My mom used to toast it for me and then spread a little butter or cream cheese on it (at home, not at camp). So delicious. Greg’s friend Zach loved it – his mom Jodi reporting, “he woofed it down saying, this is good!” Sylvie loved it too. I quickly gave the rest of this one away for a Gilda’s club event (I couldn’t trust myself to not eat the whole thing) – so no one else got to try. Next time. This is good anytime of day, a breakfast treat, an afternoon tea break or even in the evening with ice cream (in a little mug for me). The cakey bread looks festive – which might be really nice for the holidays – especially if you have family coming in. It is dense like a fruitcake, but tastes nothing like a fruitcake (sorry if you love fruitcake!) Enjoy-
 This cake is sooo very good, ridiculously easy to make, and has no butter! It is Greg’s absolute favorite but we all love it. I was talking to my old and dear friend Michelle yesterday about the blog. She said she’s been baking so much, loving it, and what to make next? I told her that the


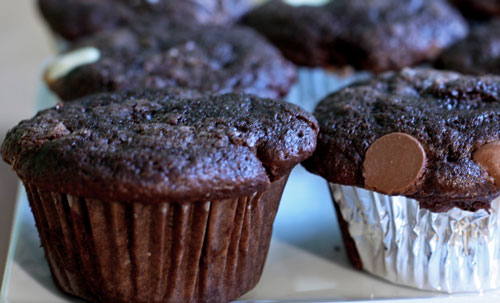
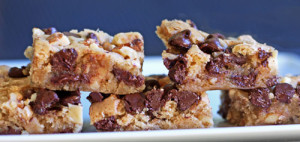
 When I started this blog I figured I’d finally attack the more difficult desserts that I never make time for. But I’ve found that it is just as fulfilling to make something simple that my family and friends love. Well, this little cake is just that. Simple and filled with tons of mini chocolate chips and a nutty crumb topping that is ridiculously addictive. I’m a fairly small person and usually have pretty good restraint when it comes to my dessert eating habits. I usually wait until after dinner and have a very small serving of whatever it is that I want – often something I’ve baked, mixed with …yes, vanilla ice cream. Anyway the evening that I made this cake – I went back into the kitchen 3 times! 3 times to refill my little little mug full of goodness. Well, that’s telling you something. Something good (the cake is yummy), and not so good (all 5 feet one inch of me can’t take that much dessert!) Anyway, this was a hit with the kids, Alisa, and my neighbors too. My friend Dani said “YUMMY” and her son Collin (Greg’s friend) said “buttery, chocolate goodness!” I didn’t share it with much more of the world because we are enjoying it so much. It is not too sweet – which is nice change as well. I’ve held onto this recipe (from the 1998 November issue of Chocolatier) for over 10 years. I’m glad I finally made it. Enjoy-
 I saw this recipe and immediately thought of a platter filled with both these cookies and the
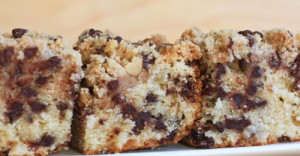
 I just love love love blondies. And they make everyone in my family happy. Greg will eat them because they are not too chocolaty, Andy likes them because there is chocolate in them (although he is really developing a palate for other flavors :)), Sylvie who really likes it all (like me), Rob too enjoys a good blondie as long as it doesn’t have white chocolate or butterscotch in it and Alisa our au pair too. She just loves the nuts in these. I’ve tried many blondie recipes over the years, and I’ve often bought blondies to try when out and about but I’m usually disappointed. But…I’m done searching. I tried and found these sweet blondies in Alice Medrich’s Cookies and Brownies book. Forever done. I hope you like them as much as we do. And of course, yes, so yummy with vanilla ice cream!