(delicious) date nut bread

This date nut bread is delicious.  Reader Heidi requested a date nut bread a while back, and I must say that it took a few tries to find a blogworthy one.  I made a sticky chewy gross one, a cake-y not enough date-y one, then some date nut cookies because I was frustrated…and then finally came upon this very good one from Baking Illustrated.  Yay.  So happy with the success!  Toasted with cream cheese – yes cream cheese, is the way to go.  The cool cream cheese, the wet juicy sweet dates, the warm bread – all make for a melody in your mouth.  I promise.  I’m not even a date nut lover – but this spoke to me!  I forced my housekeeper Sylvia to sit and eat it with the cream cheese and she later told me that she was very reluctant to eat it that way — but was so relieved when it was truly terrific.  Funny.  This bread is not too sweet but the dates themselves are – and a super contrast to the toasted nuts.  The bread looks good too – great for brunch or a hearty snack in the afternoon.  David our computer helper loved this and came back for seconds (we now barter sweets for service).  Suzanne, Lauri and Laura all split a mini loaf at the spring fair and were licking their fingers.  Success too with Jodi who loves these more old-fashioned sweets.  Mike too – the kids and I, we all thoroughly enjoyed even though we normally don’t eat this.  I’m eager to bake this bread for my sis in law Linda who will really be the true tester as this is her thing.  Oh, and Heidi too!  Fingers crossed – I’ll keep you posted.  Enjoy –

date-nut bread (very slightly adapted from Baking Illustrated, The Practical Kitchen Companion For The Home Baker):

1 cup boiling water
1 teaspoon baking soda
2 1/4 cups pitted whole dates, chopped coarse
1 cup walnuts (toasted), chopped coarse
2/3 cup buttermilk, pull to room temp
3/4 cup packed (5 1/4 oz) dark brown sugar
6 tablespoons (3/4 stick) unsalted butter, melted and cooled
1 large egg, room temp
2 cups (10 oz) all purpose flour
3/4 teaspoon kosher salt
1 teaspoon baking powder

Preheat the oven to 350 degrees.  Grease a 9×5 loaf pan, and cut and place parchment on the bottom, grease and then lightly dust with flour.  I used my 9×5 pan but didn’t end up filling it to the very top.  Instead I made another mini loaf as I find that I have a more even bake – when I don’t overfill.  You can also place the extra batter in a muffin pan and a make a few mini muffins on the side.  Or, opt to stuff it all in – just know that your baking time may be a bit longer than mine.

Stir together the boiling water, chopped dates and baking soda.  Cover and set aside for about 25 minutes until the water is lukewarm.

Toast the nuts.  Cool.  Chop, set aside.

In a medium bowl, stir together the buttermilk and sugar.  Add the melted (and cooled) butter, and egg and stir until well combined.

Add in the date mixture and stir until combined.

In a separate bowl, whisk together the flour, salt, baking powder and reserved nuts.  Then stir the buttermilk mixture into the flour mixture and mix until just combined and moistened.

Scrape the batter into the prepared pans and smooth the top.

Bake until the loaf is dark brown -and a toothpick comes out just clean.  My not full loaf pan took 42-46 minutes.  My little tiny one took 30.  If you fill the loaf pan to the very brim – the cookbook says it should take about 55- 60 minutes.

Rotate the pan during cooking.

When done, cool in pan for about 10 minutes.  Then invert onto wire rack to cool.  This bread stores well wrapped in plastic or in an airtight container.  And again, sliced, toasted w/cream cheese is heaven.  Please try!


blueberry cornmeal breakfast treat

My favorite part of Bon Appetit Magazine is the r.s.v. p. readers’ favorite recipes.  I love the letters people write – excited to share their thoughts regarding delicious meals and desserts that they’ve enjoyed all over the country.  This recipe came from a reader who stated that this cornmeal cake was her favorite breakfast treat and I guess it just spoke to me.  There were some curious ingredients in the dish and I wanted to give it a whirl.  Well, again, this was another huge hit with my foodie friend Lauren – who happens to be 11 but really seems to know her stuff!  She adored this treat.  Gave it a 10 and said it reminded her of blintzes.  Oh, and my kids too – and Rob and I both liked this a lot as well.  The flavor is new to us with a mixture of ricotta, honey and cornmeal that make this one a little bit different and goood!  The cake is crusty on the outside – and soft on the inside which I happen to love, especially the crusty part.  It is more breakfast than the boy bait from below – and really way way less sweet.  This is packed (like crazy) with blueberries and I just love that.  Especially now as the sun shines and the blueberries become sweeter and juicer.  Sliced and toasted I believe is the best way to eat this (after the first day which you should just eat as is) – with a cup of tea.  Enjoy this – another great  choice for brunch.

blueberry cornmeal cake (adapted from the Huckleberry Bakery & Cafe via Appetit May 2010):

1 1/3 cups all purpose flour
2/3 cup yellow cornmeal
2 teaspoons baking powder
2 teaspoons baking soda
1 1/2 teaspoons salt
6 tablespoons vegetable oil
2 large eggs
1 tablespoon vanilla extract
1 teaspoon honey
10 tablespoons (1 1/4 sticks) unsalted butter, room temp
3/4’s plus 3 tablespoons sugar, divided
1 cup ricotta cheese
1/3 cup plain yogurt
3 cups fresh blueberries

Pre-heat the oven to 325 degrees.  Spray or butter a 10 inch spring form pan (at least 2 3/4 inches high) – or use a smaller pan and reserve extra batter for another pan.

In a smallish bowl, whisk together the flour, cornmeal, baking powder, baking soda and salt.  Set aside.

In another smallish to medium bowl, mix together the oil, eggs, vanilla and honey.

With the paddle attachment of stand mixer (or your hand held beaters) beat the butter and 3/4 cup 2 tablespoons of hte sugar until light and creamy.  About 4-5 minutes or so.  Scrape, mix and scrape again.

Slowly add the egg and honey mixture to the butter on medium speed.  Add it little by little waiting for the liquid to be absorbed by the butter.  Beat to blend, scrape, and mix.

On the lowest speed, add the dry ingredients and mix until just about incorporated.  Then add the ricotta and yogurt and mix until just incorporated.

Remove from mixer – and pour half the batter into the prepared pan.  Then scatter 1 1/2 cups of the blueberries on top of the batter.  Spoon the remaining batter on top of the blueberries and spread to cover.  Scatter the remaining blueberries on top, followed by the last tablespoon of sugar.  Sprinkle the sugar to cover.

Bake the cake in the lower third of the oven…bake until top is golden brown and toothpick comes out just clean.  I had to tent my cake at the end with foil as it was browning a little too much.  (Next time I might try cake strips.)  This should take 65-75 minutes – keep checking.  Cool completely, then run knife around edges if need be and unlock the spring and voila – a blueberry feast!

berry boy bait (cake)

I forgot about this cake.  Gave the recipe to my sis-in-law years ago – and thank goodness she held onto it.   I have no idea where it originated…or where the name boy bait comes from, but I can say that it is delicious!  The cake is light and fluffy, filled with fruity, sweet berries and bursts with flavor.  The light cinnamon topping adds a crisp tasty texture to the cake – which is a nice contrast to the soft and super moist interior.  This tastes like a juicy muffin in cake form.  My kids absolutely love it.  Andy is always asking for a good blueberry muffin (which I cannot seem to make!) but this fit the bill.  Their friend Lauren’s wants it for her birthday cake.  She ate it for dessert last night and breakfast this AM.  I added raspberries to the recipe which tend to break down faster than the blueberries – so if you don’t plan to gobble it up immediately, then just stick to blueberries.  Also, I pack mine with berries – so go lighter if you prefer more cake and less fruit.  This is truly lovely for brunch.  But good for dessert, or afternoon.  And yes, scrumptious with that vanilla ice cream.  Enjoy-

berry boy bait:

2 cups flour
1 tablespoon baking powder
1 teaspoon salt
2 sticks butter, room temp
1/2 cup sugar
3/4 brown sugar
3 large eggs
1 cup whole milk
1 teaspoon vanilla
2-3 cups blueberries and raspberries

topping-

1 1/4 cup mixed blueberries and raspberries
1/4 cup sugar
1/2 teaspoon ground cinnamon

Preheat oven to 350 degrees.  Grease or spray a 9×13 baking pan or pyrex pan.

In a small bowl, whisk together the flour, baking powder and salt.  Set aside.

On medium high speed with paddle attachment of electric mixer – or hand held beaters, beat butter and white sugar until light and fluffy.  About 4-5 minutes.  Add the brown sugar and beat well for another 2 minutes.

Reduce speed to medium and beat in the eggs, one at a time.  Scrape, mix and scrape again.

Pour the vanilla into the milk.  On lowest speed mix in 1/3 of the flour mixture, then add half the milk, and continue – slowly adding a third of the dry alternating with the wet — finishing with the dry ingredients.

Remove from mixer and carefully fold in berries.  Pour batter into prepped pan and then scatter the extra “topping” berries all over the top.

Mix together the “topping” sugar and cinnamon – and sprinkle evenly over the berries and batter.

Bake for about 43-48 minutes – checking often as it gets close to the end.  The beauty is the moistness so try not to overcook.  This is delicious warm (although it falls apart) and also good at room temp.  Yum.  Enjoy-

(luscious) lemon yogurt cake

Mmmmm…mmm –  lemons again!  I know, I do know that we already have a lemon cake.  But this one is yogurt based and a little less rich.  Without butter, this cake relies on the tart lemon syrup that is poured and absorbed into the cake.  The sweet and tangy glaze completes it.  It is bright yellow, super cheery and certainly easier to make than the luscious lemon pound cake.  (But don’t forgo the pound cake when the mood strikes!  Greg just asked me for the pound cake for his b-day.)  My family loved this lighter yogurt cake.  I made two decent sized loaves and as Andy left for basketball practice, he said “please save some for me!” – as if we’d eat it all!  Daniel, Lauren, Zach, Melissa – so many of the kids friends enjoyed.  Especially the glaze.  Sylvie eats the whole inside then saves her outer sweet crust for her last few bites.  Good to have a plan.  Ali said Johnathan was licking his fingers with delight.  Don’t freeze this cake with the glaze on – but if you would like, freeze with the syrup and glaze once defrosted.  Oh, I doubled and made two loaves…but obviously do what you want 🙂  Enjoy!

lemon yogurt cake(from Ina Gartens Barefoot Contessa at Home):

1 1/2 cups all purpose flour
2 teaspoons baking powder
1/3 teaspoon kosher salt
1 cup plain whole milk yogurt
1 1/3 cups sugar (divided)
3 extra large eggs
2 teaspoons grated lemon zest (about 2 lemons)
1/2 teaspoon vanilla extract
1/2 cup veggie oil
1/3 cup freshly squeezed lemon juice

glaze
1 cup confectioners’ sugar
2 tablespoons  freshly squeezed lemon juice

Squeeze your juice and zest your lemons.  Bring eggs and yogurt to come to room temp.

Preheat oven to 350 degrees and grease a 9×5 loaf pan with butter (or spray) and line the bottom with parchment and grease again.

Whisk together the flour, baking powder and salt and set a side.

In another bowl whisk together the yogurt, 1 cup of the sugar, the eggs, lemon zest and vanilla.

Slowly whisk the dry ingredients into the wet and then with a spatula, fold in the oil making sure it is absorbed by the batter.

Bake for about 48-52 minutes or until a tooth pick comes out just clean.

In the meantime make the syrup by cooking the 1/3 cup lemon juice with the remaining 1/3 cup sugar.  Mix and heat until the sugar is dissolved.  Set aside.

When the cake is done, let it cool in pan for about 10 minutes, then carefully invert and place on a wire rack over a sheet-pan.  Poke lots of little holes all over the cake with a toothpick – and then while the cake is still warm, pour the lemon syrup all over the cake, over and over again – allowing it to soak in.  You may have a little leftover.  Let cake cool.

Next, combine the confectioners’ sugar and lemon juice and pour over the cooled cake.

Enjoy-

pumpkin walnut bread

OK, so again, easy and delicious.  2 bowls, no mixer and lots of yummy spices.  Not too sweet pumpkin bread with lots of healthy walnuts make this an easy staple for a breakfast treat, brunch or an afternoon snack.  And save for the icing, it is dairy free (and it is still quite good without).  I made this with my continued vertigo so you know it is simple.  I felt like purging the excess from my (somewhat excessive) pantry and I knew I would not want pumpkin in the spring and summer.  I scoured my new Sur La Table cookbook which is chock full of baking tips – really good ones – and found this.  I took out a little sugar since I wanted it to be more bread(y) than sweet and it was a great success.  Everyone really enjoyed – Mike thought too many nuts – so go easy on them if you prefer less.  These would also be great as muffins.  (Just adapt and watch baking time.)  Smart to make a double batch and pop one in the freezer since this freezes very well.  Enjoy-

pumpkin walnut bread (adapted from Sur La Table’s The Art and Soul of Baking):

2 cups all purpose flour
3/4 teaspoon baking soda
1/2 teaspoon ground cinnamon
1/4 teaspoon allspice
1/4 teaspoon ground clove
1/4 teaspoon nutmeg
1/4 teaspoon ginger
1/2 (almost) teaspoon kosher salt
2 large eggs, room temp
1/3 cup water
1 1/2 cups sugar (minus 3 tablespoons – if you want sweet bread, keep the tablespoons)
1 cup canned pumpkin puree
1/2 cup canola oil
1 1/2 teaspoon vanilla extract
1 cup toasted chopped walnuts (or less if desired)
sprinkling of sugar for top (optional)

cream cheese frosting (you will have a leftover – hold for another occasion)

6 oz cream cheese, room temp
1 1/2 oz butter room temp
1 1/2 cups confectioners’ sugar
1 teaspoon vanilla extract

Preheat oven to 350 degrees.  Toast your walnuts and set aside.

Lightly coat at 9×5 loaf pan with butter or spray – and line the bottom with parchment.

In a large bowl, whisk together the flour, baking soda, cinnamon, allspice, cloves, nutmeg, ginger and salt.  Set aside.  In a medium bowl, whisk together the eggs and water, then add the sugar and mix well.  Next add the pumpkin puree, oil and vanilla extract and mix well.

Add the wet mixture to the dry ingredients and mix until just blended.  Add the walnuts and mix in.  Pour batter into prepared pan and level the top with a small palate knife or back of a spoon.  Optional – sprinkle one tablespoon of sugar to the top of the loaf for a crispy slightly sugary top – especially good if you do not plan to ice the bread.

Bake for about 54-64 minutes – until the bread is firm to touch and toothpick comes out clean.  Let cool for 15 minutes- then turn out onto pan to cool completely before you frost (if you plan too.

icing

Place the cream cheese, softened butter in mixer and blend until smooth (with paddle – or hand mixer).  Beat well –

Whisk the confectioners’ sugar then add to the mixture and blend on low for a minute.  add the vanilla and on medium speed beat for about a minute, scrape down sides and beat again.

Spread desired amount onto pumpkin loaf and enjoy!  (The icing does need refrigeration – so pull out of frige a half hour before you plan to serve for best flavor.)

banana streusel cake

This banana cake is scrumptious.  In the midst dealing with a flat tire, trying to fix the TV volume that was (and still is) stuck on mute, and driving the kids to and from activities…I noticed that I had three very ripe bananas sitting on the counter and decided that I must use them today.  I wanted something different than my basic banana bread (that we do love) – was in the mood to try something new – but something just as simple to make since I was pressed for time.  Well, I found a good one!  I was able to prep the ingredients in between Triple A coming, rushing the car in for service (apparently I had only 10 minutes before the tire deflated again!), picking the car up 25 minutes later (I owe Jack’s Automotive some cake) and continued as I prepped dinner as well (it was a crock pot night which made things easier).  By the time dinner ended I had my mise en place and was ready to combine the measured ingredients and pop in the oven.  This is an incredibly long winded way of telling you that this is easy to make.  More importantly, it is yummy.  I made one with streusel on top and with out chocolate.  And I made one with the streusel and mini chips swirled a bit throughout.  I gave Greg the non-chocolate version in his lunch and as soon as he saw me after school he said, “what was that amazing thing in my lunch?”  Josh and Lauren loved the chippy version and Mike, Zach, Andy, Sylvie and Rob loved both.  This cake is light, delicate and more cake-y than the banana bread (which makes sense).  Anyway, the streusel topping is divine.  I love streusel.  Rambling now, but this in my little mug of ice cream…can’t wait! Enjoy-

banana streusel cake (with or without chocolate chips) only very slightly adapted from Flo Braker’s Baking For All Occasions:

streusel
6 tablespoons all purpose flour
6 tablespoons firmly packed light brown sugar
3 tablespoons unsalted butter, cut into little pieces
1/4 teaspoon ground cinnamon
1/4 teaspoon kosher salt

cake
2 cups cake flour
1 teaspoon baking powder
1/2 teaspoon baking soda
1/2 teaspoon kosher salt
1 cup mashed banana (2 medium or 3 small or 9 oz)
3 tablespoons whole milk
1 teaspoon pure vanilla extract
4 oz (1 stick) unsalted butter, room temp
1 cup sugar
1 large egg, lightly beaten, room temp
mini chocolate chips 2/3’s cup (or more or less to your taste)

streusel – in a medium bowl combine the flour, brown sugar, butter, cinnamon and salt.  Rub the mixture with your hands over and over again until the butter smooshes a bit and the dry ingredients start to look like slightly wet sand.  Set aside.

Preheat oven to 350 degrees and place oven rack in center.  Line the inside of a 9×9 pan with foil or parchment so that it comes up the sides of the pan.  Then you can pull whole cake out of oven using foil as an aide.  Look to baking tips to see photos of this with a cranberry cake.  You can also butter and parchment and flour traditionally – but it is trickier to invert from the pan – yet do-able for sure.  (These would be great in muffin shape as well!  Just adjust baking time – shorter.)

Whisk together the flour, baking powder, baking soda and salt.  Set aside.

Mush the bananas and stir in the milk and vanilla and set aside.

With the paddle attachment of the mixer – beat the butter and sugar for 3-4 minutes on medium speed.  Scrape down sides beat again for 30 seconds.  Add the egg and beat until incorporated.

Next add the banana mixture (it might look curdled that is ok) – and beat until combined.

On the lowest speed, add the flour in 2’s – and mix until just incorporated.  Finish folding by hand for best results.  If using mini chips you can fold in (some) now or you can wait and place on streusel or a little bit of both!

Spoon the batter into the pan, smooth and then cover evenly with the streusel.  And again, if using the chocolate chips, you can place some on top.  I swirled the chip batter with a knife but I actually prefer the crunch streusel on top vs inside the cake, but up to you.

Bake for about 42-50 minutes, but check often and before with a wooden toothpick.  Let cool for 10 minutes then remove from pan with the foil as aide – or invert if you buttered and floured the pan (carefully).

Let cool, and cut and enjoy!

This cake freezes well.  Wrap with plastic and then foil and freeze up to 2 weeks.

cream cheese pound cake

This pound cake is heaven.  It is rich, thick and flavorful.  The cake is soft and wet in the center, yet forms a really awesome crust on the bottom and top.  Funny the crust is my favorite part – yet Andy complains that it is too hard.  We make a perfect dessert eating pair.  Greg, Sylvie and my mom also love this cake.  Greg’s friend Collin had a bite and said “oh my God, that is amazing!”  Last year, after my friend Jill’s first bite she said, “hmmm…cream cheese.  I love this cake.”  This is heavier and denser than the yogurt cake (obviously) – but nice to have a few go-to pound cakes in your repertoire.  The recipe comes from my sis-in-law Sandy who bakes these cakes during the holidays and wraps them beautifully with cellophane and ribbon.  Great gifts for parties, neighbors, friends, tutors and teachers.  She shared the recipe which is slightly adapted from Martha Stewart’s “Everyday Food” magazine.  The cream cheese pound cake is a breeze to make and even tastes better the day after you bake it.  Oh, and sinful – yet delicious toasted for breakfast with some fresh fruit.  Enjoy!

cream cheese pound cake:
1 1/2 cups(3 sticks) unsalted butter, room temp
8 oz (one bar) of cream cheese, room temp
2 3/4 cups sugar
6 large eggs
1 tablespoon vanilla extract
3 cups all purpose flour
2 teaspoons salt

Preheat oven to 325 degrees.  Butter and flour a 4 quart bundt pan, or two 9×5 loaf pans (line with parchment)…or a small bundt and loaf pan.  Have some fun.  Next time I’ll try some in muffin shape.  Place oven rack on lower third of the oven.

With the paddle attachment, beat the butter and cream cheese for a few minutes.  Add the sugar and beat on medium high speed until the light and fluffy – about 5-7 minutes.

Add the eggs, one at a time, on medium to medium high speed, beating well after each addition.  Mix in the vanilla.

Whisk together the flour and salt.  With the mixer on lowest speed, add the flour to the creamed mixture in two additions – and mix until just incorporated.  You can finish by hand to ensure that you don’t over mix.

Spread the batter into the prepared pans and smooth.  Bake until golden and a toothpick comes out with a few moist crumbs attached.

The bundt pan took about 72 minutes to bake.  But time will vary from 68-75 minutes.  For the loaf pan, check after about 50 minutes – but will probably take from 55-65 minutes.   Try not to over bake and dry out the cake.  Keep a watchful eye as one of the cakes best features is the moistness.

If the cake is browning too much, you can tent the top with foil or use cake strips if you have them.

Let cake cool for 10-12 minutes, then invert and enjoy!

cranberry orange tea bread

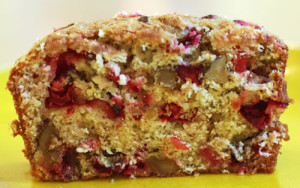
This is one of my favorites from childhood.  I loved this tea bread.  Mmmm… filled with walnuts, cranberries, orange zest and juice it is packed with flavor and texture.  It was on my camp visiting day “request list” for years.  That and chicken soup (that day my mom would bring me anything!)  My mom used to toast it for me and then spread a little butter or cream cheese on it (at home, not at camp).  So delicious.  Greg’s friend Zach loved it – his mom Jodi reporting, “he woofed it down saying, this is good!”  Sylvie loved it too.  I quickly gave the rest of this one away for a Gilda’s club event (I couldn’t trust myself to not eat the whole thing) – so no one else got to try.  Next time.  This is good anytime of day, a breakfast treat, an afternoon tea break or even in the evening with ice cream (in a little mug for me).  The cakey bread looks festive – which might be really nice for the holidays – especially if you have family coming in.  It is dense like a fruitcake, but tastes nothing like a fruitcake (sorry if you love fruitcake!)  Enjoy-

cranberry orange tea bread:
2 cups all purpose flour
1 1/2 teaspoons baking powder
1/2 teaspoon baking soda
1/2 teaspoon kosher salt
1 cup sugar
1 cup chopped walnuts
2 cups fresh (or frozen) cranberries (not dried), coarsely chopped
grated zest and juice from 1 large naval orange
1/4 cup melted butter
1 egg, well beaten

Preheat oven to 350 degrees.  Line a large loaf pan – or one medium and one small (I did this – I wanted to give a little one away), or a bunch of little loaf pans with butter and place parchment on the bottom, and butter again.  Lightly flour and tap out excess.

In a large bowl, combine and stir together the flour, baking soda, baking powder, salt, sugar, walnuts and cranberries.

In a liquid measuring cup, combine the orange zest, and melted butter.  Add enough orange juice so that your have 3/4 cup liquid (and zest) in total.  If you have extra juice, take a shot.  If you don’t have enough juice to reach 3/4 of a cup, add water so that you reach 3/4 cup.  Add the beaten egg to this mixture.

Pour the wet ingredients over the dry and mix to just incorporate.  It will be a very dense and thick batter.  Spoon into prepared pans, and bake until done.

My medium sized loaf pan took 1 hour.  My little one took 35 minutes.  The cake will get nicely browned and the top will feel slightly firm to touch.  You can use a toothpick too – to check.  Try not to over bake (as usual) or the cake will dry out.  (Although if you do – you can always slice, toast and spread a little butter on it to remedy!)

Enjoy-

(very) chocolate chippy crumb cake

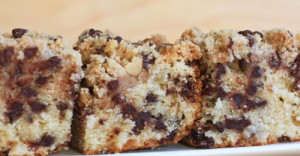
When I started this blog I figured I’d finally attack the more difficult desserts that I never make time for.  But I’ve found that it is just as fulfilling to make something simple that my family and friends love.  Well, this little cake is just that.  Simple and filled with tons of mini chocolate chips and a nutty crumb topping that is ridiculously addictive.  I’m a fairly small person and usually have pretty good restraint when it comes to my dessert eating habits.  I usually wait until after dinner and have a very small serving of whatever it is that I want – often something I’ve baked, mixed with …yes, vanilla ice cream.  Anyway the evening that I made this cake – I went back into the kitchen 3 times!  3 times to refill my little little mug full of goodness.  Well, that’s telling you something.  Something good (the cake is yummy), and not so good (all 5 feet one inch of me can’t take that much dessert!)  Anyway, this was a hit with the kids, Alisa, and my neighbors too.  My friend Dani said “YUMMY” and her son Collin (Greg’s friend) said “buttery, chocolate goodness!”  I didn’t share it with much more of the world because we are enjoying it so much.  It is not too sweet – which is nice change as well.  I’ve held onto this recipe (from the 1998 November issue of Chocolatier) for over 10 years.  I’m glad I finally made it.  Enjoy-

(Since I posted this – there has been a lot of feedback in that some had trouble determining baking time – and also some thought baked too long and dry.  So use caution.  I may re-test soon.)

(very) chocolate chippy crumb cake:

chocolate chip streusel
1 1/2 cups all purpose flour
1 cup packed light brown sugar
1/2 cup sugar
3/4 cup chopped walnuts (I like them chopped fairly small here)
1/2 teaspoon kosher salt
11 tablespoons (1 stick plus 3 tablespoons) unsalted butter cut into pieces
1 1/2 teaspoons vanilla extract
1 cup mini semisweet chocolate chips

chocolate chip batter
2 3/4 cup all purpose flour
1/4 cup unsifted cake flour
1 1/2 teaspoons baking powder
1/2 teaspoon baking soda
1 teaspoon kosher salt
2 sticks unsalted butter, softened at room temp
3/4 sugar
1/4 cup packed light brown sugar
1 tablespoon vanilla extract
3 large eggs (bring to room temp)
1 cup buttermilk (bring to room temp)
2 cups mini chocolate chips (semisweet)

confectioners sugar (optional)

Preheat oven to 350 degrees.  Butter a 9×13 pan.

For the streusel – combine the flour, brown sugar, sugar, salt, chunks of butter and the vanilla, and with your paddle attachment, mix on the lowest speed until the butter becomes incorporated into the sugars.  It should become cohesive and moist.  You can also do this by hand by picking up the sandy mixture and rubbing your hands together so that the butter becomes incorporated.

Add the chopped walnuts and mini chips and mix until combined.  Set aside.

For the cake – whisk together the flour, cake flour, baking powder, baking soda and salt and set aside.

Cream the butter with the paddle attachment on medium high speed for a minute or two and then add the sugar and continue to beat until lighter and fluffy.  3-5 minutes.  Add the brown sugar and mix for another minute or so.

Add the vanilla extract and then add the eggs, one at a time beating well after each addition.  Scrape down the bowl, mix and scrape again.

On the lowest speed, alternately add the flour mixture in 3 additions with the buttermilk in 2 additions- beginning and ending with the flour.   Mix until just incorporated.

Add the chocolate chips and then pour the patter into the prepared pan and smooth the top.  Next, take the reserved streusel and scatter all over the batter – use it all and make sure you hit the edges too!

Bake the cake for about 47-53 minutes.  The cake will pull away slightly from the sides of the pan when done.

Let cool and if you choose you can sprinkle with confectioners sugar.

The cake is best fresh but keep in an airtight container to keep it moist as the week goes on.

Enjoy!

glazed irish tea cake

This past week I had grand plans for baking…I bought ingredients for creamsicle ice cream (pictured below) that I couldn’t wait to make for our friend Mike who loves orange and fruit flavor.  I was also oddly excited to make a grapefruit yogurt cake (again photo below) which I know sounds kind of weird, but I had a really good feeling about.  The grapefruit cake – for lack of a better word, sucked.  It didn’t taste like anything.  Awful.  Had to toss it.  The orange ice cream was great right out of the ice cream maker.  Soooo good – like a real creamsicle – yet in ice cream form but once it sat in the freezer it became chalky and kind of started to taste like baby aspirin.  I brought it to Mike and he sadly agreed.  The funny part is that Greg came home that day – and announced that we needed an Irish dessert for school.  He signed me up to bake.  Well, I was in no mood after my failures and I was wiped, and I’m not Irish – nor know much about Irish baking!  So I looked for the easiest recipe that I could find that we could do together.  I decided to double the recipe so we could taste it (what else is new) and also decided to spike the raisins in our cake with rum.  Well, even though this is not something I thought I would love – it was really good!  The cake was light and fluffy – the rummy raisins were a tasty addition and the light glaze on top was really good too.  I find out today if the kids liked their cake (no rum).  Hope so.  (Greg just came in and said eveyone in the whole class loved it!)  Enjoy this – it is nice in the afternoon with coffee or tea (if you like raisins).

glazed irish tea cake (adapted from irish.spike-jamie.com):
3/4 cup butter (softened)
1 cup sugar
2 teaspoons vanilla extract
2 eggs (room temp)
3 oz. cream cheese (not whipped and not low fat, room temp)
1 3/4 cup flour
1 1/4 teaspoon baking powder
1/2 teaspoon kosher salt
2/3 cup buttermilk (pull out to room temp)
2/3 cup raisins (or currants, dates) and rum (optional)

glaze-
1/2 cup confectioners’ sugar
2-3 teaspoons of fresh squeezed lemon juice

If spiking the raisins – place in a saucepan and add about 1-2 tablespoon of  rum and simmer lightly until rum is absorbed by the raisins.  Set aside

Preheat the oven to 325 degrees.  Butter, flour, and line a 9 inch or 7 cup capacity loaf pan.

Whisk the flour, baking powder and salt together and set aside.

Cream the butter and sugar until light and fluffy about 3-5 minutes.  Add the vanilla and then the eggs one at a time – mixing until incorporated.  Scrape down the bowl and mix again.  Add the cream cheese and mix well.

Add 1/3  of the flour mix to the mixer on lowest speed.  Then add half of the buttermilk.  Repeat – and end with the last 1/3 of  the flour mix.  Mix as little as possible.

Remove from mixer and continue to fold batter and scrape down sides to incorporate the flour and butter.  Add the raisins and mix again.

Pour into prepped pan and bake in center rack for a while.  I forgot to time this!  But the cake got nicely browned and had a good spring to it.  Use your toothpick.   The recipe says 80 minutes – but I don’t think it took that long.  Sorry…really wasn’t planning to blog about this.  Just lucked out.  So set the timer for 45 minutes – start there and see how it goes…check often based on what you see (this is really the best way to bake a dessert by the way).

Once cooked, let stand for 10 minutes.  Make the glaze.  Combine the confectioners’ sugar and lemon juice and whisk until smooth.  Invert cake carefully as it is delicate – and spread glaze onto the warm cake.  Cool completely.  Enjoy!