
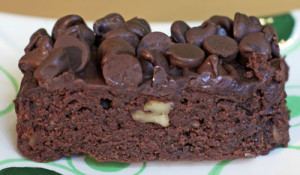
 I’m always on the lookout for a good frosted brownie. Always. I love my fudgy brownies and they are my “go to” brownies…but Rob loves and often asks for a frosted one. I made these thinking they were frosted, but they were really glazed – so I’m actually still on the lookout for Rob. But despite the glaze/frosting misunderstanding, these were delicious! Our friend Rob (another Rob) liked them so very much. He was impressed that with all the other desserts I offered – that a simple brownie stood out. Waaay out. I found these in Great Cookies by Carole Walter. Carole’s write up was so compelling that I had to try them. I didn’t change too much although I really loved the glaze in the espresso brownies so I put the two together. I added some chocolate chips to the top – just to continue the chocolate overdose theme and wow, great. These are a little bit crumbly – but if I can say so – in a really good way. I loved them as the base of a mini brownie sundae I ate Sunday night. Super mini, but delicious with my coffee ice cream. I will however, continue to try and test for a true frosted brownie, and a cakey brownie as well as a cracked topped brownie…as that is half of the fun! Enjoy-
glazed nutty brownies (adapted from Great Cookies by Carole Walter):
8 oz bittersweet chocolate – coarsely chopped
1/2 cup plus 2 tablespoons (1 1/4 sticks) unsalted butter – room temp for 15 m
3/4 cup firmly packed light brown sugar
1 1/2 teaspoons instant espresso powder
1 teaspoon vanilla extract
1/4 teaspoon finely ground black pepper (optional)
1/2 teaspoon kosher salt
3 large eggs (room temp)
3/4 cup all purpose flour
1 1/2 cups coarsely chopped walnuts (best if toasted first for 6-10 minutes in a 325 degree oven – until fragrant)
icing–
4 tablespoons butter
1/4 cup milk
1/2 cup sugar
1/2 cup light brown sugar
1/3 cup cocoa powder
1 teaspoon vanilla extract
1/3 teaspoon salt
chocolate chips – 1/2 cup to 1 cup depending on you (optional)
Preheat the oven to 325 degrees and line your pan with foil so that it comes over the edges of the pan. You can do this with parchment too. (That way, when cooked, you can pull the brownies from the pan – holding onto the foil – in one quick and easy effort. Then smooth down the sides of the foil, and easily cut and serve.) If you don’t care about appearance, then just butter the bottom of the pan – and you can dig them out later. Up to you.
If you plan to toast the nuts now is a good time – in a preheated oven at 325 degrees and place nuts in a single layer on a foil lined sheet pan (less cleanup). Cooking time varies based on the size of your nut so check these often – you want them to be fragrant and have a warmer color – but do not burn (obviously). This can take from 6-10 minutes.
Melt the chocolate in a metal or heatproof bowl atop a small amount of simmering water. (Or a double boiler.) Slowly melt the chocolate and stir occasionally. Remove when melted and set aside to cool a bit.
In your mixer – with paddle attachment, beat the butter until smooth then add the brown sugar, espresso powder, vanilla, pepper, and salt. Mix well. Scrape down the sides of the bowl, and mix again.
Add the eggs one at a time (wait to add next egg until you can’t see the egg before). Scrape down the bowl, and mix again – for another minute or two on medium speed. The mixture will look curdled but don’t worry.
I like to do the rest by hand, but either way by hand or the mixer on low, lightly mix the melted chocolate into the batter. Fold the flour in very gently and mix until almost incorporated. Add the cooled nuts and fold in as well incorporating the nuts and the rest of the flour. Do not over mix.
Place in prepared pan and bake for approximately 30-35 minutes. Mine took 33 – Carole’s took 35 so as usual check often and before…checking every 2 minutes or so towards the end. These brownies should come out slightly wet with a toothpick. You want them that way – and they will continue to cook a little bit more on the counter. Let cool a bit maybe 15 minutes or so.
In the meantime, make the icing. Bring the butter, milk, sugars, cocoa, vanilla and salt to a boil in a small saucepan. Continue to stir and whisk as it comes to a boil.
Pour the icing over the warm brownie (you may not need all of it – but save it! Use it with something else). I then scattered semisweet chocolate chips all over the glaze – for an extra extra chocolate explosion. This is really optional! I’m just crazy about texture. Then let all set and harden for a few hours.
When cool and set, using the foil as an aid, pull the brownies from the pan and place on cutting board. Smooth down the edges of the foil and there you go – no fighting to get them out of the pan. All pretty and all neat (if you care!)
Feel free to freeze.
Enjoy!


 This is another childhood favorite which my mom happened to save! She made it for my dad on Tuesday and boy did he LOVE it. He left me a very effusive voice mail message about this blueberry cake of all things (my dad really only likes chocolate desserts or Drakes coffee cakes). So I got to work and made it yesterday for family and friends. It was delicious. Greg and Sylvie loved it and Andy did too (he who is not a blueberry fan). My friend Melissa said that she saw Jason hunched over the counter last night and couldn’t figure out what the heck he was doing. Turns out he was cutting and nibbling – cutting and nibbling. Another friend said the cake was so good and that she too couldn’t stop nibbling. Only problem was that the crumb topping constantly fell into her cleavage. Funny. Something for someone to enjoy later…back to baking…this couldn’t be easier to make. Really. Great for brunch, afternoon or after dinner with a little ice cream. It’s like a delicate blueberry muffin with crumb top everywhere. It is really packed with blueberries – and I’m sure it would be great with raspberries too. Enjoy!
 This past week I had grand plans for baking…I bought ingredients for creamsicle ice cream (pictured below) that I couldn’t wait to make for our friend Mike who loves orange and fruit flavor. I was also oddly excited to make a grapefruit yogurt cake (again photo below) which I know sounds kind of weird, but I had a really good feeling about. The grapefruit cake – for lack of a better word, sucked. It didn’t taste like anything. Awful. Had to toss it. The orange ice cream was great right out of the ice cream maker. Soooo good – like a real creamsicle – yet in ice cream form but once it sat in the freezer it became chalky and kind of started to taste like baby aspirin. I brought it to Mike and he sadly agreed. The funny part is that Greg came home that day – and announced that we needed
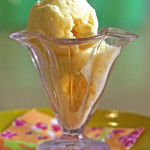
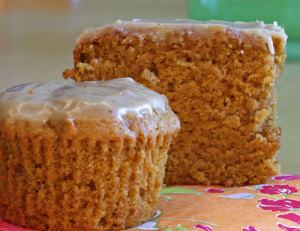
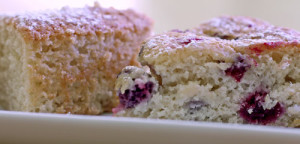
 an Irish dessert for school. He signed me up to bake. Well, I was in no mood after my failures and I was wiped, and I’m not Irish – nor know much about Irish baking! So I looked for the easiest recipe that I could find that we could do together. I decided to double the recipe so we could taste it (what else is new) and also decided to spike the raisins in our cake with rum. Well, even though this is not something I thought I would love – it was really good! The cake was light and fluffy – the rummy raisins were a tasty addition and the light glaze on top was really good too. I find out today if the kids liked their cake (no rum). Hope so. (Greg just came in and said eveyone in the whole class loved it!) Enjoy this – it is nice in the afternoon with coffee or tea (if you like raisins).
 So if you’ve been reading my blog – you’ll remember that although we all really liked the
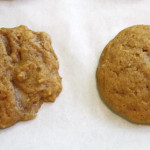
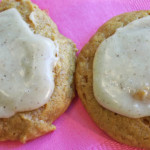 some people. Soo…now you have your muffin pans or loaf pans! Problem solved. Or…drop by spoonfuls onto parchment. I did a side by side comparison to show you the difference – the right side is the cookie that was piped, the left dropped. Honestly no biggie here…right? Plus, once you add the icing it makes even less of a difference. 🙂 If you do decide to pipe the cookies, here are some tips: 1 – do not overfill piping bag. You will lose control of the batter. 2 –
 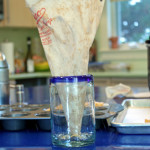 to fill the bag, place it in a large container – a glass or measuring cup or vase – so that you have two hands to fill it. 3 – twist the end of the bag and with light pressure, squeezing from the twist, gently pipe the cookies. Use a round 1- 1 1/2 inch tip – I just used the coupler but do what makes you happy.
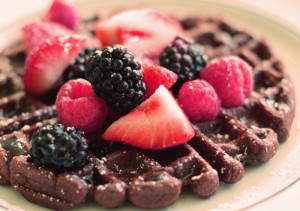 Sometimes the recipe that comes in the instruction manual is actually pretty good! In this case, very good. You may know (from a
 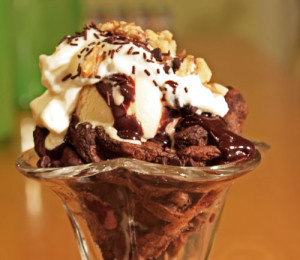 14 – 6 inch waffles. I wrapped each individually in plastic wrap and then into a freezer bag. (I just read about
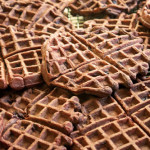

 The week of my daughter Sylvie’s school bake sale, my son Andy was sick with fever. I normally go cookie crazy the days leading up to the sale because as I’ve mentioned, I like baking! But this week was a little different – dividing my time between keeping him company, taking him to the doctor, talking to my friends about him, asking my dad and brother (who are docs) about him, and worrying about him (was it swine? no, it wasn’t, well, not sure). Luckily I made a large sheet pan of brownies last week – and froze them in preparation. I had the Halloween Peeps as well. I planned to make my soft meringues the day of the sale but really wanted to do more but keep it simple. I found what looked like a good recipe in
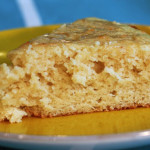
 I loved the write-up of this recipe in Cake Keeper Cakes – in that you usually have the ingredients for it on hand. This is a great simple plain cake. One that my son Greg loves. He said “mom, this is amazing – it is just perfect for me!” Every day this week there was a piece in his lunch – and he was a very happy person. Laura Chattman’s recipe calls for the cake plain which is delicious, but I happen to have some mixed frozen berries and I added them to half the batter (I doubled the recipe and made two cakes). The result was equally as great. Greg’s friend Jamie was over and exclaimed that he loved berries and cake and “oh, Lisi, this is really really good.” My daughter Sylvie loved the berries in it too. I like this cake because there is no butter, and the low fat yogurt and eggs somehow make this feel like a healthy treat despite the sugar and white flour. (So I didn’t scold my au pair Alisa for eating it for breakfast.) Enjoy!
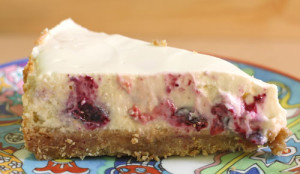 My dear friend Dani read my first five posts and said – “love it, but what about my cheesecake and my peppermint ice cream?” Cheesecake first. Dani was very close to having gestational diabetes with her first pregnancy. Doctors orders… no sugar – none! It was wicked hard (yes I’m originally from Boston) for her so I really wanted to do good by her when she could eat sweets again. When I asked what she needed as as she was going into labor, she replied, “the
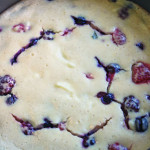

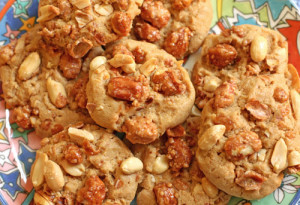 The recipes in Alice Medrich’s cookbook Pure Dessert are so innovative and fresh. I read through the book dog-earring many pages vowing to bake from it. I finally made the time even though I knew that these cookies would be a tough sell for my family. No peanut lovers here (except for me) and my brother-in-law Patrick turns his nose with disgust whenever I make anything with peanut butter (he’s French and says the French just don’t get peanut butter). But I forged ahead because I knew I’d like them and I just needed to try. Well…yum! If you like peanuts and peanut butter – then this is a cookie for you. My friends Ali and Jonathan generally get to try and enjoy most of my sweets (they are neighbors so they get it all) but claim to not be critical enough. But I’ll take Ali’s concise comment – “loved them.” My daughter Sylvie surprised me by telling me that they were yummy – that the nuts reminded her of the chou-chou nuts that they sell on the beach in France. Oh, and by the way, these cookies are truly beautiful to look at.
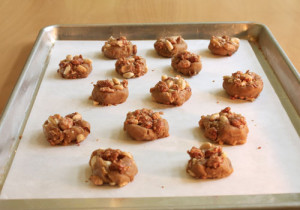 h for each cookie and roll in a ball and then into the nuts. Press in the pieces that fall off. I like to cram as many as I can into the cookies. Place on cookie sheet and bake for anywhere from 14-19 minutes. Baking time will vary and depends on the size of the cookie, where they are placed in the oven, and how you measured your ingredients that day. The humidity and weather can also affect baking time. So please check the cookies often so as not to over bake. They should look very lightly browned on the top. Let cool and enjoy! Turn into a peanut cookie ice cream sandwich with vanilla ice cream. A little messy but delicious.